All the aspects of running a business can feel overwhelming. This is especially true if you think of each small thing separately. However, by organizing those elements into more general categories, you can keep your thoughts more organized and create a plan to enhance your operations. The following outlines a few categories to focus on when developing your business.
Visit ZaarmTech for the latest resources and tips about web design and software development!
Finances
Data show that most business failures result from cash flow problems. A financial projection is an invaluable tool when it comes to managing business finances. The forecast outlines the expected income and expenses for an upcoming period. Use sales history to estimate income. The longer the business has been in operation, the more accurate the estimate is likely to be. Balance the expected income against expected expenses. Go through your financial records and calculate all fixed and recurring expenses. Add in expenses you expect to incur, and leave some room for unexpected expenditures as well. A reasonably accurate forecast allows you to determine where to cut costs and if you have funds available for optional purchases.
If you need help with managing finances, an accountant can help you keep track and make reasonable projections. A professional can help you with a variety of tasks, including paying bills on time to avoid late fees and invoicing customers in a timely manner to encourage prompt payment.
Customers
Every business needs happy customers. Take time to measure customer satisfaction through surveys and by monitoring social media. Reach out to customers who are unsatisfied and try to remedy the situation. If you see the same issues occurring repeatedly, create a long-term solution. Use surveys or a suggestion box (physical or digital) to give existing customers a chance to let you know what would improve their experiences. If your current client base is happy, they are more likely to provide word-of-mouth advertising and help you gain more business.
Another way to grow your customer base is through digital marketing. This includes social media, search engine optimization, targeted emails, and other tactics. Consider using analytics to figure out which tools are most effective. This allows you to streamline your marketing campaign and not waste time and money on strategies that do not work. A useful tool for digital marketing is a free custom logo maker where you can make a logo for free. Simply choose your imagery, font, size, and colors.
Employees
If your business is large enough to have employees, it is important to comply with all legal requirements. Make sure you understand the difference between independent contractors and employees so that you classify all your workers correctly. If necessary, get workers’ compensation insurance, and make sure that you pay the correct payroll taxes. Ensure that the workplace meets federal safety standards.
Although government regulations are important, they are the minimum. Employee satisfaction depends on a variety of factors. A generous benefits plan helps attract and retain quality workers. Treat all workers with respect. Consider allowing employees to work from home or offering a more flexible on-site schedule. Survey employees and ask for suggestions.
By focusing on employees, marketing to customers, and finances, you increase your business’s chances for success. These three key elements are necessary for success, no matter what your business specializes in. By strengthening these areas, you strengthen your organization overall.
It’s safe to say, teamwork cannot exist if collaboration between team members is not present. Moreover, a business will find it difficult to achieve its goals where there is no unity of vision. This is why collaboration is so vital to a business’s success because it’s the glue that holds everything together in a sense. So, if the teamwork within your company needs a bit of improvement, Zaarm Tech shares how to use collaboration to keep your team strong.
Foster a Culture of Open Communication
Generally, people tend to be shyer and reserved at work. Moreover, they might be more reserved in a workplace setting for fear of being judged about their opinions and views on certain matters. That’s why it’s important to foster a culture where there is open communication between everyone so that team members can not only build more authentic relationships with one another but also, so they feel heard, understood, and appreciated when being candid on work matters that they believe are beneficial to the business.
Encourage Technical Savviness
Indeed, technology is a major part of life these days, and even more so in the workplace where the majority of work is done online. And because technology is advancing at such a rapid rate, it might be best to keep everyone involved and up to speed as possible to avoid valued team members lagging behind. Moreover, including the relevant people where learning new technology is involved is one way to get people more invested in the project, as well as build unity where this may have been absent before. For example, you could offer mentoring programs to those that are interested in enhancing their knowledge. You could also host more employee workshops to encourage the further training of employees in key areas.
Encourage Acceptance of Each Other
Employees don’t always fit the same mold. They might have come from different backgrounds, speak different languages, and will most certainly have traveled different paths in life. This can, therefore, make seeing eye to eye a challenge at times, notwithstanding the workplace politics that are common in an office setting. This is why encouraging team members to be more accepting and open-minded of each other is so vital. Because when disagreements and differences of opinions arise (as they surely will) team members are bound to be more understanding and accepting of each other on good and bad days.
Create Opportunities for Cross-Functional Collaboration
Another way to enhance team participation is by creating opportunities for cross-functional collaboration. Here, it’s about encouraging staff members from different departments to work together to achieve a common goal. For example, rather than just isolating team meetings to include just the marketing department, you could opt to combine the marketing, sales, and finance teams into one to creatively brainstorm solutions and solve challenges together.
Recognize Achievements
If you should ask employees what their main motivations are at work, you’re likely to find a common thread in their answers-to feel validated and recognized for their achievements. From a morale point of view, recognizing achievements and honoring employees for their diligent and often long-standing service is one of the best ways you can encourage employees to continue giving their best. Examples of this could be to include giving out Best Employee of the Month awards, performance bonuses, long-standing service awards, and more.
Collaborative Tools You Should Be Using
Nowadays, promoting teamwork between members couldn’t be any simpler. With project management tools like Trello, Asana, and even Google Suite, sharing and collaborating on ideas has become so much easier with many of these tools allowing collaboration in real-time. What’s more, many of these collaborative tools allow for increased workplace flexibility. And in a day and age where flexibility and work-life balance has become increasingly important, being accommodating to these needs is one way to create a more harmonious work environment for all.
However, that’s not to say it’s without its fair set of challenges. For example, suppose you want to market your business but you don’t have a lot of funds to invest. You can save money by using this free program to create an infographic quickly and without hassle, then enlisting your team to help you share it via social media. To do this you can also use the famous tool called Canva.
In summary, collaborating on the work front has certainly progressed in leaps and bounds to get where it is today. It comes as no surprise, either, not when you consider how vital getting along and working together in the workplace is if you want to achieve your goals.
I started Zaarm Tech to share my knowledge with the people who need it. I have always loved to explore more on tech. Currently I am pursuing a Bachelor of Information Technology and specializing in software development and web design. Check out my shop today!
Being your own boss, setting your own schedule, and working from wherever you’d like: These are just a few of the many benefits of starting a business. In order to enjoy these perks, however, you must first choose a business idea — and it’s not always as straightforward as it may seem. These tips will help you to decide so you can officially go from wantrepreneur to entrepreneur!
What Are Your Passions, Interests, and Skills?
Entrepreneurship is a long road with lots of twists, turns, and roadblocks, so it’s crucial to be passionate about and genuinely interested in your business idea. After all, you’ll be working a lot in the beginning — and having a passion for what you’re doing will help you to push through when times are tough.
If you’re interested in and skilled at tech, for instance, you might consider starting a business that offers IT support, web design or development, or cybersecurity services. Or if you’re creative and passionate about art and design, you might choose to create and sell artwork online, restore and revive old furniture pieces, or create visual content for social media.
If you’re having trouble identifying your passions and interests, take a moment to consider your hobbies, existing career skills, childhood dreams, and general interests. Chances are, you can apply these interests, skills, and hobbies to your career as an entrepreneur.
How Much Time and Money Do You Have?
Many startups take years to become profitable, which means you’ll need to have the time and money to get your business idea off the ground. There should also be a market demand for the product or service you’re thinking of offering.
Here are some of the other things you’ll want to consider to determine whether your business idea is truly feasible.
Your budget. How much money will you need for expenses such as office space, utilities, furniture, equipment, materials, and inventory?
Your financing options. Will you rely on bootstrapping, crowdfunding, or small business loans and grants?
How much time you’ll need.Will you continue to work full-time as you get your business up and running? Can you afford to outsource any startup tasks if you don’t have the time to take them on yourself? Will you have nights and weekends free to put your business plans into action?
Which Tools and Resources Are Readily Available to You?
Depending on your hobbies, interests, and desired business idea, you may already have a few tools and resources to help you go from wantrepreneur to entrepreneur. These tools could include art supplies, graphic design software, cookware or bakeware, or simply a laptop or desktop computer.
Many educational resources are also available to aspiring entrepreneurs and new business owners. A few of them include the Small Business Administration (SBA), SCORE, Bplans, LegalZoom, Wix, and MailChimp.
Still Can’t Decide? Consider Going Back to School
Knowing you want to be an entrepreneur is just the start of your entrepreneurial journey. So if you’re still having trouble deciding on a business idea, you may wish to go back to school and work toward a bachelor’s, master’s, or doctorate degree — as accredited online programs are available in areas such as business administration, cybersecurity, accounting, data science, psychology, and more. Earning an online degree makes it possible to work toward your entrepreneurial goals while keeping your day job, raising a family, and saving money to start your business.
Make Sure the Business Idea Fits Your Lifestyle
To really succeed as an entrepreneur, make sure your business idea fits your lifestyle. If you’re raising a family and want to be available to them, for instance, avoid business ideas that will require you to work overtime, nights, and weekends. Or if you’d prefer to work from home, avoid business ideas that will require you to work from an office, retail shop, or warehouse.
Your business idea should fit your lifestyle, budget, skills, interests, and hobbies — and it may take some time to find an idea that truly works for you. Don’t rush it: The idea will come when you’re ready!
Where to start?
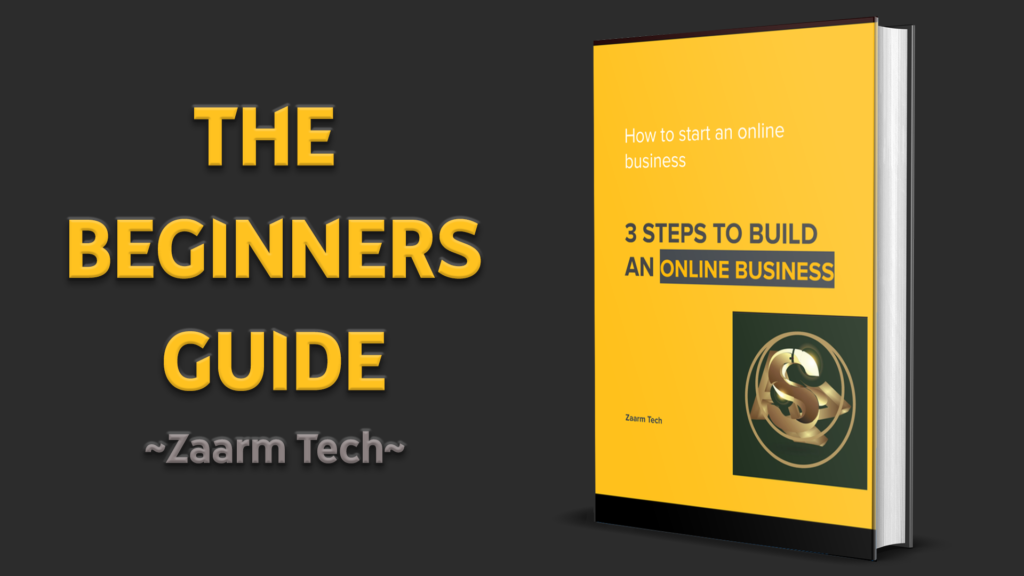
Look, the starting is the hardest part, This is why I would like to give you my free eBook, with additional training for starters like you. With my eBook you will start receiving emails daily on how to became successful on online business. So click the image below to get your free ebook.
Basically, a laptop or MacBook with an internet connection is fine. Some software’s I use costs a one-time small fee. I recommended paying a small one-time fee and doing it, however, you can also use alternative software also.
The first step is to create the voice over for your video, The sofware I use for this is the speechelo, If you want you can use some other free software to generate voice. But speechelo has a lot of features and is available througha web app on any device.
Step 2
The second part is to create the video. For this, I use a whiteboard animation software called doodly. What I do is import the audio file I have generated in step 1. After that add relevant texts and images. Once you purchase the doodly, they will show you some video’s on how to use it. And if you need help from us, you know where to find us.
Step 3
For posting I don’t use a seperate software. I just go to the website and schedule them. For instagram posts I use hashtags, which is generated from Best Hashtags
The legendary marketer and freedom breakthrough are the best online business and affiliate marketing training program out there. I have been enrolled in both of this program and I want to give you my opinion on Legendary Marketer vs Freedom Breakthrough. Before I start, I would like to state that “Both of these programs are very good training program”. But of course one will be better than another.
Overview of Legendary Marketer vs Freedom Breakthrough
The legendary marketer is a 15 day online business challenge where a guy named Dave Sharpe teaches everything from scratch. In this 15 days they teaches about how to start online business, built funnels & generate lead and all. One of the best thing about legendary marketer is they support 1 on 1 support when you join the 15 day business challenge.
The freedom breakthrough challenge is a 3 day course where a guy named Jonathan Montoya teaches everything from scratch for beginners. In this 3 days, he will teach you how to setup the perfect funnel for you to start affiliate marketing. He even gives his own book for you to add your affiliate links and to use it as a lead magnet.
David Sharpe is a internet freelance digital marketer who has been featured in Forbes and most importantly he has coached, mentored and worked with thousands of marketers and entrepreneurs. He personally understands their struggles and how to overcome them. He literally went from Park Benches to Park Ave through the Power of Marketing Influence. Not mention that he is a 9th Grade Drop Out Started A Multi-Million Dollar Online Business, From Scratch.
Jonathan Montoya is a 7-Figure internet entrepreneur. He is the founder of Passive Income Lifestyles. He is the GO TO coach and Mentor to thousands of people worldwide looking to quit their 9-5 jobs. Jonathan Montoya started making extraordinary online content in the mid-year of 2019, and quit his normal daily work as an electrical specialist by spring of 2020. At the time he has a degree in electrical engineering. His techniques center on publishing on online platforms such as YouTube/TikTok and utilizing that to drive traffic to his 3 day online business challenge. Assuming you need to figure out how to build an email list, create affiliate funnels, and drive free organic traffic to those channels, you should look at his training online course .
What’s covered in Legendary Marketer vs Freedom Breakthrough Challenge?
The course contents of these might change, so that’s why I want to leave a link to a page where you can see all the details of the course. For legendary Marketer you can visit this page, which contains the topics which will be covered in each day of this 15 day challenge. In this 15 days challenge you can buy other products from them like
Marketer’s Club
Omni-Branding Formula
Traffic University
Affiliate Marketing eBook
Business Blueprints
Again the pricing of these products differs from time to time. The important high ticket product here is business blueprints which as of now costs around $2,500. These are completely optional items they offer in addition to their free email templates, FB ad templates and many other items.
In the freedom breakthrough challenge you get access to the 3 day free training that teaches about the affiliate ecosystem. In this 3 day Jonathan Montoya will build a live affiliate business funnel Infront of you. The best part about this 3 day training is that he will give his book, that you can insert to your own funnels with your affiliate links as a lead magnet. Its all explained in his 3 day challenge.
Once you finish the 3 day challenge (can directly purchase also), you can upgrade to freedom breakthrough challenge 2.0, which covers EVERYTHING IN ONE PLACE for you to start your affiliate marketing. If you want check the modules of this 2.0 course click here.
Which is cheaper – Legendary or Freedom Breakthrough?
The main course fee for Legendary Marketer and Freedom Breakthrough is $7. And to be honest that’s just basic course fee that teaches you all these. That been said, once you are in, They will show you different tools of theirs and others tools or services they use. But all of these are completely optional. If you purchase the freedom breakthrough 2.0, you basically gets everything they offer for a one-time price.
Main problem with Legendary Marketer & Freedom Breakthrough
Both of these program are great, but the problem is that in this 2 courses they built their online business on click funnel. Click funnel is the best program out there, But the problem is that click funnel does not have a free plan. Yes, I know about their 15 day free trial, But what if I could not generate a high ticket sale in that 15 days. Should I pay the $97 every month.
The alternative to this is systeme.io which has a very good free plans with all the features you need to run your business. Even though you can’t import their funnel, you can simply create your own funnel with all those templates in systeme.io. This is what I did when I got started. If you want use systeme.io, click here to signup for completely free.
Which one should I choose?
If you want start affiliate market and if you are serious about this, You can go to freedom breakthrough 2.0 and purchase the whole course. This course covers everything in one place, so you don’t need to go from guru to guru.
That being said, As beginners we all struggle through money. So please check the below table and select the table course you like.
If you are planning to go for a training program like this, then you should definitely check our free guide on 3 steps to build an online business eBook. In this book we have covered everything you need to know you get started. This book is not a 100 pages long eBook. Its a small guide that contains useful tips and tool that you can use when running your business.
Cold email marketing is basically sending a email to some one without them subscribing to your list. This means that there are a lot of thing you need to be careful when sending bulk cold emails. So before you start cold email marketing be careful to the points mentioned below.
Personalize the email to the recipient
Keep it short and easy to reach
A clear call to action
Warmup your accounts
Setup SPF, DKIM and DMARC records
Do not use spam triggering words like DEAL, OFEER OR FREE
1) How to send cold emails with your Gmail or GSuite?
The Gmail is one of the most used email service in the world. The Gsuite is basically the paid version of the Gmail. If you use a free Gmail account, you are limited to sending a maximum of 500 emails in a 24-hour period, and a maximum of 100 addresses per email.
Gmail Free Plan Details
Limit type
Limit
Messages per day Daily sending limit per user account*
2,000 (500 for trial accounts)
Messages auto-forwarded Messages automatically forwarded to another account, not included in the daily sending limit
10,000
Auto-forward mail filters Account filters that automatically forward mail
20
Recipients per message Addresses in the To, Cc, and Bcc fields of a single email*
2,000 total per message (maximum of 500 external recipients)
Recipients per message sent via SMTP (by POP or IMAP users) or the Gmail API Addresses in the To, Cc, and Bcc fields of a single email. Includes email sent using smtp-relay.gmail.com or smtp.gmail.com*
100
Total recipients per day Email addresses (recipients) count each time a message is sent; 5 emails sent to 10 addresses count as 50 total recipients.*
10,000
External recipients per day Email addresses outside your primary domain, including domain aliases and alternate domains
3,000
Unique recipients per day Each email address (each unique recipient) counts only once per day:5 emails sent to 10 different addresses count as 10 unique recipients*5 emails sent to a single address count as 1 unique recipient*
3,000 (2,000 external, 500 external for trial accounts)
If you are using a Gsuite account, ensure to set the DKIM records properly, before proceeding.
Use Gmass Chrome Extension
Gmass is the most easiest way to send bulk cold email using your Gmail or Gsuite account. The above video show’s how its done in a simple step. The next thing you need to worry about is pricing. Check the below setting for more details on the pricing of Gmass.
Gmass Free Plan
GMass already limits free accounts to sending 50 emails per 24 hours, which is well under Gmail’s own limits. The good thing about gmass is you can set a lot of setting to schedule your emails accordingly.
Gmass Pricing
The individual plan start with 19 dollar per month. If you want know about pricing check Gmass Pricing.
2) How to send cold emails with Office 365?
So to start with go to office.com and get your microsoft 365 accounts. While you are there, ensure to get the business plan which starts with jut $5 per month for a user. Enter the required information get your office 365 email. I know this process is little bit complicated, if you are using a business domain. So I will leave a video guide to this below. So ensure to set the Records such as DKIM properly to land your email in the inbox.
Get a application to send emails using office 365 mail
After setting your account you need a application to connect your SMTP server to send bulk emails. For this you can use application such as mautic or Gmass. For details check the below video.
3) How to send cold emails using word & Outlook?
Yes, You read above right. Design your email in Microsoft office word and send the emails using outlook. The outlook is super cool because to start with outlook is completely free and also you can add any SMPT server including Gmail and other common SMPT services in a few clicks. If you want to know more about how I achieve this check this video below, where I explain it all.
4) How to built a cold emailing system to send unlimited emails?
This is super cool, and before you think that this is complicated to setup, Let me tell you that you don’t need to. You can place a order here and get your setup ready in no time. Once you place a order they will setup a emailing system using Postal and mautic. Mautic is an open-source, marketing automation system and is mostly used as a self-hosted email marketing solution. Postal is a complete and fully featured mail server for use by websites & web servers. Think Sendgrid, Mailgun, or Postmark but open source and ready for you to run on your own servers. Postal was developed by a Tech Media to serve its own mail processing requirements and then decided that it should be released as an open-source project for the community.
So basically
Postal will be your SMTP server to send emails
Mautic is the application used. Basically setting auto responders and other automations.
Conclusion
The above contains the most beginner friendly ways to send bulk emails using most common application. If you want a professional solution, I would recommend the Method 4, The one with mautic and postal smpt. Other than this also there are other cold email service providers such as woodpecker, Saleshandy and Snov.
How to show popups when people try to exit your website
Yes, its annoying when people try people leave your website. So today I will show you How to show popups when visitors try to leave your website. This will be super useful, especially if you are running an ecommerce website. That being said, with this method I will show you how to show popups when people try to leave any kind of website. It could be a WordPress website or shopify store or even in Magento application.
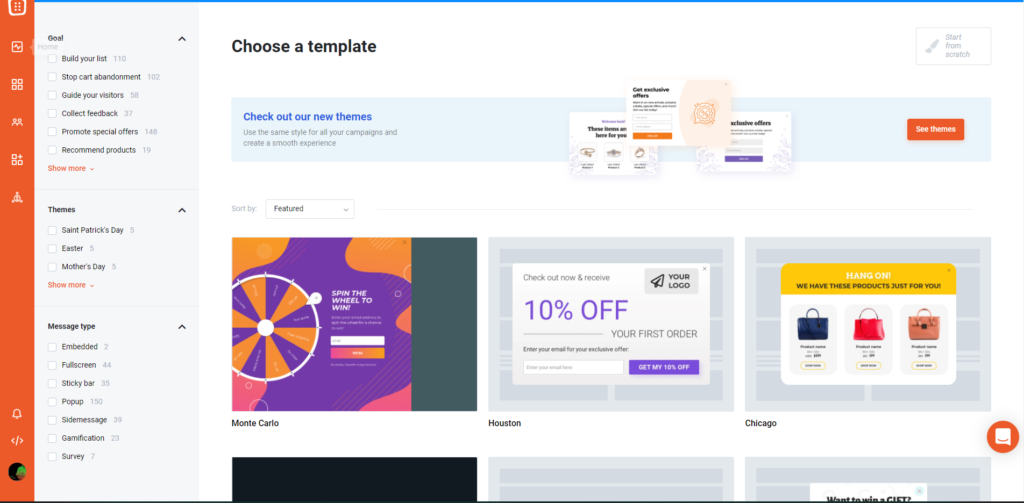
To show exit popups you can add a service such as OptiMonk or OptinMonster. After that you can design the popups in the dashboard. From there you can set which pages you want exit popups to appear.
What is OptiMonk and OptinMonster?
OptiMonk and OptinMonster are both powerful popups showing service that you can add to any website. With these tools you can show popups ads not only on page exists, But also on many different conditions. You can manually define rules very easily that allows you to configure when to show popups. On ecommerce websites,, these tools have increased the engagement of sites by 500% or more also. You can read the success story of OptiMonk here and the success story of OptinMonster at here.
The reason you should use these over custom building a exit popup is the ease of use with the lot of highly tested converting templates. The OptiMonk has hundreds of tested templates that you can easily plug and play. The best part about OptiMonk is that you can use OptiMonk for completely free until you get more than 15,000 views per month. Basically at that point you will be generating a good income from the OptiMonk popups itself.
The OptinMonster is also a great and is widely used in industry. But the issue with it is pricing. OptinMonster is not free, and it doesn’t offer a free version (or a “freemium” plan). The cheapest plan starts with $14/mo, and in that plan also they have a limit of 2,500 page views.
OptiMonk VS OptinMonster
Features
OptiMonk
OptinMonster
Exit Popup
Available
Available
Pricing
Free Until you get 15,000 (Views/Month)
Starts with $14/mo until you get <2,500 Views
Countdown Timer
A more advanced timer with many option
Limited but necessary option are there
Support
Unlimited Support with free installation on your website
QUICK NOTE:- OptiMonk is cheaper until you get 100,000 pageviews per month. When you hit that limit OptiMonk charges $79/ month, while OptinMonster charges $49/ month (Normally its 80 dollar, but as of now there is a sale in which you can get for $49/mo)
How to show popups when visitors try to leave your website using OptiMonk?
2. Install OptiMonk on your website (You add JavaScript code or just use a plugin)
3. Go to campaigns and click create new & design your exit popup
In here you can click chose a template for the exit popup. On the left side you will see options to filter the templates. Select the template you want in your exit popup.
4. Set the popup to appear on page exit
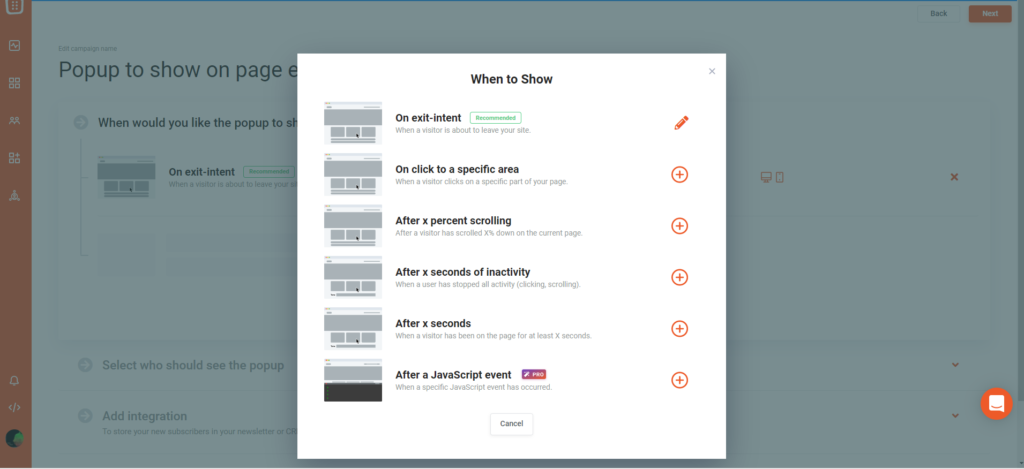
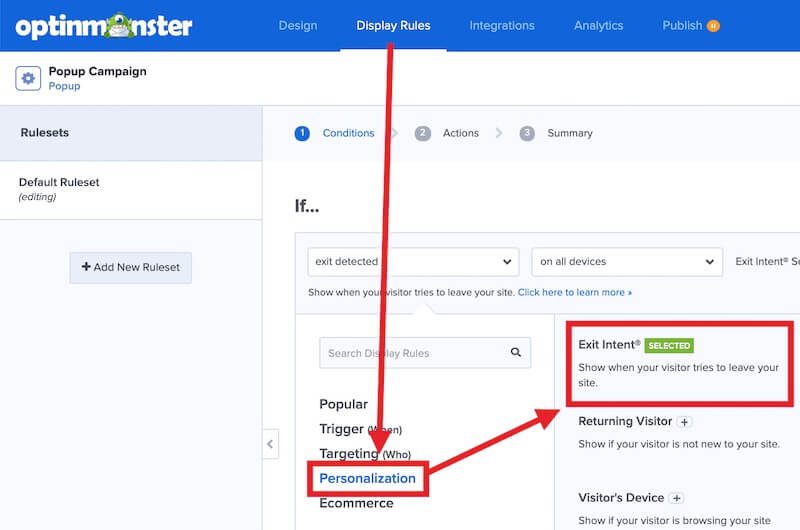
Once you design and click next, you will be prompt with option on when to show the popup. In here ensure that “On exit-Intent” is select.
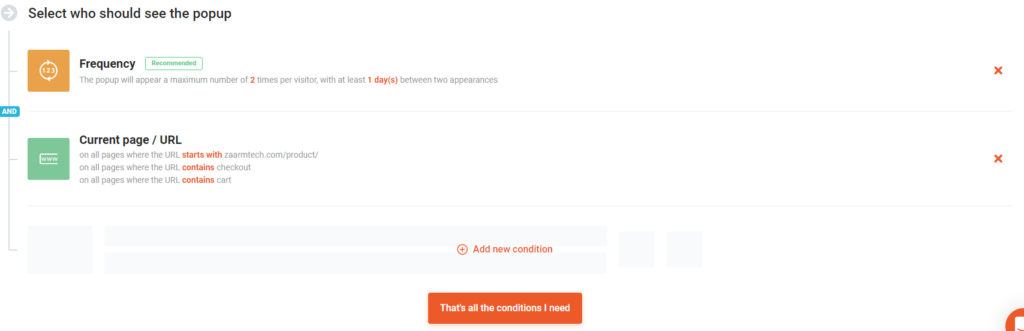
In here you can also set the option to show the exit popup only when visitors are exiting a specific page in your website.
5. Activate your campaign
Once your finish design & conditions, go to your dashboard and check if the campaign is active. If it is not just toggle button to activate the popup.
6. Check the popup on your website
How to show popups when visitors try to leave your website using OptinMonster?
1. Sign up to OptinMonster and Add it to your website
As I have explained for OptiMonk, when you sign up you will see the code that you need to add to your website. Also OptinMonster has plugin for WordPress and other platform. You will see this information when you sign up.
2. Create your campaign & design it
In this step also, you can select a template as we did before. Design the popup the way you want it to be.
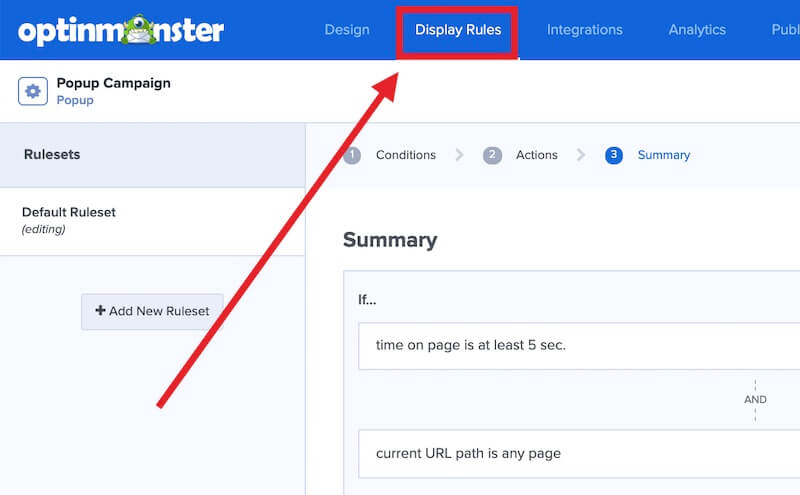
3. Go to the display rules in the campaign
4. Add exit intent as the rule to the ruleset
5. Click the save button & see it live on your website
Show popups when people try to exit your website
Now if you did everything as explained above, you will see the exit popup when you try to exit the website
Why I choose OptiMonk over OptinMonster
Basically its the pricing, and support I get from optimonk. Pricing is a huge factor, but also the personally I can say that support at optimonk is awesome. I have contacted them regarding some of my campaign they were always there to help me. Furthermore, the GUI and simplicity to find features are super simple. So if you ask me for recommendation, Surely I will suggest OptiMonk
Now that you’ve decided to take the plunge and become a solopreneur by starting your own business, you might be feeling more than a little overwhelmed by the sheer number of items on your to-do list. Don’t despair. Help is available if you know where to look and how to put together a team of tech support and freelancers to get your business off the ground and keep it flying smoothly. To day we will talk about How to Find Help as a Solopreneur
Forming Your Business
One of the first items on your list is likely forming your business, and this is also one of the first things you may need some help with. The rules and regulations for registering businesses are complex and vary by state. If you want to set up a limited liability company (LLC), for instance, there are affordable business formation services online that can help you file your paperwork and provide all the required documents. Using one can save you time and money.
Handling Computer Issues
Since so much business is done online these days, make sure you have an efficient computer system. Unless you’re a computer whiz, consider hiring a technician to set up your computers and keep them running. Having someone to call when your computer goes offline or your printer gets tied up in knots will give you peace of mind.
Managing the Books
Your business’ finances can get tricky. While you may be excellent at running your business and maintaining the best quality products and services for your customers, you may not be all that great at keeping track of your income and expenses, much less figuring out the complexities of the tax system. Consider hiring a freelance bookkeeper to make sure your books are accurate and complete. Visit a freelancer job site like Upwork, and look through some profiles. Read customer reviews, too, and make sure that the bookkeeper you choose has the experience and skills you need.
Marketing Your Wares
Getting the word out about your business can be a challenge, and you may discover that you need some help in this area. You could hire a web developer to create an eye-catching website for your company or a freelance writer to produce advertising copy, blog posts, or product descriptions. If you want a website feel free to send an email to admin@zaarmtech.com to get a quotation of a website for your online business. Even think about reaching out to a freelance marketing specialist to put together a whole campaign. This could save you some stress and give your business a major boost.
Keeping Yourself Organized
Finally, as a solopreneur, you probably have a packed schedule and more tasks on your agenda than you can keep track of. Before you pull your hair out, consider hiring a virtual assistant to keep you organized. There are several online companies that specialize in connecting virtual assistants and clients, and your assistant can do everything from managing emails to scheduling meetings to doing data entry.
Flourishing as a Solopreneur
Life as a solopreneur can be hectic, but you can flourish in a business that you love if you know where to turn for help.
Don’t hesitate to get tech support and freelance assistance from Zaarm Tech when you need it.
What if you need everything from scracth
Ok, You might be wondering what the above subheading said. What I mean is lets try to see how to build an business from scratch. The below video contains what you need and how you can start an online business from scratch. Feel free to check this video.
Now a days its a trend to create vertical short video’s for platforms like tiktok, YouTube Shorts or Instagram Reels. Today I will go through a python script that creates automated tiktok video in python. Everyone like when its automated. You do not need to do any work, Just run the script, and you get a video to post to your favorite platform.
To create automated tiktok video in python, all you need to do is run this script, that generates both video and thumbnail. With this script you can generate quiz, did you know, facts video’s and many more.
What features do this automated video generator have?
This script is focused on generating the everything you need to post to tiktok or youtube shorts. This mean this automated video generator will give you a video and a thumbnail for you to post to platforms you like.
The main features of this script include:
Generate Video
Generate High Quality Thumbnail
Add Voice Over
Add Background Music
Change Video Duration
How does this script work?
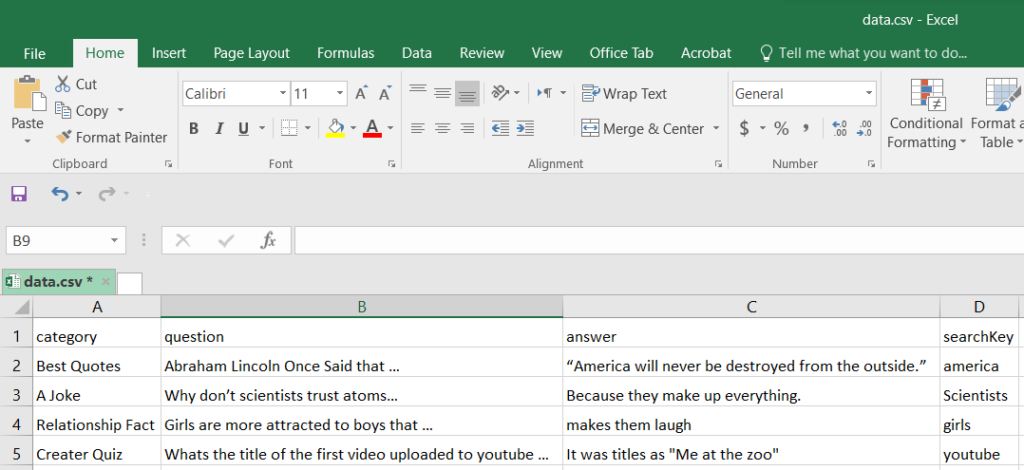
This python script will use a file called data.csv as the information needed to generate the video. This sheet contain 4 column, the category, question, answer and searchKey column. The category column contains a heading that will be used at top of the video and thumbnail. The question is the main text that will popup when you start the video. After 7 seconds, the text in answer column will popup. I think now you get the idea of how this is going to work. The searchKey column contains the keyword related to the video. With the text in searchKey column, the script will fetch images and video for the image from pixabay.
The pixabay is a great website that provides Stunning free images & royalty free video’s. This mean that photo and video from pixabay can be used in video’s that we monetrize. You can full write to use this video and images. It wont create any problem with tiktok or youtube monetarization. The best part is that, you do not even need to give credit to the pixabay or owner. But it is always nice to mention them in the description and thank them.
On the “main.py” go to editVideo function. On that function you can see that I have set the clip duration to 16 seconds. Just change the 16 seconds to what ever the number you wish. As a result, the average duration of the clip will increase. But if you change the total duration, also be sure to edit the Question and Answer duration
Just below the Clip you can see a new variable called “heading_clip”. In here also I have called “.set_duration(16)”. This mean that the heading of the video (category in data.csv) will be in the video for 16 seconds. You can always adjust this amount to be shorter or not.
Again you can see the both question clip and answer clip. In here using the set_duration I have set the duration of the Question and Answer. The answer will popup on screen right after the question duration is over. So to make the video perfect, its best to keep in mind.
How to generate automated thumbnail?
A sample of a thumbnail generated using this script
The above is a sample of a thumbnail that will be generated using this script. The script will take your question as the main text in the thumbnail. But with a single line of code you can change this. This script will be very easy for you to modify if you have any knowledge of programming. Always remember that you can contact admin@zaarmtech.com to get the support you need. Like I mentioned above, The image is fetched from pixabay using the searchKey from data.csv file.
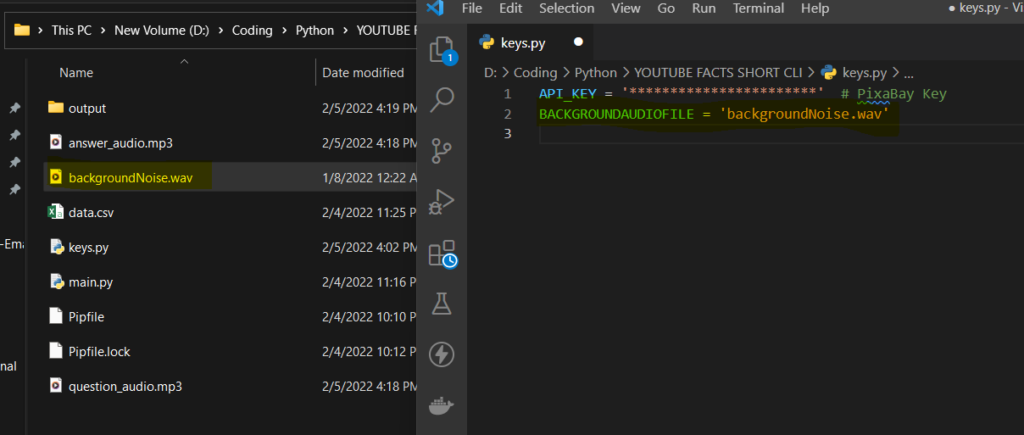
How to add the background music?
On the current directory you can see a file named “keys.py”. On the second line of this script there is a variable named “BACKGROUNDAUDIOFILE”. Add the name of the background music file to this variable. You can add a longer music file also. The script will automatically take only the required length of this audio based on the duration of video file. This audio will be played in the background during the whole video.
If you know the python programming language, you can edit this audio file to adjust the volume and the duration if you wish. But as for the demonstration of this tutorial I will be keeping this in this way, which is much simpler.
Which language does this automated script is coded on?
This script is coded on python. Python is very popular programming language, which is known for automation tasks like this. The main library used in this youtube automation script is moviepy. Moviepy is a python library used for editing video’s in python. Other than moviepy I have used other libraries such as requests, pillow. Requests is used to fetch the images and video’s from pixabay. The thumbnail that you see generated is done mainly used with the pillow library. If you want to know about this script visit to our facebook messenger inbox. We will be more than happy to share details.
Can I monetarize a YouTube channel with this script?
The short answer is that you can earn money by posting YouTube Shorts. YouTube has created a shorts funds to value creators. To earn money from YouTube shorts you do not need to be in YouTube Partnership Program. The YouTube Shorts Fund is a $100M fund to reward creators for their dedication to making creative, original Shorts that delight the YouTube community. YouTube will reach out to thousands of creators each month to tell them that they qualify for a Shorts bonus from the fund.
Other than earning from YouTube shorts funds, you can use YouTube shorts to promote promote products. My YouTube channel is about 1 thousand subscribers as of now, but still I get brand deals to my inbox, without having to ask or promote. Other than that YouTube shorts is a great traffic source for websites and affiliate products.
You can also use YouTube shorts to boost your YouTube channel subscribers. Because of the way YouTube shorts shelf is designed, its very easy to subscribe to YouTube channels. If you want your channel to blow up, YouTube shorts is the place.
This YouTube Shorts Generator Script is worth hundred’s of dollars, because with this script YouTube script you can built an automated YouTube Shorts Channel that pays you a lot more than this. But Today I am giving you this script for less than $50 dollars.
The script itself wont make your channel explode. The most important thing is to keep posting daily. YouTube loves creators who post daily and its fair to say that, If you start posting daily the YouTube algorithm will start promoting your content for you.
To get this software click the “add to cart” button and go checkout. If you have any problem downloading, send us a chat message using the messenger icon at bottom right corner.
To make money, you need traffic. What a better way to reach thousands of people in a single click by posting to a facebook groups. Today, we will show you how to make money with facebook groups, even if you are not a owner of facebook groups. You can just post to facebook groups and make money.
Best methods to make money with Facebook groups
Affiliate Marketing
Sell a Product
Earn per Click
Sell a Service using Saas
Print on Demand (shirts, cup etc…)
Other than this also there is a lot of ways to make money, but these are best and top 5 working methods.
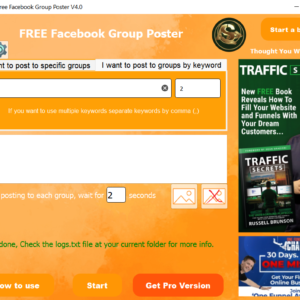
Post to multiple facebook groups at once
If you want to make money with facebook groups, then you need to post to lot of facebook groups to start earnings. Its very difficult to achieve this with two or three groups. But please do not spam and always post to facebook groups that are relevant to what you are posting.
Posting to each and everyone group by might be little time consuming and boring, this is why we have created a new software called facebook group poster pro. This software can post the same thing to multiple groups automatically once its been configured. So if you like this, check it below. It has a free version and a paid one.
In the affiliate marketing you will be promoting some one’s product or service. And whenever some one clicks or buy a product or service using your affiliate link, you will get paid.
Many of the products or services have an affiliate program, But as you will be using many affiliate products and service, its advisable for you to join a affiliate network. In the below list you can find what the best 2 affiliate networks that I have worked with.
Click Bank:- probably you heard about, Click bank is not a product, it’s an affiliate network where you can find thousands of products to promote.
CJ Affiliate:- CJ is also one of the largest Affiliate Networks available Online. I do work with CJ, and I promote some Web hosting services like Contabo and Other products.
ShareASale:- Th shareasale is also same as the both mentioned above. When you sign up to shareasale, you will get a lot of affiliate products to promote as its a affiliate network.
These 3 website might not have the products that your facebook groups will be interested in. In that case go to the websites of the products and service that your audience will love, and sign up for their affiliate program. Mostly you can find their affiliate program details on their website.
After registering to the affiliate program of a product or service, you will get an affiliate link. Post this link to facebook groups and when they purchase, you will get a commission. This is one of the easiest way to make money with facebook groups.
Important Tip:- If you have a website, its better to take them to the website, where then can sign up to some sorts of email list. To create an email list you can use a service like MailChimp, GetResponse or system.io
In the affiliate marketing, you will be promoting someone else product or service. This is not bad, because you do not need to worry about the product or service. But the downside is that in affiliate marketing you will get paid a percentage of the product. You wont get the full amount. But if you are the one who owns the product, you can sell it for any price that you like and keep all the profit to your self.
What could you sell?
You might be wondering I do not have product or service that I can offer to people. Well, its time to start a one. If you are good at a service, usually a service that you can provide online will be better. Furthermore, the most common idea is to create a book by taking a simple article from a website. For this you can use the Canva, which has many templates to start with. You can also buy products from online stores such as eBay, AliExpress or amazon and sell it for a higher price.
How do I accept payments and show my product or service details?
You can get a website, settle all these things. Contact our team to get a quotation for website, if you do not know how to make a one. But if you do not have a website please do a consider a click funnels. If you just focus on selling a product, click funnels are much better than a website. With a click funnel you can attract more customers and chance for the sales will be so high. Its the best one, if you are focused on selling a product or service. Please complete the 5 day lead challenge to get started on this.
When you share a link in facebook groups, and someone opens it, you might get paid. Yes, I just said it in simple terms. What actually need to happen is that, you will share a link which will be shortened using a service like shrinkEarn. When people click it they will be taken to website where, there are ads and a continue button. So when they click continue, then they will be redirected to the actual website that you want them to be. This is great, when you are giving things for free. This way you can earn some, without the customer having to actually pay.
How much can you get paid per view?
That really depends on the country of the visitor. In high tier countries like Greenland you can get paid up to $20 per 1000 views.
The below contains the important info about shrinkEarn
Minimum Payout: $3
Payment Frequency: Daily
Payment Methods: PayPal, WebMoney, Payeer, AirTm, PaySera, Perfect Money, Paytm, GooglePay, UPI and Bank Transfer
Package Description / Country
Earnings per 1000 Views
Desktop
Tablet/Mobile
Greenland
$20.000
$20.000
Iceland
$13.000
$13.000
San Marino
$10.000
$10.000
Gibraltar
$7.000
$7.000
United Kingdom
$7.000
$7.000
Canada
$7.000
$7.000
United States
$7.000
$7.000
Andorra
$7.000
$7.000
Australia
$6.000
$6.000
New Zealand
$6.000
$6.000
France
$5.000
$5.000
Germany
$5.000
$5.000
Denmark
$4.000
$4.000
Saudi Arabia
$4.000
$4.000
United Arab Emirates
$4.000
$4.000
Brazil
$4.000
$4.000
Norway
$4.000
$4.000
Singapore
$4.000
$4.000
Spain
$4.000
$4.000
Thailand
$4.000
$4.000
Sweden
$4.000
$4.000
Italy
$4.000
$4.000
Mexico
$4.000
$4.000
Philippines
$4.000
$4.000
Indonesia
$3.510
$3.510
India
$3.510
$3.510
Worldwide Deal(All Countries)
$3.500
$3.500
WHY VIEWS/STATISTICS/EARNINGS ARE NOT COUNTING?
Visitors must be unique within a 24 hours.
Visitors must reach their destination page.
Visitors must have JavaScript enabled.
Visitors must have Cookies enabled.
4. Sell a service using Saas
The Saas stands for Software as a service. I think you have seen a lot of websites online like pdf convertors or tools or service that are similar to that. The basic idea is to create a website like that and put some ads like google ads or ezoic ads. After that with the help of tools like facebook group poster pro, you can get a huge traffic to the website. The Saas are more profitable in the long run, because people will always come back to your website for that service over time. Please watch this video and this video on how to build a website.
If you do not have programming knowledge, you can buy a script or a website from code canyon and put it online. If you need any help, we are always an email away.
5. Print on Demand
I the print on demand, You will be designing shirts and other products and selling this. If you are in a facebook group of a series or movie, You can create quotes on products and sell that product by posting to those facebook groups. You can also add vector images to items and sell it.
To achieve this the most common website is merch by amazon. Merch by amazon is for anyone who wants to create, promote, and market branded merchandise on Amazon with no risk and no up-front costs. On the Teespring also you can get started for completely free. They have a nice interface and drag and drop builder to create item in minutes.
Conclusion
So basically on each of the above method you will be getting a specific link. By posting that link to facebook groups, you will start getting paid, based on the method you chose above. When you are posting please do not post to random groups as it will not work. Check the interesting topic for people in the particular group and post only those related to that groups. To automate the posting, you can use facebook group poster pro.
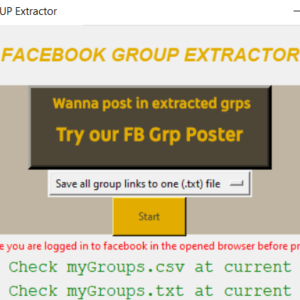
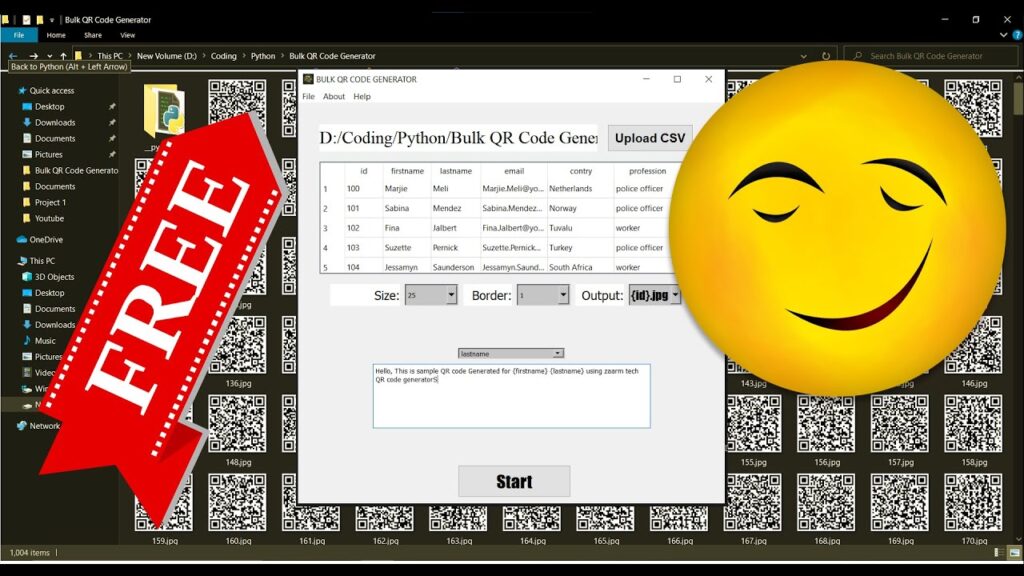
Just In case if you want to get all your facebook group links, or the id of the groups, You can use this tool (which will be introduced to later in this blog post) to get those information to a excel or csv file. We have made this process so easy. This tool also extract name, description and even the icon of the facebook groups you have joined.
To Extract facebook group links, run the app and sign in to your facebook account in the opened chrome window. Then on the app, click extract button and see that all your Facebooks group details written to a csv file created at the same directory as program.
What details Can I Extract from facebook groups?
This tool we created have basically 2 option when it comes to extracting facebook groups. The first one only extract the links of facebook groups you have joined to a text (txt) file. We added this option because, this format is required to use in our facebook group poster pro. However, if you are extracting for that program, we recommend to select the option described below.
The second option which can be selected in the tool, will extract name, description, icon photo link and the link to the group itself to a csv (excel) file. This option contains everything we offer to extract in this program. If you want a custom extractor contact us, so we can quote a price.
How to use facebook group extractor?
The facebook groups extractor is a simple software, All you need to do is select the option you would like (we described available 2 options above) and click start. To be honest you would not need a video guide, but here is a full guide video for you.
Video Guide
How to extract facebook group icon?
The software extracts the facebook group icon links to a csv file. The csv file will contain the direct icon as png or jpeg file. It will be a link to icon. Paste the link in any browser and you will be redirected to the icon. Now you can right click and save the icon as an image file.
Manually downloading each icon might be time consuming. With a simple script and the csv file you can automate this task in minutes. At the moment we do not have a separate tutorial for that, but hopefully we will but a one soon.
Click the above Add to cart button to download this software. Right now the software is not for free, But there is a chance you can get it for free. Earn the free points and use those points to pay for the software. This software is eligible for refund, under the terms and condition.
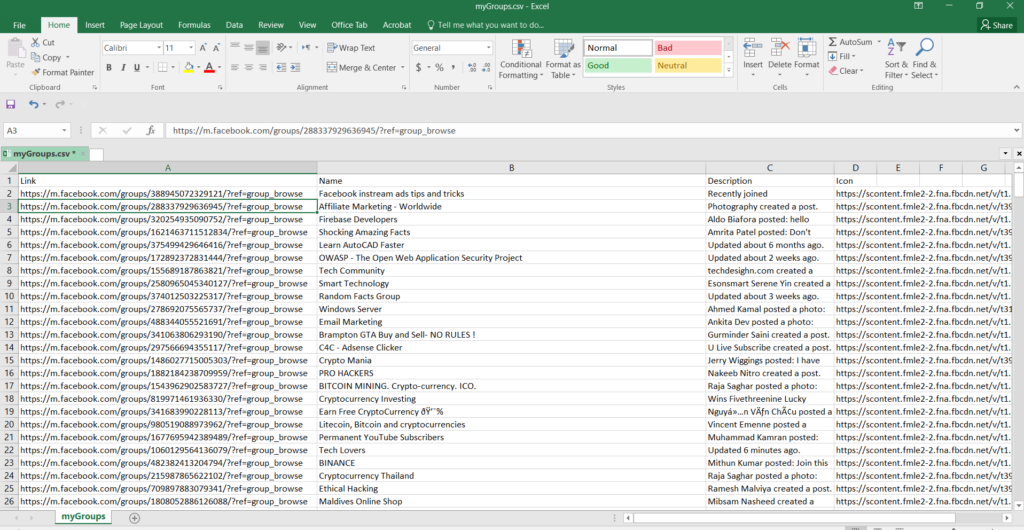
How does the extracted csv file look like?
How to extract facebook groups
The extracted csv file will contains rows and columns with the details of the groups you have joined. This program will only extract the details from the groups you have joined only. Once the program finishes extracting the facebook groups, you can open the csv file and edit the csv to any way you want. For example you can use the find and replace tool in excel to extract the only id of the group by editing the link field.
If you are from a small country like me that doesn’t support PayPal or Stripe, Getting paid online will be a pain in ass. I have researched the internet a lot to accept payments by credit card with a link from clients world wide. There are lot offering this service but somehow I do not meet minimum requirement (country or traffic). So Today I am going to share you a method on how to accept payment by credit card with a link from anyone with a payment card. The only requirement is for you to have a valid passport, you do not need a website or traffic to get approval. For this service we will use a virtual bank called DukasCopy which has a lot of cool features.
To accept payment by credit card go to your account and click request. This will prompt you to enter the amount you like to receive. Once you enter send request, it will give you a link to accept payment by credit card. Share this link and get paid online from anyone with a credit or debit card.
Please note that this request option will be visible only on mobile app. Also check other post from my My Blog
Download DukasCopy Connect App.
How to accept payment by credit card with a link
The first thing you need to do is go to playstore or appstore and download DukasCopy 911 app. Also you can download mobile bank also, But to open you need to use Dukascopy Connect 911 App. The mobile bank app can be used once you complete the registration. On the registration use the code V46-AR8 to get 5 DukasCoin (Can be converted to dollar).
How to open your virtual bank account
How to open a dukascopy account
Now you have successfully installed the 911 app, Open the app and fill the required form. The form will contain basic question, ensure that you write your name and details, as exactly in your passport, because like any other bank, dukascopy bank is going to verify that information.
The last step is the video verification. Don’t panic, its just a two minute call where they take a live picture of you with your passport to verify that you are a real person. Its completely normal for any banking system. They wont be asking much of a question, but they may ask your name to verify that you are not a bot.
What are the features of Dukascopy bank
Now that you have completed all steps, within an hour you will receive an email with confirmation. Now you can login to your dukas account using web or mobile app. The dukascopy will work just like any other bank. You can create visa or master card to spend on online store or even deposit or withdraw from popular services like skrill or neteller.
The best features of dukascopy bank include:
Supports 20+ Currencies
Exchange currencies
Get paid from anyone with a payment card
Deposit or withdraw using Payment card, Bank Transfer, Skrill & Neteller
Virtual Master and Visa Card
Online bank statements
etc…
How to accept payment by credit card with a link
Live Proof
Accepting payment by credit card is very easy in DukasCopy bank. You can request money from anyone by sending a link, But this option can be seeing in the mobile app only at the time of writing this post. You can always visit the web and check if that option is there or not, But for me I couldnt find it.
On your mobile open swiss bank app, In the Accounts tab you should see a button with text of “request”. Click this button enter the amount you want and click send request to generate a unique URL you can send to your customers to start accepting payment by credit card with a link. Please note that this link will expire in 7 days.
Create your virtual Master or Visa Card to spend it
Now that you have learnt how to accept payment by credit card with a link, lets focus on how you can withdraw or spent it. The app has bank transfer option, so you can always transfer this funds to your local bank using swift transfer. But the DukasCopy have a great feature, that lets you create master or visa cards.
On the cards tab select plus button to create your payment card. You can get a virtual card or even a physical card which will be delivered to your address. Furthermore, you can also select whether you want a visa card or master card. Please note that for each card you create, you need to pay about 20 USD as a one time fee.
The Dukascopy bank have integrated the skrill and neteller to their banking system. This mean you can easily deposit or withdraw to your skrill and neteller account in seconds.
A quick important note
As you have just started your dukas account, you will be having a limitation in withdraw or deposit amount. So if you ever run into any limitation send a text to bank using the 911 app we downloaded earlier, so they will increase your limitation.
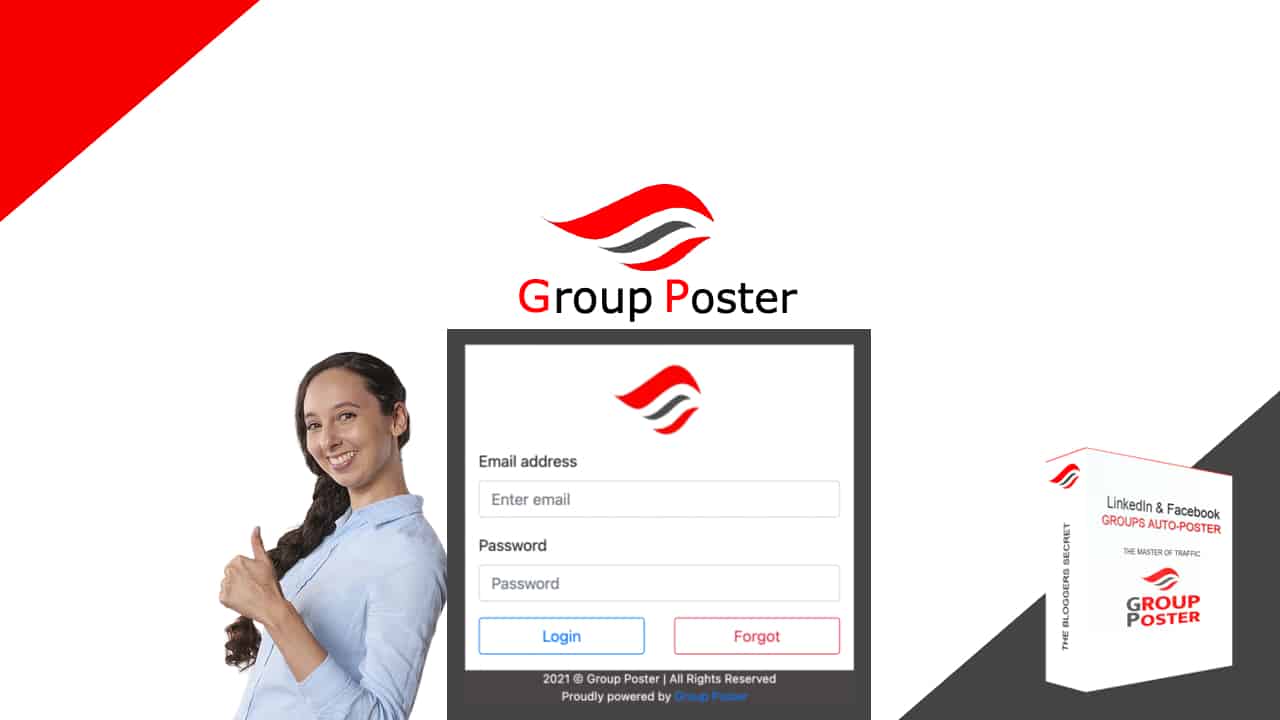
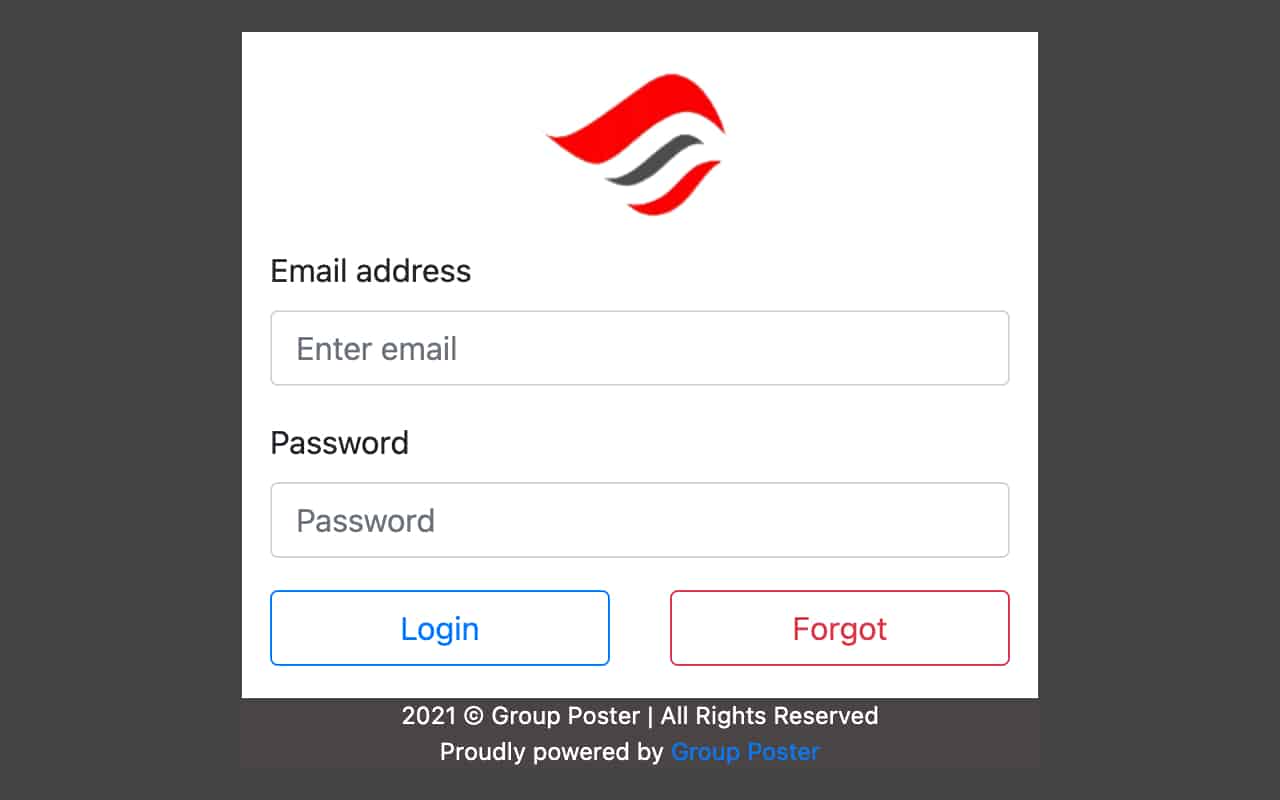
The main difference between our facebook group poster pro and GP Group Poster is that we have a software that run on windows, and GP Group Poster is a website.
Which is better, our software or GP Group Poster
Well, this is a debatable question, as different people prefer different methods. Our software is a simple tool we built, while GP Group Poster is a little bit advanced tools. Lets see the main difference in these both facebook group poster
Facebook Group Poster PRO (By us)
GP Group Poster
=> Can Upload Image
=> They are already working on the upload image feature
=> Provides support using email & Facebook messenger
=> Provides support using WhatsApp or Facebook Messenger
Difference between our facebook group poster & GP Group Poster
Now I think this is enough about difference’s of both tools, So lets focus on GP Group Poster. If you want to know about our facebook group poster as I mentioned go to How to post to multiple groups on facebook | AUTOMATED
What’s GP Group Poster & How it works
GP Group poster is a chrome browser extension for anyone to post their content automatically to any facebook and linkedIn group. Once you have purchased GP Group Poster, you will receive the access details and instruction to use the tool. Basically all you need to do is go to google web store, click on the add to chrome button and log in to the extension using the access details you recieved, when you completed your purchase, and then start posting.
Do I need to be an admin of the group
Well, In the facebook and linkdlin you do not need to be an admin to post content. If you navigate to the group from the normal your browser and if you are having the permission to post to that group, Then there is nothing that stops you from posting using GP group Poster.
Do they offer a free trial or refund?
The short answer is no, The GP Group Poster is a professional website, but as for everyone they have down time, espicially with tools like this. So before purchasing I recommend that you contact their support and check if everything is OK or not.
Their live support will be available using facebook messenger and WhatsApp.
According to them they do not offer free trial or refund because:
1. Due to the importance of LinkedIn & Facebook Groups posting they allow serious businesses only to use their tool.
2. GP Group Poster offer enables you to apply powerful marketing techniques for business.
3. To protect the Networks from spam and abuse, they are not providing longer Free trials and refunds anymore.
As a creator of similar tools like this, I undertsand this. For a service like this its difficult to offer free trials as expenses of hosting are high.
There are a lot of methods on how to reset the windows password in the internet. Some of them will be simple as asking asking you to select “forgot password” under sign in screen (which you obviously would have tried) or asking you to edit windows folder in C drive which might be fairly complicated for you OR NOT.
Today I will share the easiest method which is to boot your PC from a usb which we will recommend below and either copy your files or even let the usb reset windows login password for you. We will be mentioning 2 usb drives (free and paid), but we always recommend you to go for the paid one, as it was developed by professional companies. And most importantly its available on amazon itself.
Reset windows password using EZALINK USB (Reccomended)
Windows Password Reset
Let me simply what you need to do reset windows password to 3 step for you.
Insert the USB and shut down your computer.
Change your settings to boot from the USB. (instructions included)
Presto! The software will reset your password with just a few clicks.
As much as this sounds interesting, I know you will have some Question. I will try my best to answer some here, and if you have any question, comment it below.
“What’s An Ezalink?”
Ezalink products combine quality software with over 20 years of combined technical experience.
Every product can be used without the subscriptions that cost you hundreds over time.
Each USB includes printed instructions and extra guidance is available so you’re never left in the dark.
Frequently Asked Questions
Can I use this on multiple devices? Yes
Can this reset a BIOS or Bitlocker Password?
No, only Windows user passwords can be reset, this includes the admin user.
Does this work with the Password Reset Wizard?
No, it works by booting a small program from usb itself. The steps are similar and the instruction has been extended as well.
Does this work if the hard drive is encrypted? Yes, It will work
Features of Password Reset USB
Now if you want this usb click this link or select product below to make the purchase. If you do not want this, keep reading I have another method, that could copy your files.
Reset windows password with help of Hiren’s Boot CD
Hiren’s boot cd works similar to above USB. Instead of trying to reset the password, hiren boot cd will open your device with the operating in the boot cd. Even though I am referring to CD hiren boot cs can be installed to any usb. You can get hiren boot cd from amazon or even download it from their website.
Insert the bootable cd or usb with hiren boot CD installed, and change your boot device to this device. After that once, logged in you can access all hard drives in your PC like in windows and copy the necessary files. After that you are free to format your PC to reset the password. This way at least you wont loose your data.
Reset windows password with CMD
If you are not a tech person, of course with might sound like its difficult, But just follow this article to get it done.
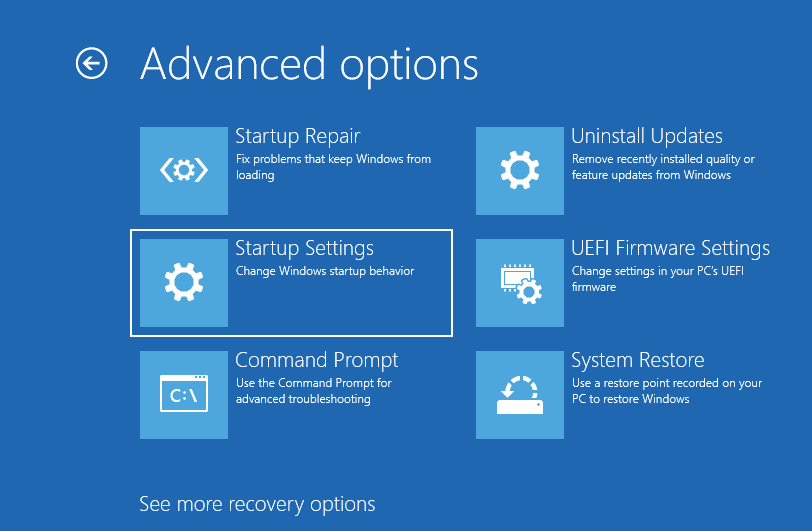
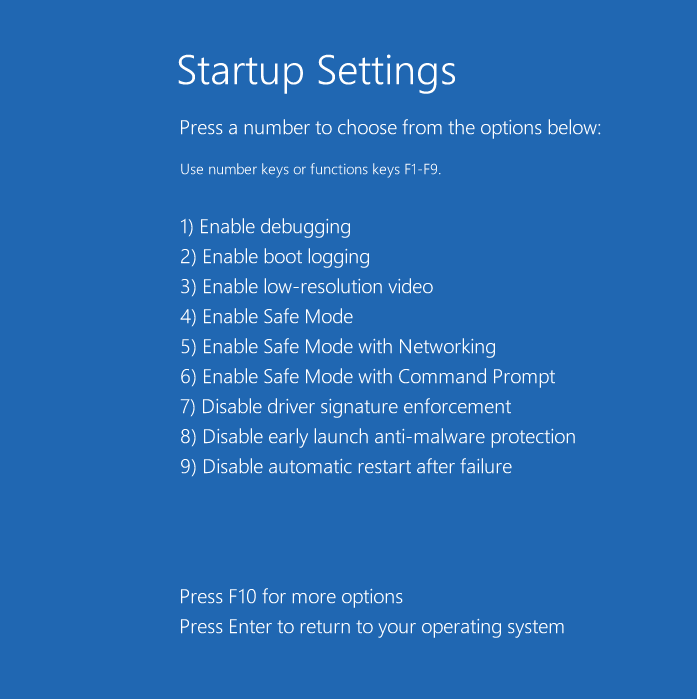
1) Go to troubleshoot blue screen
Navigating to troubleshoot screen can be little different on different PC, So let me break down most common ways
On the password entering screen, Click & Hold “Shift” and select restart
Press power button when manufacture logo appears for 3 times
I know that pressing power button on boot, sounds foolish, but when you crash booting for 3 times, It will automatically navigate to Troubleshoot screen.
Troubleshoot menu
Once you go to Troubleshoot screen, you need to navigate to “Advanced Option”
2) Select Startup Settings
Once you see all the options, on advanced options, Choose the startup settings
Select startup Settings
3) Enable the safe mode
Under the startup setting you can see many option, from there select 4th option, which is to enable safe mode.
Enable Safe mord
4) Get available users using CMD
Once you are reboot your PC, you will get a window, opened with cmd or command prompt. CMD is a basic input output typing windows, which is usually black and white. On the CMD type the following command to see available users in your PC.
net user
Net User Command executed on CMD
5) Reset password using CMD netsh command
From the previous account you can get the name of the DefaultAccount, In my case which is “Administrator”. Once you get execute the following command to change the passowrd.
net user Administrator YourP@ssw0rd
Reset windows password using CMD
Once above steps are completed you can restart your machine and login using the password you set above.
The PDF is something that we need to deal on a regular basis. However these when it comes to converting a PDF to Image on android I have seen people struggling. This is why I decided to break down the process into a simpler way. The first thing is that some mobile photo implemented this feature on production and others did not. There are 2 common ways:
With any pdf reader (without installing an app)
Using toolkit application (installing a app)
PDF to IMAGE without installing an app
This might sound surprising, But there is a way to convert the PDF files into image file without having to install any application. Yes as I have mentioned above some mobile phone manufactures implement a feature to convert pdf to image on android. This option can mainly found when you open a PDF file using system default PDF reader. If you cant find this option, don’t worry there is a work around.
Even though your mobile not have this option, you can easy open the pdf file and zoom to that area of the presentation you would like to make a image, and screenshot this area. Mostly you can take screenshot by pressing volume up button and power key. I know that in some documents, the quality wont be great, This is why we have a second method down below using our mobile app toolkit.
PDF to IMAGE using our toolkit box
The toolkit box is an application designed by us for everyone with simple android tools, that you need daily.
These tools will help you to perform a lot of tasks by using your mobile phone. All of the tools are native, means that this is not a web application, and operations are performed natively and its super fast. Convert between different file types and even recognize the text from printed material in offline mode with the tools in this application. The most important feature in this app is that you can save the files generated by these tools to your device easily.
These tools include => Image to PDF Convertor => PDF to Image Convertor => Speed Test => Text to Speak => Stopwatch => Device Info => Unit Convertor => Time Convertor => Day Calculator => Text Recognition => QR Code Generator => Flashlight => Crop Image => QR Code Scanner
All of these tools are full offline, Means that you do not need internet connection to use these tools.
The first thing is for you to head over to playstore and download this application. After downloading open the tool and select PDF to IMAGE option.
Convert PDF to Image on Android
As you can see in the above screen, all you need to do is select the PDF file that you wanted convert to image and it will be saved to my files folder on the application in image format. It is simple as that.
The video guide on how to convert pdf file to image
First of all its not hacking. We are going to look into how to find wifi password of the networks that you have previously connected on any machine that run windows. I have tested this on windows 10 and is expected to work on any version of windows. Before you want I am going to break it down to 3 categories or methods to see the password of every wifi network you ever connected.
Find wifi password using wireless properties.
Find wifi password using our program.
Find wifi password using cmd
Find wifi password using wireless properties
Image from PCMAG
If you a windows machine you can get into this very easily, without any coding or writing anything on terminal. You just need to follow the steps mentioned below and you are done.
On a Windows PC that’s connected to your Wi-Fi network, do one of the following, depending on which version of Windows is running on your PC:
On Windows 11, select the Start button, type control panel, then select Control Panel > Network and Internet > Network and Sharing Center.
On Windows 10, select the Start button, then select Settings > Network & Internet > Status > Network and Sharing Center.
On Windows 8.1 or 7, search for Network and, then select Network and Sharing Center from the list of results. To learn how to find out which version of Windows you have, see Which Windows operating system am I running?
In Network and Sharing Center, next to Connections, select your Wi-Fi network name.
In Wi-Fi Status, select Wireless Properties.
In Wireless Network Properties, select the Security tab, then select the Show characters check box. Your Wi-Fi network password is displayed in the Network security key box.
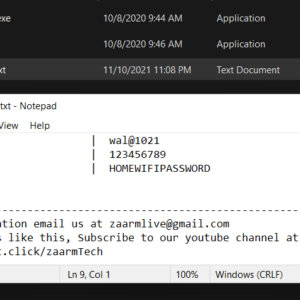
It might sound like you have to do a lot of thing, But all you need to do is run our program, and it will give you a text file with all your wifi passwords. This is very helpful if you want to get it done very soon.
Are you starting a new social page. Then you might feel like you are not getting engagements you deserve. This might be because you are having very low followers or subscribers in your account. Just ask yourself, are you going to like a Instagram account that has less than 100 followers, if you don’t know them, then surely you wont. So today I am going to share you how you can buy social media marketing for famous platforms like Facebook, Instagram, twitter etc.
Which social media marketing’s are available?
Facebook
LinkedIn
Instagram
Website Traffic
YouTube
Twitter
Pinterest
Spotify
Sound Cloud
Twitch
Vimeo
Telegram
You can buy social marketing in these platform for likes, followers, watch time, subscribers, Reposts etc…
A word of caution? Do not use this unless
Buying social media marketing is not something you should do. It might negatively impact your brand, so Its always important to grow organic rather than just purchasing.
Yes there are written as REAL in the service you are going to purchase, but even though they are real, they wont be returning customers or customers who are interested in your content. If you are feeling like your social presence is not growing you could purchase a little followers or subscribers, so that the people who are going to visit your profile, will think you have these many followers, so why not I also follow this person or business.
There are tons of website out there giving these service. But personally I found only two websites the trustworthy. That is socialservicepanel and anothersocialpanel.
I do not have any affiliate with any of the website above, But from my experience, I would suggest you to check the price and description detail for the service you are going to use. Which ever the one, you prefer you can choose. Overall, these two have almost same price rating and their service are amazing.
Many digital service marketers on platforms like fiver, are charging you a lot and buying social media marketing from these websites for a cheaper rate.
Is this secure & safe?
From a technical perspective both of this website are safe. Their support https, so data transfer’s are encrypted. The payment option on these two pages are supported by international trusted payment gateways like stripe, paypal and coinbase. Furthermore, under each service, they have mention that if that is bot or real. So depending on your budget and purpose, you could go with whatever the one you like.
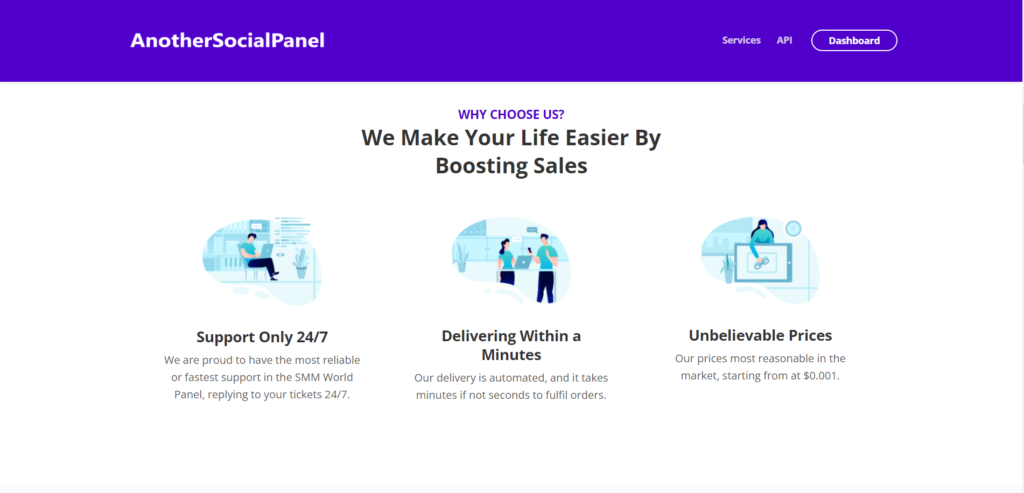
AnotherSocialPanel
The other side you should consider when buying social marketing is that, whether these purchased likes or followers will stay for how much longer. To ensure that they stay for longer, always try to purchase the recommended services. The ones I tried are not loosing any things over years also. And you can always use refill if you have any problem with the service you purchase.
How to place an order on a SMM Panel?
The first thing you need to buy social media marketing is go to anothersocialpanel and register a account. It is very simple, just enter your email and other required details. To register you do not need to pay fee. Its completely free, no monthly fees ever.
After registering you need to add some funds to your account before placing any order. You cannot pay on new order screen. You need to go to add funds option at navigation bar in the header and add your desired amount to your account. The minimum amount to deposit is $5, however you can place order with $0.01 also. They payment methods are stripe for card processing and for crypto, they having coinbase. Both of these are the top payment gateway available on the world. So both of them are pretty secure.
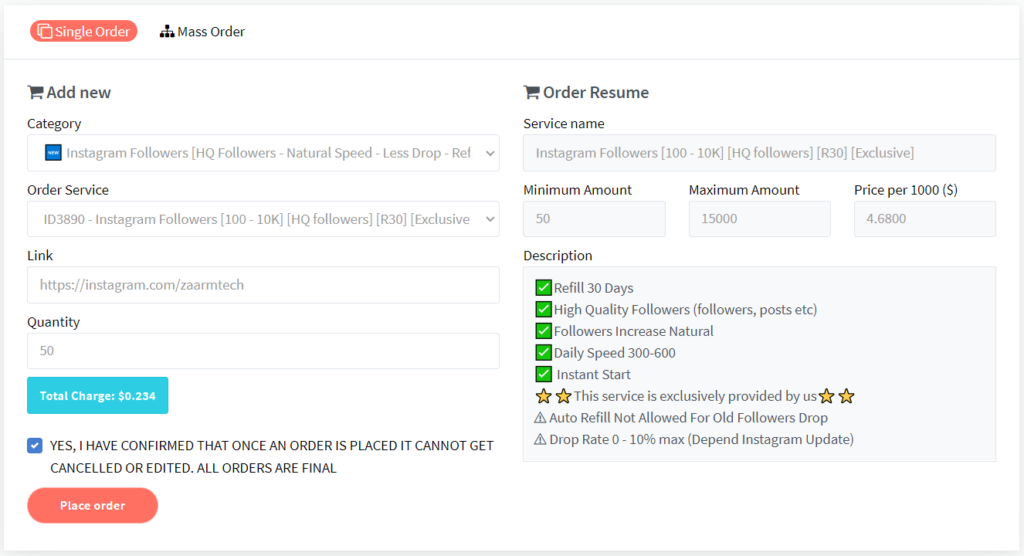
Now navigate to new order screen and select the category and service you liked to purchase. Remember to read the description for each purchase, as there are specific requirements for each order. The common requirement for every order is minimum and maximum quantity. So ensure the quantity you write falls between minimum and maximum.
Order Panel of AnotherSocialPanel
Once you place the order you can go to order logs and wait for the results. You always see the status of your order on the order log.
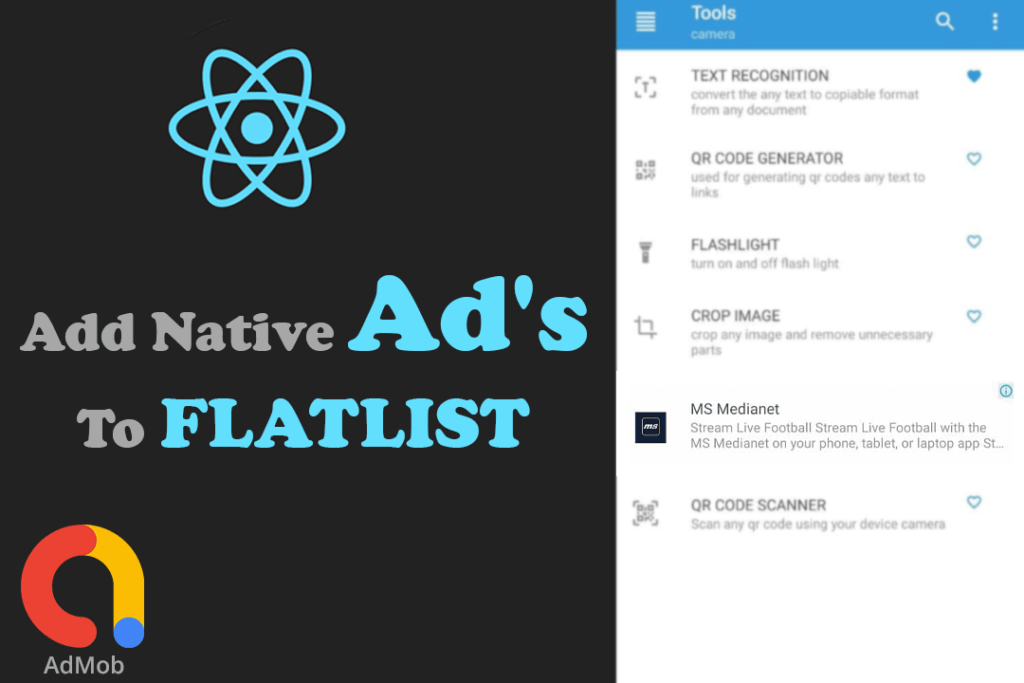
Recently I have added google admob native ads to my react native Toolkit Box application. I want make these ads appear on different place of my flatlist’s. That way I can maximize CTR for my admob apps. But when I start thinking about how to render ads in flatlist, I was out of idea. But when I start coding it was a piece of cake. So basic question here is how to add admob ads to flatlist.
The first thing you need to do is add your ad library to application. I am using react native admob native ads library, but you can use any library you need for your ad’s.
If you are using react-native >= 0.60 you just need to do run a simple command in your project directory
npm install react-native-admob-native-ads --save
or if you are using yarn run
yarn add react-native-admob-native-ads
After installing the react-native-admob-native-ads you also need to install react-native-vector-icons
npm install react-native-vector-icons
or
yard add react-native-vector-icons
Please note that you need to setup react-native-vector-icon, for that use this guide.
Lets setup react-native-admob-native-ads
First of all, for this you need admob account. If you don’t have an admob account got to this page and sign up for admob.
AdMob Home Page
On this page add your and go to App Setting, here you can find your app id, which we will need for our next step. In addition to ensure, that compiled sdk version is 28 or higher in your app/build.gradle
AndroidManifest.xml
You need to add the meta data for admob in your androidmanifest.xml as shown in below
In here only thing you need to change is android:value, DO NOT CHANGE android:name eventhough, its ending with ‘APPLICATION_ID’. For android:value, paste your app id from admob, which we noted earlier.
build.gradle at project level
Please note that this project level build.gradle is located under android folder at android>build.gradle. It’snot the one under android>app>build.gradlew
Now this is the part to design the native ad to display on flatlist. Here, you can design whatever, you want to display. As I use react-native-admob-native-ads, I will use the component from their, library but for you, design it anyway you want using whatever library want.
The ad unit in the above example need to be replaced by your own ad unit id. you can obtain an ad unit id by navigating to Ad Unit section under your app in admob. Ensure to select Native advanced ad format as we are using that kind of ad.
How to find ad unit id
One more thing in above example is that I have used short form (? & 🙂 to render static element if for any reason my ad has failed to load.
As you can see, we are adding a custom item to data array. It need not contain much fields, just one field to identify its the ad object. But if we do this way, it will always add ad to bottom of the flatlist.
This code below, will insert the ad object to random position of the array. It’s just basic javascript.
The last part on How to add native ads to flatlist on react native is to render these ads on the flatlist itself. This is the most simple task in the whole application. On the render component of your flatlist, Just add a simple if statement to check if that id of the received object is ‘ad’ or not. Based on that you can render your flatlist component or your
This tutorial is based on an app developed toolkit. If you go and download this app, you can see that I have implemented some advance feature’s in react native. So if you want you can purchase this product on our website.
This tutorial is about how to host a website locally. Which mean at the end of this tutorial, you will be able to access the website you host to be accessible from any device on your network. You might need to host a local web app on office to access it internally or even at home for watching movies, across many device. At the end of this tutorial, you can access this website from any device on your local network. And a quick note I have testing this on windows 11 and on windows 10.
Can you host any type of website?
I have tested this with react application. The important thing is that it should contain index.html or index.php and other static files. You website need not to be in react, it can be a WordPress website or a custom php website with MySQL as database. So, to start you need a web server to serve your files. Don’t worry, its not a big configuration, you just need to install an app. In browser search for download page of xampp server. Once you get there, you can download the latest version. With the help of this software, we will setup the apache server. And if you use MYSQL, then you can install it too.
The XAMPP Server
Once download is completed, open the setup file and install it. Its a simple next, next screen you need to follow. On service selecting screen, you can select what services that need to be installed for you. If you don’t know what these things are then select apache and untick all other options. If you want to use local MySQL database you can tick MySQL option. you can leave all other option as default. Once the installation is completed click finish button to open xampp control panel. When the xamp control panel starts start the apache module. When it starts you should see port 80 under ports. Ensure you have port 80 there.
Xampp Control Panel
Move your website public folder
Click explorer button on xampp control panel and then you can close the xampp control panel. Even though you close xampp control panel, the apache server will be running in the background. Navigate to htdocs folder on the “C://xampp/htdocs” and delete everything there is, to host your website at root directory. Those deleted file are default xampp files and if you want you can also host it on a new folder in here and add folder name to your URL. This way you don’t need to delete those files.
Your website files should be here
Paste your website files on this folder. Ensure you have index.html or index.php on this htdocs folder. Now when you go to localhost on web browser you should see your website live on your PC.
Lets make it accessible from any device on your local network
Many people think this is very hard, or requires a complex configuration, buts its a piece of cake. Open windows defender firewall and navigate to advance setting on left side bar. Under Inbound rule, create a new rule to allow port 80 in your firewall. With this, your device will open port 80 (which is default port for web server). Also, do the same with outbound rule to allow port 80 there also. The reason why we are using port 80 is because, then we need not to specify port when we go to this address. If you do not understand this make sure to watch the video at end on this post.
Adding a custom domain name to your local website
Check the web address, its custom name, You can also add .com or .org etc…
How to access this website using a name of your choice. For that go to rename your PC and rename it to what you want you want domain name to be. You can also rename your PC by going to advance system setting. So if your DNS server is mapping device name to IP ,any device visiting to http your device name will see the website.
However, you cant put .com or .net as your PC name. So if your want access your device using something like localwebsite.com, then you need to add a record to your router or dns setting to point that domain name to your IP.
You can get your IP by opening cmd and typing IPCONFIG.
Lets wrap it with video explanation on how to host any website locally
So basically, what we did was, install xampp and put our website in htdocs folder. And to access from any device on my local network, I allowed port 80 on my device.
Yes, If you are running windows 10, you can upgrade to windows 11 for completely free. But you have to meet windows 11 requirements for running windows 11. So in this tutorial I will explain how to upgrade windows 10 to windows 11 for completely 0 dollar.
Compatible with DirectX 12 or later with WDDM 2.0 driver.
Display
High definition (720p) display that is greater than 9” diagonally, 8 bits per color channel.
Internet connection and Microsoft account
Windows 11 Home edition requires internet connectivity and a Microsoft account. Switching a device out of Windows 11 Home in S mode also requires internet connectivity. Learn more about S mode here. For all Windows 11 editions, internet access is required to perform updates and to download and take advantage of some features. A Microsoft account is required for some features.
Taken from Microsoft website
Certain features require specific hardware. System requirements to run some apps will exceed the Windows 11 minimum device specifications. Check device compatibility information specific to the apps you want to install. Available storage on your device will vary based on installed apps and updates. Performance will scale with higher end, more capable PCs. Additional requirements may apply over time and for updates.
This tool will check if you meet windows 11 requirements
Going through one by one of this will be very difficult, But with a tool that will determine all this will help. Happily we can install Health PC Check App to see if its a match. This tool will tell you specifically which requirement you are missing to run windows 11. This tool can be downloaded from https://aka.ms/GetPCHealthCheckApp
How to upgrade windows 10 to windows 11 (What I Did)
When I first downloaded and checked if my PC was capable of installing windows 11 it said “Your PC does not meet windows 11 requirement“. I was horrified when I saw this notice. I have a Ryzen 7 and 16 GB RAM and a SSD, But still It said your PC does not meet windows 11. I opened the notice and it said, I am missing TPM 2.0. So I went to windows update, and there was some firmware updates also. SO I went ahead and installed the firmware Update and all other minor updates. After that I went to BIOS setting and under security there was TPM 2.0 with on and off switch. So from there, I enabled TPM 2.0 in my PC.
After restarting PC and running the “check for update” in windows update, I saw an available update named windows-11-someletters. Without waiting for much long I clicked download now button. As my Wi-Fi is slow, It took me exactly 1 hour to finish the download. After downloading It automatically started installation. I was able to use by PC during the installation process. After installation has completed, It nicely prompt me to restart the PC. After restarting just like any update would, I saw the this new look of windows 11. Its amazing. While you are also here how to reduce photo size, save in GB’s.
Microsoft Recommended way to upgrade windows 10 to windows 11
Yes, the Microsoft recommended way to upgrade windows 10 to windows 11 is through windows update as explained above. But what if your PC meet windows 11 requirements, but cannot see the windows 11 update in windows update. From the homepage of windows 11 download on Microsoft , They say to wait until you see the windows 11 update on their. But who are we to wait, Lets find a way.
When you navigate to this page on Microsoft website you can see windows 11 installation assistant. Once you see it, Click the download button and run this software. This software will help you install windows 11. As I installed the the update through windows update, I haven’t tried this method, But I can assure you this will work, as it is mentioned on Microsoft website.
Lets Recap everything we covered on one single video
As of now we can see that QR code is a new trend, Even if you are running a business or non-profit organization you need to generate QR code for various purposes. Most of the online sites and tools offer this service very easily, but all of them are paid when it comes to bulk QR code generator. You might be able create 50 to 100 QR code for free, But when It comes to 1000 or 10 000 QR code, its definitely paid. This is why I have generated a bulk QR code generator software free.
Why is your bulk QR code generator software free?
Lets say that, I love my subscribers and visitors, So I gave them this software for free. The real truth is that I have developed this software using popular programming language known as Python (https://www.python.org/). And as this program will be running on your PC I wont need to pay for anything. It will be using your laptop resources to create QR codes. DONT PANIK, its a very light weight software, so you don’t need to have a higher PC.
Features of bulk QR code generator – a bulk QR code generator software free
Generate unlimited bulk QR codes
Simple .csv upload
Adjust the size of QR code
Change border width of QR code
Select output (Generated QR code Image) filename
Unlimited number of text can be embedded on QR code
Generate QR code in seconds (Very Fast)
A log file printing console (So you can identify if any problem occurs)
Insert fields from .csv (data file) to embedded text in QR code
No additional FEE. (100% FREE)
No ads
Smaller file size
How to generate bulk QR code using this software?
1. Download “A Bulk QR Code Generator Software Free”
As I have mentioned above, You can get this software for completely free. To download this software, you need to fill this form at the end of this page. Once you submit this form, we will send you an email containing the a google drive link, that will contain this software. Just download the software from google drive link. If for some reason, your antivirus software is blocking this program, ensure to disable the antivirus or whitelist this .exe file. If you did not receive the email ensure to check your Spam and promotion box in your mail. Also add admin@zaarmtech.com to your contacts, so can see this mail easily.
Now that the “bulk QR code generator software free” is running successfully, prepare your .csv file. An excel file can be saved as .csv file or even you can use https://docs.google.com/spreadsheets to create your .csv file from scratch.
Yes your column name can contain anything. Your csv file heading can be as many as you want, it also can be as long as you want. And also it can contain as much as detail you want. Lets have a look at my csv file which contain 1000 records.
sample csv file
To upload the csv file, click “Upload CSV” button and chose your csv file. Once you chose the CSV file, you should be able to see records of that csv file inside the program.
3. Adjust the settings to your needs
Bulk QR Code Generator
In here, you can customize the QR code by changing its size, border and output file name. Most importantly the bottom input text box contain the text you want to embed in the QR code. In here you can insert dynamic fields from uploaded csv file by using input insert button above or by wrapping the heading of field in csv file with “{}”. For example: {your_field_Heading_name}
4. Generate bulk QR codes at once
Once everything is ready its time to generate QR Codes. To do this simply click start button. Mostly, it will take less than 15 seconds for 1000 records, and the speed varies with number of record and your system specification. Here is the picture of QR codes I generated.
Well, Here is video guide to Bulk QR Code Generator
How to embed different types of links to QR code?
I think you have seen that QR codes open email with pre written subject and body. You might be wondering , “Can I add emails to QR code using this bulk QR code generator software free”?. The answer is YES. Everything that are embedded to a QR code is a text. Even though we don’t have a separate section or option to select email or telephone, you can add it to the QR code like a pro.
What happens if I run into any problem at “a bulk QR code generator software free”
Yes, Error’s happen. It might be on my side or your side. The best approach to solve a issue like that is to use “zaarm tech” community.
Copy the error message from the log of your application (It will look like above), and paste it in the comments of this blogpost or even in the comments of the YouTube video. Its better to ask in the media that is having better engagements. I will my best to give you a reply from comment section as soon as possible.
This program is developed in popular programming language python and is mainly using qrcode and qt5 library. Take a look at the following part of the source code, and if you are interested you can buy the source code as it is not free. After purchasing QR code ensure to check your mail. If you cant see it there, send a message to admin@zaarmtech.com or use Contact Us page. We will send you source code ASAP.
import os
import csv
from PyQt5 import QtCore, QtGui, QtWidgets
import qrcode
import sys
import webbrowser

def resource_path(relative_path):
    """ Get absolute path to resource, works for dev and for PyInstaller """
    try:
        # PyInstaller creates a temp folder and stores path in _MEIPASS
        base_path = sys._MEIPASS
    except Exception:
        base_path = os.path.abspath(".")

    return os.path.join(base_path, relative_path)

class Ui_MainWindow(object):
    def setupUi(self, MainWindow):
        MainWindow.setObjectName("MainWindow")
        MainWindow.resize(800, 778)
        MainWindow.setCursor(QtGui.QCursor(QtCore.Qt.ArrowCursor))
        self.centralwidget = QtWidgets.QWidget(MainWindow)
        self.centralwidget.setObjectName("centralwidget")
        self.UploadCSVBUTTON = QtWidgets.QPushButton(self.centralwidget)
        self.UploadCSVBUTTON.setEnabled(True)
        self.UploadCSVBUTTON.setGeometry(QtCore.QRect(580, 40, 161, 51))
        font = QtGui.QFont()
        font.setFamily("Arial")
        font.setPointSize(14)
        font.setBold(True)
        font.setWeight(75)
        self.UploadCSVBUTTON.setFont(font)
        self.UploadCSVBUTTON.setCursor(QtGui.QCursor(QtCore.Qt.PointingHandCursor))
#These are the first few lines of the software, Purchase the full source code below
If you are a graphics designer, At some point in your life you need to create cards. It might be student cards, staff cards or even another kind of card that contains images / photo’s in it. If you are a corelDraw or Illustrator designer you might be not have option to do photo merge. This tutorial explain how to do print merge with photo. Its 100% Free
How to do print merge with photo / Images
As explained in the above video, In the latest version of coreldraw, you dont have this feature. For this to work you need to export your artwork in corel draw as eps file. This way the quality of your atwork will be intact. After this you can import your design in adobe Indesign without loosing anything in your artwork. After that perform a simple data merge using indesign. If you have any doubt ensure to comment it below, so we can fix it together.
Simple Print merge in CorelDraw
Tutorial on Print merge Corel
An Excel document with CSV design (Example: abc.csv)
Stage 1: Open the Corel draw. Then, at that point explore to File > Print Merge > Create/load Print Merge.
Stage 2: Print Merge Wizard exchange box will be shown. Select “Import text from a document or an ODBC information source”, then, at that point click on Next button.
Stage 3: Locate the document source, which is the Excel record inside CSV design. Snap on “Peruse” symbol and select the document.
Make a point to choose the record types as “Comma Separated File (*.csv)” starting from the drop menu close to File name.
Stage 4: Once you select the document, press Next button. An exchange box will show up inside data from the Excel record. If it’s not too much trouble, twofold check to guarantee you are utilizing the right information. Then, at that point, press Next.
Another discourse will seem to show all information from the Excel document. Press Next when you wrap up really taking a look at the information.
Stage 5: Finish the wizard box.
Stage 6: From Corel Draw screen, you currently can get to Print Merge toolbar as displayed beneath.
From the toolbar, select the field you need to add to your plan and snap on “Insert Print Merge Field”. The field is then added as a text object (Repeatedly measure with different fields).
Stage 7: Click on Merge to New Document. You presently can print with your printer with all printing objects allotted on the plate.
How to print merge with photo in CorelDraw (PAID METHOD)
It is said that E Cut at Macro Monster can do print merge with photo’s. However, Personally I did not try this and I do not recommend this. Why should we pay for a tool like this, when it is already available for free. CorelDraw is a vector designing tool. So it is acceptable to not have this print merge with photo feature. As I mentioned in the above video, you can import CorelDraw design to InDesign and perform the data merge which will contain the image and will be properly displayed on the design.
Well I cant pay But I am a developer, Can I develop a one like that.
The short and sweet answer is YES. If you are a developer you can develop macro’s that will perform the print merge and display the images. But to make it perfect you need a lot of coding. To be honest it depend on design. If you go to YouTube and searched for macro tutorials in CorelDraw, you will find something to start with. But you might need to adjust the coding a bit so, your macro will perform the print merge in the way you want. If you search the web, you might find some macro, but these macro’s will be most likely outdated. So you need to adjust the code to work it with the version of CorelDraw you are using.
HOW TO POST TO MULTIPLE GROUPS ON FACEBOOK IN ONE CLICK
how to post to multiple groups on facebook
Its time to post for me to show you how to post to multiple groups on facebook on one single click. All you need to do is prepare the list file with facebook groups and this free tool will post to multiple groups on Facebook. Dont worry, we will show you how to get links to all your facebook groups and how to filter the list to your needed groups. This method will get traffic to your links in few clicks. If you have any question about this free tool make sure to comment it below and if you want to take it to the next level make sure to Contact Us
Method 1 On how to post to multiple groups on facebook
This video is about how to post to multiple Facebook groups at once 2021. As of February 2021 Facebook have removed this feature, so here is a automated software that will post to multiple Facebook group at once on 2021.
To do this first of all, you need to watch the video above. Once you understood how to post to multiple groups using the software click the link below to download Facebook groups software.
The Social Auto Poster software is not created by US and some of the users have found that this software is difficult to post to multiple Facebook groups at once, So I have created a new software (Which I will explain in below). However you can download Social Auto Poster software and give it a try. Ensure to check up to bottom of this post to see our facebook post poster.
This software is outdated (still works with chrome V89), and we recommend to use software below (Method 2)
Method 2 on how to post to multiple groups on facebook (New Method)
The above video on Facebook group poster uses little outdated software, This is why I decided what if I coded a program like this on my own. So I started the Facebook group poster project on programming language PYTHON and created a Facebook grp poster with much more features and it is so simple. This program can
Post Text
Post Multiple Images
Post Multiple Video’s
Simple txt file upload
Etc…
Now if you want to know how to use this software check the video below. If this guide helps make sure to subscribe to our YouTube channel.
As you can see in this software, You can post to multiple Facebook groups with photo or even video’s. But the thing to note is that these are the automation scripts I have created based on the Facebook website. In future if they change the coding on the website we might need to update the program as well. This is why I decided to share the source code of my python script. However, if you don’t know the coding, no need to worry just download the program using below form and run it.
Pro version and free version
The Facebook group poster designed with us will have two version, A free version, that you can download without providing any payment details. The paid version need to be purchased for $15. However, there are always sale’s going at zaarm tech, so make sure to grab it, while it is in sale. Also you can get coupon code by completing specific task at zaarm tech. Make sure to follow us at http://facebook.com/zaarmtech and http://instagram.com/zaarmtech to get coupons for the products we sell at http://zaarmtech.com
Recently, I have added all features in pro version to free version. The free version will have limitation. However, you can try the free version before purchasing the full version. If you cant to get some more info on pro version and a coupon code watch below video.
Why stop with free version, What’s new in PRO version
Recently, I have added all features of pro version to the free version. Right now, the only limitation in free version is that it will limit the number of groups you can post. We want to let you try the software before purchasing.
Can I buy traffic to my social media?
Basically the reoson you need a facebook group poster is to get traffic. And more importantly free traffic. If you want to achieve this without using facebook groups, the most common thing is to check The first and most important thing is not to buy any just random bot traffic. You could use different google ads or Facebook ads to drive traffic. If you want a cheaper one check our article on How to buy social media marketing? Cheapest SMM
The Source Code
This code is written in program language known as python. So to run this script you will need Download Python and setup your PC. You might also want to download some code editor if you want.
FB GROUP POSTER THUMBNAIL
To run the above code ensure your have python installed and added to path. To run the script you need to open CMD and type “python ‘pathtopythonfile.py'” and hit enter. Once again you dont need to do this if you are not a python developer. You can always download .exe
Hello everyone, welcome to the blog. This tutorial will explain how I removed the FRP lock on my Samsung J7. This method can be applied to any android phone. So you can say this tutorial is about how to remove FRP lock on android devices.
How are we going to remove FRP lock on android device, The short and sweet answer is that we are going to delete the user data that have stored your previous email and FRP setting, so that when you open your device it won’t ask for any previous emails stored on your device.
So before starting I will go briefly on what is FRP lock and what it does.
Factory Reset Protection (FRP), is a security feature on Android devices with Android OS Version 5.1 (Lollipop) and higher. The FRP provides a built-in security feature you are able to use that protects your device and information, including screen locks and data encryptions. The FRP is enabled automatically when a Google account has been registered on the device and will be disabled if the Google account is removed from the device prior to the Factory Data Reset. Once the FRP has been activated, it will prevent use of your device after a Factory Data Reset in an untrusted environment. This means if your device has been Factory Reset in any other way than Settings General Management Reset Factory Data Reset, the FRP Lock will be enabled. So basically when FRP lock is enabled you will be asked to sign in using a google account that was previously synced on your device.
Now enough talk, let get our hands dirty. One more this before proceeding.
We won’t be taking any responsibility for anything that happen to your devices, however we will show some tricks at end to solve any problem you face during the procedure.
Lets Start the process
To begin with get the required files by filling above form. The above form collects your email in exchange for email address. Do not worry, we wont spam you, but we will send you updates only when we have a new post.
After downloading the zip file from the link in email, extract the zip file and open the folder. Now you will see 3 files that I used to remove FRP lock on my android phone. As I am using a Samsung device, I am installing Samsung usb driver. Make sure to install the appropriate driver for your device. For some device you might not need to install any driver at all. But to be on safe side, make sure to install the usb driver.
After the installing is complete unzip or extract the odin file and open the odin file. Odin is used to wipe the user data on your device using exynos file we have downloaded. After opening the odin, you need to connect your mobile device to your PC using an usb cable.
Make sure to use a strong usb cable, the cable that came with your device would work perfectly fine. Once connected you need to boot your device in to recovery mode. To boot your device into recovery mode turn off your device and press power button, volume down key and if there is main home button in your device, press that all three or two button at same time. Once, you see your manufacture device logo, remove from three buttons at once. It might ask for confirmation in some devices, in that case press yes or continue using the volume up key.
Pres the button required to go to this screen
Once you are in recovery or download mode, you can go back to odin and start the process. In odin you need to see “added” message now, if you have done everything as I have instructed.
As I have not connected any device to my PC it’s not showing added but for you it need to be showing on the screen. Next thing is to check the AP and click AP button. This will open a new dialog and now you need to select that Exynos dot RAR file.
This is what you see when you are processing rar file..As mentioned do not turn off your device
Once selected click start and now to will start the process. You will see a progress bar on both odin and android device as things proceed. Once the process is completed your android device will automatically open and you won’t be asked for any previous synced email address.
Its done, But one last step
If your notice any problem like storage full or anything, now you can do a factory reset directly from the setting.
How to do a factor reset after opening the device
Remember that I have told you in the begging about how I can fix my device if anything happens. For that also you need to follow exact process, but instead of selecting the Exynos dot RAR file you need to download the firmware of your device from any website select that file. These are some of the websites that you can use to download the firmware.
If this video helps make sure to give a thumbs up and comment and subscribe to our channel for more tutorials like this. Also check my other tutorial on WordWeb(Offline Dictionary)
Video Tutorial on how to remove FRP lock on android phone
Is this all, What if it doesn’t work for some reoson
Removing FRP lock is tricky and will vary from device to device. Another working method that I found is to insert a SD card to device with some application to launch your home screen. I am sure if you google for your phone model FRP removal, this method will popup. I wont be explaining that method here, but if you have a question make sure to comment it below
how to reduce multiple photo size at once without losing quality
How to reduce multiple photo size at once without loosing quality?
To achieve this navigate to bottom and click the download button. This will open a website that have download link of software that we are going to use. From there you can install the software for completely free. Open the software and drag all the photo’s you want to compress without loosing the quality. This will show a alert saying that do you want overwrite the compressed photo or create a new folder to store the compressed photo’s. Select the option you prefer and all is done. Now all of the those photo’s you dragged to software will have reduced file size and quality will remain same. Isn’t it easy.
This have proven quite useful for bloggers to photographers. Bloggers want a smaller size of image because it will load faster on the web, hence decrease page loading time. Photographers take high quality photo which were going to take a lot of storage. So even if they drag and drop those thousand of photo’s they will save GB’s of storage from their storage devices. While you are here at zaarmtech make sure to check our tutorial on LATEST TRENDS IN INFORMATION TECHNOLOGY
What’s this software that we are going to use?
JPEG Mini is a handy application for various field users mainly photographers, photo editors, designers those who have daily workflow of images with JPEG formats. The application offers users a tools to minimize or reduce the size of their JPEG file without losing image quality or pixel integrity. Through this way, users can save a ton of space in their drives, memory cards or USB drive.
Get the smallest picture record size without compromising high-quality or converting your workflow. The best thing about them is that as they are having a desktop application. You don’t need to upload anything to cloud. Its all done natively on your PC. All you need to do is get the Software.
Simple and easy to use especially with drag and drop.
Fastest operations.
Compress JPEG formats.
Save more hard drive space.
Modern wonderful graphical user interface.
Support different Cameras.
Many modes for optimization.
The license of JPEGmini is valid for lifetime, and offers update for 1 year. As like software’s there are full version for free on sites like GetintoPc . However to support developers I recommend you to purchase it through their website. They have a one time fee of 59 dollar that will give you the full access to the application for lifetime.
Are you a lightroom or photoshop fan?
If you use lightroom or photoshop, you can add their plugin to the software. This way you can perform JPEGmini functions directly from your photoshop or lightroom.
Yes, Its difficult believe, So watch this video of me trying the software
how to reduce multiple photo size at once without loosing quality
There are other software or online tools like this, but if you are planning to get a easy and bulk processing software then I recommend JPEGmini pro for you.
The JPEGmini pro Suite photo Optimization software program is a image resizing utility designed to reduce average file sizes without sacrificing photo nice, resolution, or format. Capable of decreasing your JPEG record sizes through as much as 5x, this tool affords an efficient solution for releasing up hard power space and shortening add instances.
This pro Suite model of JPEGmini utilizes all processing cores for your laptop for faster resizing and exporting performance and may assist JPEG pics as much as 128 megapixels. A plug-in for each Adobe Photoshop and Lightroom is covered, which integrates into your workflow, processing each picture when you export it from either software.
How do the following categories of computer differ from each other?
How do the following categories of computer differ from each other?
What are the 4 types or categorized of computer?
The four basic type of computers are Micro Computer, Mini Computer, Mainframe Computer and Super computer. Computers are classified into different types based on their size and speed. Each of these types of computers are used for different reason based on their features and properties.
The micro computer is the most common type of computer that we use in day to day life. Destop computers, laptop, personal digital assistant, smartphones and tablets are example of micro computer. These computers are widely used and it spread very fastly. The main reason for this is because it is cheap and most people can afford it easily. The calculator we used in our school life is also a micro computer. Mostly these computers are designed to be used by one user at a time. The terms microcomputer relates to the microcomputers which is used in these computers. The use of this microprocessor is to process data and instruction codes. It also can be used for entertainment purpose, education and work purpose.
The micro computers include a memory (to store data) and minimal input/output circuitry mounted on a single printed circuit board. Microcomputers weren’t much popular until 1980s with the advent of powerful microprocessors. The first microcomputer is known as the Altair 8800. It was produced by Micro Instrumentation and Telemetry Systems (MITS), and invented by Ed Roberts. This microcomputer does not have a operating system. Anyway, it accepts the commends entered via a row of switches, because it also didn’t have a keyboard.
The Minicomputers or mid-range computers are the computers which is bigger than a microcomputer and smaller than a mainframe computer. In general, we can say that minicomputer is a multi-processing system capable of supporting from 4 to 200 users simultaneously. One of the main purpose of the minicomputer is to support a small group of users with reasonably powerful computing capability. That’s why minicomputers are mainly used by small companies and firms. The online catalog in many libraries are run by minicomputers.
The setup of minicomputers allowed many people to access computers, which results in a spurt of new application around the world. Minicomputers are introduced in 1960s. Digital Equipment corporation has developed the PDP-1 ( a minicomputer) in that time. The one of the most popular minicomputer is Texas Instrument TI990. It was a series of 16 bit minicomputer sold by Texas Instrument in the 1970s and 1980s.
The Mainframe Computer
Photo by Tima Miroshnichenko on Pexels.com (Laptop in photo is not a mainframe computer)
The Mainframe computer is large and expensive types of computers which can support thousand of users simultaneously. These kinds of computers are mainly used by governments and large organization with thousand of customers, for bulk data processing, critical applications, transaction processing, census, industry and consumer statistics among others. These computer are very powerful but not as much as supercomputers. It can store and process terabytes of data. Mainframe computers can be accommodated in large rooms, because of their size and air condition is necessary due to the heat it produces.
In Maldives companies like Ooredoo or dhiraagu (service providers) can use these kind of computers to store theirs customers data securely. The main difference between a mainframe and supercomputers is that a supercomputer channels all its power into executing a few programs as fast as possible, whereas a mainframe uses its power to execute many programs concurrently.
The supercomputers are extremely fast computer which can perform hundreds of million of instruction in fraction of seconds. They are the fastest computer in the world. These are very expensive and used for special application that requires lot of mathematical calculation. The weather forecasting and nuclear energy researches are done using the supercomputers. These computers are also big in size like mainframe computers due to its numerous parts and components involved in their design. One of the example of supercomputer is Tianhe 2. Tianhe-2 also known as TH-2 is a 33.86-petaflops supercomputer. It is located in China. It was developed by a team of 1,300 scientists and engineers.
Compare and contrast the bounded and unbounded transmission medias in detail?
Compare and contrast the bounded and unbounded transmission medias in detail?
Compare and contrast the bounded and unbounded transmission medias in detail?
The every communication between two device is transmitted. Even when you send anything from one device to another device its transmitted. The way or what is used to transmit this data is called transmission medias. It might be some sort of wire like a normal copper wire or even a radio frequency signal which is transmitted through the air or now we call it wireless. The Bounded means its some sort of physical item like cable and unbounded means wireless or its transmitted on air.
The Bounded media are physical cables that travel through a narrow path. It is mainly made up of external conductor such as copper and covered by a non conductive material. It is also known as wired or guided media. The Bounded transmission means having connectivity between a source and destination using a wire or cables. So in bounded media signal will be travelling through the wire to its destination. The signal will not leave, except for smaller leakage amounts in bounded media. There are 3 types of bounded media. They are coper twisted pair, copper coaxial cable and optic fiber cable.
The Copper Twisted Cable
In coper twisted pair, two insulated wires or cable will be twisted together. The coper twisted pair is also again classified into two types known as shield twisted pair (STP) and unshielded twisted pair (UTP).
The Shield Twisted Pair
The shield twisted pair or STP is cables with the techniques of shielding, cancellation, and wire twisting. In shield twisted pair or STP the twisted pair of wire will be covered or wrapped in a metallic foil. The reason for covering the twisted pair of wire is to protect the transmission line from the noises and electromagnetic interference leaking into or out of the cable. Shielded twisted pair or STP are used in places like airports where there is too much noises. The unshielded twisted pair or UTP wire are not covered or wrapped in a metallic foil.
The un-shielded twisted pair
The unshielded twisted pair wire is cheaper than the shielded twisted pair wire. The twisted pair cables are used in homes and offices as ethernet cable. These cable supports low to high data rates but are not high as optic fiber cables. Other than ethernet cables, twisted pair wire is used in telephone communications also.
The optic fiber cable is similar to an electrical cable, but optic fiber cable contain one or more optical fibers that are used to carry light. The optical fiber elements are typically separately coated with plastic layers and contained in a protective tube suitable for the environment where the cable will be deployed. The fiber optic cable has very high bandwidth more than 2 gigabytes per a second. It is used for long distance telecommunication and to provide high speed data connection. The optic fiber cable use both analog and digital signal and are not affected by electromagnetic interference, so noise and distortion will be very less. However, these cable are very expensive and difficult to repair once its broken.
Unbounded media is in which the data transmission occurs through the air, commonly known as wireless. It is also known as un-guided or wireless media. Some example of unbounded media are microwave, radio wave, infrared waves and satellites. Microwave transmission use a transmitter and receiver with a clear path. If the path is not clear means it cant transmit data. Some times due to heavy rain and wind also it cant transmit data. But in radio transmission line of sight or clear sight is not necessary because radio waves can pass through the buildings. Infrared wave uses infrared light wave to transmit signal and can be blocked by hand or objects. Most type of remotes uses Infrared waves to transmit signal. The satellite transmission uses satellites to transmit signal. There are many satellites around a planet in a elliptical path.
Lets compare and contrast the bounded and unbounded transmission mediasin detail
Now that you have understood what is bounded and unbounded transmission media’s, lets put some point out some important details
Bounded media’s are physical wires
Unbounded media’s are wireless
Bounded media’s include copper twisted pair cables and fiber optic cables
Unbounded media’s include radio transmissions and satellite
Explained the categories of E-commerce in shortest way possible
If you are a business or tech person, ecommerce is thing you have to bother in your career. As the internet have expanded, so does the e-commerce. As of now people differentiate the categories of e-commerce in to 6 types. In this tutorial, I will try my best to Explained the categories of E-commerce in shortest way possible. Also check out Merits and Demerits of E-commerce
There are 6 basic types of e-commerce:
·Business-to-Business (B2B)
oThe e-commerce between two or more business. We can also that when
one company sell or buy products from another company.
·Business-to-Consumer (B2C)
oThis is the most common type of e-commerce. It is between The
company and their consumers.
·Consumer-to-Consumer (C2C)
oThis is also a common type of e-commerce as the e-commerce is
between consumers.
·Consumer-to-Business (C2B).
oSome times Consumers are also selling items to the companies. That
is known as Consumer to Business.
·Business-to-Administration (B2A)
oThis is when a company sell or buys products from the government.
·Consumer-to-Administration (C2A)
oThis is like applying for police report online. A consumer is
going to get a service from government.
Now lets Identify these websites belongs to which category
of E-commerce why?
Explained the categories of E-commerce in shortest way possible
The above have explained the categories of e-commerce in shortest way possible, But lets summarize what we have covered so far. There are 6 types of e-commerce categories. They are business to business (B2B), Business to consumer (B2C), Consumer to consumer (C2C), Consumer to business (C2B), Business to administration (B2A) and Consumer to administration (C2A).
Now lets have a clear meaning of these terms we used
Business
The company or a registered business
Consumer
The end user or the normal people who use the service
Like anything E-commerce also have its merits (advantages) and Demerits (disadvantages). This tutorial will look in to details of these advantages and dis advantages. When we compare the merits and demerits of e-commerce, I believe merits would be more than demerits. Buts lets discuss the merits and demerits of E-Commerce. If I miss any important point, ensure to comment it below on this post, so we all can learn together.
E-commerce is like shopping online. E-commerce’s merits or advantages can be classified into three main categories. They are Advantages to consumer, Advantages to organization and advantages to society.
Merits (Advantages) to Organization
The advantages to organization of e-commerce include reducing the operational cost of the organization. Your organization does not need a showroom and more employees for the e-commerce. Other than that, e-commerce help organization to improve the brand image of the company. You can also attract more customers in e-commerce due to the easy process of e-commerce. You can purchase items by staying at home by just a few clicks.
Merits (Advantages) to Consumer
The best benefit for the customers of e-commerce is the 24/7 support. You do not need to wait for a specific time. You can always ask question about the product you want and get instant feedback. Customers also can easily find alternative products and compare the products they want in simple steps. This helps customers to get the best available product. Furthermore, customers can give review about the products they purchase and see the rating of the product, that you are going to purchase. E-commerce has increased the competition among the organization. As a result customers are getting huge discount on the products.
Merits (Advantages) to Society
Some of other advantage of e-commerce include 24/7 selling and buying service. You can access the e-commerce website at any time and place your order. As e-commerce does not require a physical company setup, It is easy to start and manage the business. Customers can easily select different products from different companies without moving around physically. This means that overcrowdings on the roads will decrease. Which surely will have a impact on transitive diseases.
The Demerits of E-Commerce
The demerits of e-commerce include that anyone can start a e-commerce websites. There are some e-commerce websites that eats up their customers money without providing the service. Some of the products are very fake and is difficult to understand what is fake and what is good. As it is a online process, there are hackers who hack the payment gateways. There is a high chance that some of the e-commerce websites are used in phishing also.
The same way Demerits of E-Commerce will also have huge impacts on Society and Organization and even to consumer. But we need weigh the pros are cons of E-Commerce for themselves.
Explain any three latest trends in information technology?
Explain any three latest trends in information technology?
Information Technology is a huge word and the easiest way to define information technology is by saying that it is a study or use of systems for storing, retrieving, and sending information. We can also say that it is exchanging of electronic data. In this modern world there are new invention and modern trends in information technology. Some of the latest trends in information technology includes cloud computing, Artificial Intelligence, 5G proliferation, quantum computing, Drones, Mobile computing and application and Automation. So let me explain any three latest trends in information technology?
Cloud Computing means using a network to send and receive files. With the help of cloud computing users can use application or links to store and send files by using internet. The top benefits of cloud computing include the cost. Mostly if you need to store data means you need to purchase a storage device. But you can use cloud computing for free of charge using some websites like google drive or mega. Other than that if you are using cloud computing means that files can be easy accessed over any part in the world. It also offers protection from potential threads and makes data backup when needed. The perfect example that of cloud computing we use in our daily life is emails and google drive.
Artificial Intelligence
Artificial intelligence is an area of computer science that emphasizes the creation of intelligent machines that work and react like humans. The fifth generation computers are also based on artificial intelligence. The device which use artificial intelligence include speech recognition and do tasks automatically. The robots also use artificial intelligence. Nowadays most common program that use artificial intelligence is siri and Alexa. These apps or device will perform task after listening to what you said and based on that.
The Famous 5G
5G is also known as the fifth generation of mobile network. 5G supports the speed of downloading 20 gigabytes per second. It is the latest generation of mobile network yet. 5G will not only interconnect people but also it will deliver new levels of performance and efficiency that will empower new user experiences and connect new industries. 5G uses better spectrum compare to 4G and it also has low latency. 5G support new services such as mission-critical communications and the massive IoT.
Quantum Computing
All the computer will be storing and manipulating information. The Current computers are storing and manipulating individual bits, which stores information as 0 and 1.Quantum computers leverage quantum mechanical phenomena to manipulate information. To do this, they rely on quantum bits, or qubits. They use three quantum mechanical properties known as superposition, entanglement, and interference to manipulate the state of the qubit. The speed of these quantum will be very fast. It is said that Quantum computers perform calculations based on the probability of an object’s state before it is measured.
Drone
Drone is basically a kind of a mini aircraft which has multiple purpose. It is used in photography as well as in military. Some of the scene of famous movies are shot using drones. The drones used to capture photo or video contain camera on the drone itself. Drones can be controlled remotely. In military there are drones which used to bomb places in war. These drones carry bomb to specific location and detonate the bomb. There are some drones which can lock a target and move towards to the target. Drones are also used in surveillance. People are tracked using facial recognition with the help of drones in seconds.
Last Words
Latest trends in technology also brings a huge impact on mobile applications. Now with the help of AngularJS you can use html and JavaScript to build hybrid mobile application. After the release of angular there has been a huge increase in number of apps in stores. It is developed by google and maintained by community of individual people.