Developers and Users who use apps developed using selenium has started getting error “There is no such driver by url:https://chromedriver.storage.googleapis.com/LATEST_RELEASE”. While every support forum and all are getting crowded with this question, Let me answer you why your getting “
There is no [win32] chromedriver “latest” for browser google-chrome “117.0.5938” in cache
[INFO] Get LATEST chromedriver version for google-chromeError: There is no such driver by url https://chromedriver.storage.googleapis.com/LATEST_RELEASE_117.0.5938″
Please note that above version 117 might differ but you will be getting this error!
Why are you getting there is no such driver by url
The error message “There is no such driver by url” occurs when the Selenium WebDriver is unable to find the specified driver from the URL provided. In your case, it seems that the error is related to the ChromeDriver version for the specific browser version you are trying to use.
The error message also mentions that there is no [win32] ChromeDriver “latest” version available in the cache for the Google Chrome browser version 117.0.5938. This could happen if the ChromeDriver version you are trying to download is not compatible with the specified browser version.
Basically as of now the latest chrome driver version on https://chromedriver.storage.googleapis.com is version 114. But if your chrome version is greater than 114, You will be getting this error.
How to check your chrome version?
To check your Google Chrome version, you can follow these steps:
Open Google Chrome on your computer.
Click on the three vertical dots located in the upper-right corner of the browser window. This will open a menu.
From the menu, hover your mouse over “Help” and then click on “About Google Chrome.”
A new tab will open, and Google Chrome will automatically check for updates and display the version number.
You will see the version number displayed under the “Google Chrome” heading. It will be a series of numbers separated by periods (e.g., 91.0.4472.124). This is your current Chrome version.
Knowing your Chrome version is essential when troubleshooting compatibility issues with other software, such as Selenium WebDriver or ChromeDriver. Basically the number you see here must be less than the number you see when you click here.
How to solve there is no such driver by url
Basically to this no such driver by url issue, you need to uninstall and install a version thats lower than the number you see here.
To uninstall and install a specific version of Google Chrome, you can follow these steps:
Uninstalling Google Chrome:
On Windows:
Click the Start menu and open the Control Panel.
Select “Uninstall a program” or “Programs and Features”.
Find Google Chrome in the list of installed programs.
Right-click on Google Chrome and select “Uninstall” or “Remove”.
On macOS:
Open Finder and go to the “Applications” folder.
Find Google Chrome in the list of applications.
Drag the Google Chrome icon to the Trash or right-click and select “Move to Trash”.
Right-click on the Trash and select “Empty Trash” to completely remove Google Chrome.
Scroll down to find the version you want to install.
Click on the download link for your operating system.
Once the download is complete, run the installer file.
Follow the on-screen instructions to complete the installation.
By following these steps, you should be able to uninstall your current version of Google Chrome and install the specific version you desire.
PLEASE NOTE THAT FOR ALL OF THE ZAARMTECH SOFTWARE’S AUTOMATICALLY DOWNLOAD CHROME DRIVER AS LONG AS YOU HAVE CHROME INSTALLED. PLEASE FOLLOW ABOVE GUIDE IF YOUR HAVING There is no such driver by url ERROR.
If your computer has been crashing recently, you may be wondering why and how to fix it. There are a few potential reasons for why your computer may be crashing, but luckily there are also a few things you can do to try and fix the issue. In this blog post, we’ll go over some of the possible causes of why your computer may be crashing, as well as some potential solutions to try. Hopefully, by the end of this post, you’ll have a better understanding on why does my computer keeps crashing. Not to mention that you will be able to solve the common problems that cause your computer to crash in the first place.
Why does My Computer keeps crashing?
It’s no secret that computers crash. Sometimes it seems like they do it for no reason at all, but there are actually quite a few reasons why your computer might suddenly stop working. In this comprehensive guide, we’ll take a look at some of the most common causes of computer crashes and what you can do to fix them. If you’re wondering why your computer keeps crashing, you’ve come to the right place. Here are top 3 of the most common reasons for computer crashes and how to fix them.
Hardware Issues
One of the most common causes of computer crashes is hardware issues. If your computer is crashing frequently, it could be because of a faulty piece of hardware or an outdated driver. To fix this, try updating your drivers or replacing any damaged or old hardware.
Overheating
Another common cause of computer crashes is overheating. If your CPU gets too hot, it can lead to all sorts of problems, including system instability and blue screens of death. To keep your computer from overheating, make sure you have good ventilation and avoid running resource-intensive programs for long periods of time. You can also try using a cooling pad or fan to help cool down your laptop if it tends to overheat often.
Software conflicts
Computer crashes can also be caused by software conflicts. This happens when two programs are trying to access the same file or resource, which can cause instability and ultimately lead to a crash. To fix this , try uninstalling any programs that you don’t use regularly , as well as any third – party applications that might be causing conflicts. You can also try disabling certain features in programs that are known to cause conflicts.
How to fix computer crashing?
Computers crash for a variety of reasons. Sometimes it’s a simple software issue that can be fixed with a restart or an update. Other times, it could be caused by hardware problems or malware. In this comprehensive guide, we’ll discuss the top reasons for computer crashes and how to fix them later. Also if you want you can check this 10 ways to fix computer crash, But only if the rest of ways I mention in this article is not useful for you. The reason for that is because above mentioned ways are little bit technical than the solution mentioned below.
Top reasons for computer crashes
Computers crash for a variety of reasons. Sometimes it is due to hardware failure, while other times it is because of software issues In either case, it can be frustrating when your computer crashes and you are not sure why. This guide will give you some tips on how to fix your computer crashing problem. There are many different reasons why computers crash It could be a hardware issue, such as a faulty processor or bad memory Or, it could be a software issue, such as an incompatible driver or virus. No matter what the cause, there are several things you can do to fix your computer crashing problem.
If you suspect that hardware is the cause of your computer crashing, then you should check all of the connections inside your computer. Make sure that everything is plugged in correctly and securely. You may also want to try replacing parts that seem to be causing the problem. If this does not solve the issue, then you should take your computer to a professional for further diagnosis.
If you think that software is the root cause of your computer crashing, then you should run a virus scan and remove any malware from your system. You should also update all of your drivers and install any missing patches for your operating system. These steps should fix most software-related issues that can cause crashes However, if these do not work, then you may need to reinstall your operating system or contact a technician for further help. But usually when you go to windows updates and update to the latest version, the issue will not be there anymore.
If your reaching a technician online, share some video of the
Computers crash for a variety of reasons. Sometimes it is due to a software problem, while other times it is because of hardware issues. In either case, there are solutions that can help you fix the problem and get your computer up and running again. One of the most common reasons for computers to crash is because of a software issue This can be anything from an incompatible program to a virus or malware infection. If you suspect that this is the cause of your crashing issue, then you should run a virus scan and see if anything comes up. You may also want to try uninstalling any new programs that you have installed recently as they could also be causing the issue.
Another common reason for computers to crash is because of hardware issues. This can include things like bad drivers or faulty components. If you think that this might be the cause, then you should check all of your drivers and make sure they are up to date. You may also need to replace any damaged or defective parts on your computer. If you are still having problems with your computer crashing, then it may be due to a more serious issue such as a corrupt file system or registry In these cases, it is best to contact a professional who can help you fix the problem so that your computer will start working properly again. If its a software problem, then most likely formatting and reinstalling the windows will solve the issue.
Ways to fix a crashed computer
This guide will show you some of the top reasons for computer crashes and how to fix them. We’ll start with the most common causes and work our way down to the more difficult ones. One of the most common reasons for computers to crash is because of corrupt or outdated drivers. Drivers are what allow your operating system to communicate with your hardware. When they are out of date or corrupt, it can cause all sorts of problems. The good news is that updating your drivers is usually pretty easy. You can usually do it right from within your device manager. If you’re not sure how, there are plenty of guides online that can help you out.
Another common reason for crashes is because of malware or viruses as I have mentioned multiple times in this blog post. If your computer gets infected with something, it can really screw things up. That’s why it’s important to have a good antivirus program installed and running at all times. And if you do get infected, make sure you run a full scan as soon as possible to get rid of the problem.
Furthermore, if your computer crash is caused my a software issue, Then installing the latest windows update from your setting might also help. Its something you definitely want to try before worrying over your head.
How to prevent computer crashes
Computers crash for a variety of reasons Often, it is due to an error in the programming code or a corrupted file. There are ways to prevent computer crashes, and there are also ways to fix a crashed computer. Here, we will take a comprehensive look at the causes of computer crashes and how to fix them.
If your computer keeps crashing, there could be several reasons why. Fortunately, there are also several things you can do to fix a crashed computer. Top reasons for computer crashes include outdated software or hardware, corrupt or missing files, and overheating. To prevent your computer from crashing in the future, be sure to keep your software and hardware up to date, run regular maintenance scans, and keep your PC clean and well-ventilated.
If somehow this guide did not solve your computer crashing problem, I recommend you watch the below video which is more in-dept.
A screenshot is an image taken of whatever is on your screen. The Windows operating system has built-in screenshot capabilities, and taking a screenshot in Windows is very simple. There are a few different ways to take a screenshot in Windows. The most common way is to press the Print Screen button on your keyboard. This will take a screenshot of your entire screen. If you only want to take a screenshot of a specific window, you can press the Alt and Print Screen Button.
How to take a screenshot on Windows
Are you wondering how to take a screenshot on windows? Well, you’ve come to the right place In this comprehensive guide, we’ll show you everything you need to know about taking screenshots on your Windows computer. We’ll start by showing you how to take a basic screenshot using the built-in tools in Windows Then, we’ll move on to more advanced methods, such as taking screenshots of specific areas or regions on your screen Once you know how to take screenshots in Windows, you’ll be able to capture any images or information that you need for work, school, or personal use. So let’s get started!
The different ways to take a screenshot on Windows
There are many different ways that you can take a screenshot on Windows. You can use the Snipping Tool, you can use the Print Screen button, or you can use the Alt + Print Screen shortcut ,You can also use the built-in Game Bar in Windows , or you can use third-party software like Greenshot.
How to take a screenshot of your entire screen
To take a screenshot of your entire screen, press the “Print Screen” (often abbreviated to “PrtScn” key on your keyboard). This will take a photo of your screen and copy it to your computer’s clipboard. Open an image editing program like Paint or Photoshop and paste in the image from your clipboard. In most programs, you can do this by selecting “Edit” > “Paste” from the top menu or pressing Ctrl+V on your keyboard. Crop out any parts of the screenshot that you don’t want to save and then save the file to your computer You can usually do this by selecting “File” > “Save As” from the top menu or pressing Ctrl+S on your keyboard.
To take a screenshot of just one window, first make sure that window is selected and open — you’ll see its name at the top of the window when you hover over it with your mouse cursor, Then press Alt+PrtScn on your keyboard. Also when you take a screenshot, you can will get a notification at right end of your screen. If you click that notification, snipping tool application will be open with the image of the screenshot you just captured. Now in this software you can make little edits and also save the screenshot as png or jpeg file.
How to take a screenshot of a specific area
Are you wondering how to take a screenshot of a specific area on your Windows computer? With the help of this comprehensive guide, you will be able to do just that in no time! In order to take a screenshot of a specific area on your screen, you will need to use the Snipping Tool. This is a handy little tool that comes pre-installed on all Windows computers.
To launch the Snipping Tool, simply search for it in the Start Menu or type “snippingtool” into the Run dialog box. Once the Snipping Tool is open, click on the “New” button and then select the “Rectangular Snip” option. Now simply use your mouse to draw a rectangle around the area of your screen that you want to capture. Once you have done this, release the mouse button and your screenshot will be taken!
You can also use keyboard shortcuts to take screenshots on Windows. To do this, simply press the “PrtScn” (Print Screen key on your keyboard This will take a screenshot of your entire screen If you only want to capture an active window, then press “Alt + PrtScn”. Once you have taken your screenshot, it will be saved as an image file in PNG format within the Pictures folder by default. From here, you can then edit or share it as you please!
How to save your screenshot
We all know how to take a screenshot on our phones, but what about on our computers? Here’s a comprehensive guide on how to take a screenshot on Windows. Whether you want to save a picture of something you found online or capture an error message before it disappears, taking a screenshot is always useful. Here’s how to do it To take a screenshot of your entire screen, simply press the “Print Screen” (sometimes shortened to “PrtScn” key on your keyboard). Your screenshot will now be saved in the clipboard. You can then paste it into an image editing program like Paint or Photoshop and save it as a file.
If you only want to take a screenshot of part of your screen, you can use the Snipping Tool To find this program, go to Start > All Programs > Accessories > Snipping Tool. Once the program is open, click and drag your mouse cursor over the area you want to capture. The selected area will appear in blue so you can make sure you got everything you need. When you release the mouse button, your screenshot will be automatically saved as a PNG file in your Documents folder
Taking a screenshot on Windows is quick and easy with these seven simple steps. With just a few clicks, you can capture images from your screen to save or share with others. Give it a try the next time you need to take a picture of your screen!
The easiest method to save your screenshot is by clicking the notification, you get when you take screenshot using snipping. Once you click this notification, the snipping tool application will be automatically opened with your screeen capture that you just did. Now simply press save button at top to save your screenshot.
How to share windows screenshot to Chat apps
Its verry common especially on office environment, your required to take a screenshot and send it to your boss through email, whatsapp or even in microsoft teams. If that is the scenario, As discussed above take the screenshot using snipping tool. The quicking way is to use snipping tool keyboard shortcut, and right after that, you can just paste the image to your chat apps. You do need to save the image.
For more posts like this ensure to visit zaarmtech daily.
How to show popups when people try to exit your website
Yes, its annoying when people try people leave your website. So today I will show you How to show popups when visitors try to leave your website. This will be super useful, especially if you are running an ecommerce website. That being said, with this method I will show you how to show popups when people try to leave any kind of website. It could be a WordPress website or shopify store or even in Magento application.
To show exit popups you can add a service such as OptiMonk or OptinMonster. After that you can design the popups in the dashboard. From there you can set which pages you want exit popups to appear.
What is OptiMonk and OptinMonster?
OptiMonk and OptinMonster are both powerful popups showing service that you can add to any website. With these tools you can show popups ads not only on page exists, But also on many different conditions. You can manually define rules very easily that allows you to configure when to show popups. On ecommerce websites,, these tools have increased the engagement of sites by 500% or more also. You can read the success story of OptiMonk here and the success story of OptinMonster at here.
The reason you should use these over custom building a exit popup is the ease of use with the lot of highly tested converting templates. The OptiMonk has hundreds of tested templates that you can easily plug and play. The best part about OptiMonk is that you can use OptiMonk for completely free until you get more than 15,000 views per month. Basically at that point you will be generating a good income from the OptiMonk popups itself.
The OptinMonster is also a great and is widely used in industry. But the issue with it is pricing. OptinMonster is not free, and it doesn’t offer a free version (or a “freemium” plan). The cheapest plan starts with $14/mo, and in that plan also they have a limit of 2,500 page views.
OptiMonk VS OptinMonster
Features
OptiMonk
OptinMonster
Exit Popup
Available
Available
Pricing
Free Until you get 15,000 (Views/Month)
Starts with $14/mo until you get <2,500 Views
Countdown Timer
A more advanced timer with many option
Limited but necessary option are there
Support
Unlimited Support with free installation on your website
Limited Support
OptiMonk vs OptinMonster
QUICK NOTE:- OptiMonk is cheaper until you get 100,000 pageviews per month. When you hit that limit OptiMonk charges $79/ month, while OptinMonster charges $49/ month (Normally its 80 dollar, but as of now there is a sale in which you can get for $49/mo)
How to show popups when visitors try to leave your website using OptiMonk?
2. Install OptiMonk on your website (You add JavaScript code or just use a plugin)
3. Go to campaigns and click create new & design your exit popup
In here you can click chose a template for the exit popup. On the left side you will see options to filter the templates. Select the template you want in your exit popup.
4. Set the popup to appear on page exit
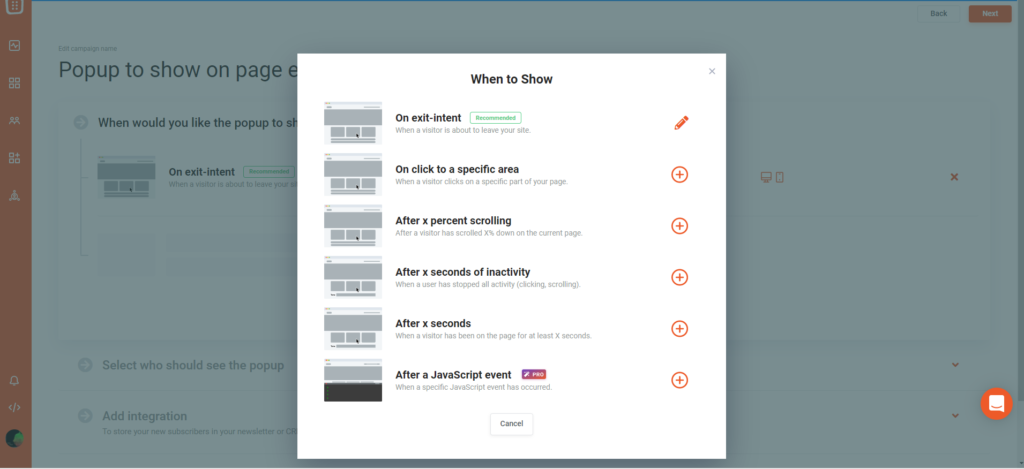
Once you design and click next, you will be prompt with option on when to show the popup. In here ensure that “On exit-Intent” is select.
In here you can also set the option to show the exit popup only when visitors are exiting a specific page in your website.
5. Activate your campaign
Once your finish design & conditions, go to your dashboard and check if the campaign is active. If it is not just toggle button to activate the popup.
6. Check the popup on your website
How to show popups when visitors try to leave your website using OptinMonster?
1. Sign up to OptinMonster and Add it to your website
As I have explained for OptiMonk, when you sign up you will see the code that you need to add to your website. Also OptinMonster has plugin for WordPress and other platform. You will see this information when you sign up.
2. Create your campaign & design it
In this step also, you can select a template as we did before. Design the popup the way you want it to be.
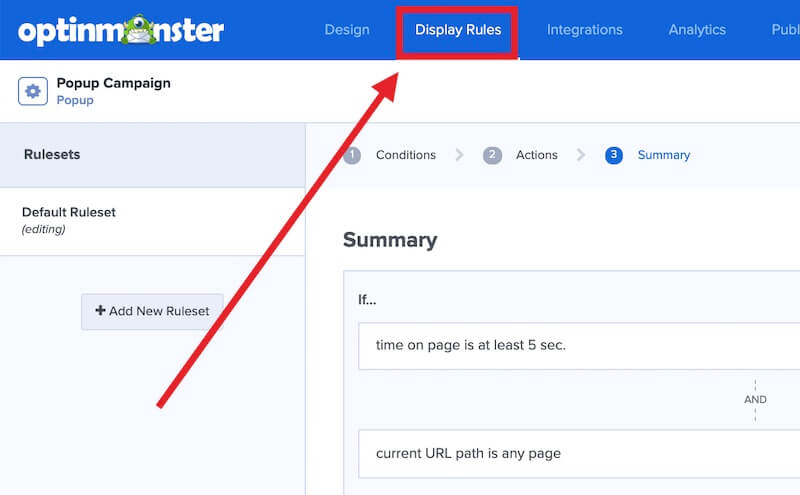
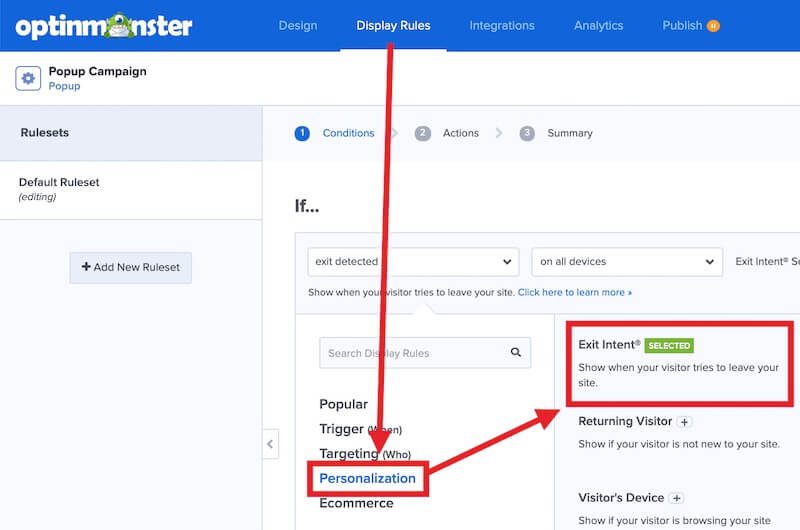
3. Go to the display rules in the campaign
4. Add exit intent as the rule to the ruleset
5. Click the save button & see it live on your website
Show popups when people try to exit your website
Now if you did everything as explained above, you will see the exit popup when you try to exit the website
Why I choose OptiMonk over OptinMonster
Basically its the pricing, and support I get from optimonk. Pricing is a huge factor, but also the personally I can say that support at optimonk is awesome. I have contacted them regarding some of my campaign they were always there to help me. Furthermore, the GUI and simplicity to find features are super simple. So if you ask me for recommendation, Surely I will suggest OptiMonk
Just In case if you want to get all your facebook group links, or the id of the groups, You can use this tool (which will be introduced to later in this blog post) to get those information to a excel or csv file. We have made this process so easy. This tool also extract name, description and even the icon of the facebook groups you have joined.
To Extract facebook group links, run the app and sign in to your facebook account in the opened chrome window. Then on the app, click extract button and see that all your Facebooks group details written to a csv file created at the same directory as program.
What details Can I Extract from facebook groups?
This tool we created have basically 2 option when it comes to extracting facebook groups. The first one only extract the links of facebook groups you have joined to a text (txt) file. We added this option because, this format is required to use in our facebook group poster pro. However, if you are extracting for that program, we recommend to select the option described below.
The second option which can be selected in the tool, will extract name, description, icon photo link and the link to the group itself to a csv (excel) file. This option contains everything we offer to extract in this program. If you want a custom extractor contact us, so we can quote a price.
How to use facebook group extractor?
The facebook groups extractor is a simple software, All you need to do is select the option you would like (we described available 2 options above) and click start. To be honest you would not need a video guide, but here is a full guide video for you.
Video Guide
How to extract facebook group icon?
The software extracts the facebook group icon links to a csv file. The csv file will contain the direct icon as png or jpeg file. It will be a link to icon. Paste the link in any browser and you will be redirected to the icon. Now you can right click and save the icon as an image file.
Manually downloading each icon might be time consuming. With a simple script and the csv file you can automate this task in minutes. At the moment we do not have a separate tutorial for that, but hopefully we will but a one soon.
Click the above Add to cart button to download this software. Right now the software is not for free, But there is a chance you can get it for free. Earn the free points and use those points to pay for the software. This software is eligible for refund, under the terms and condition.
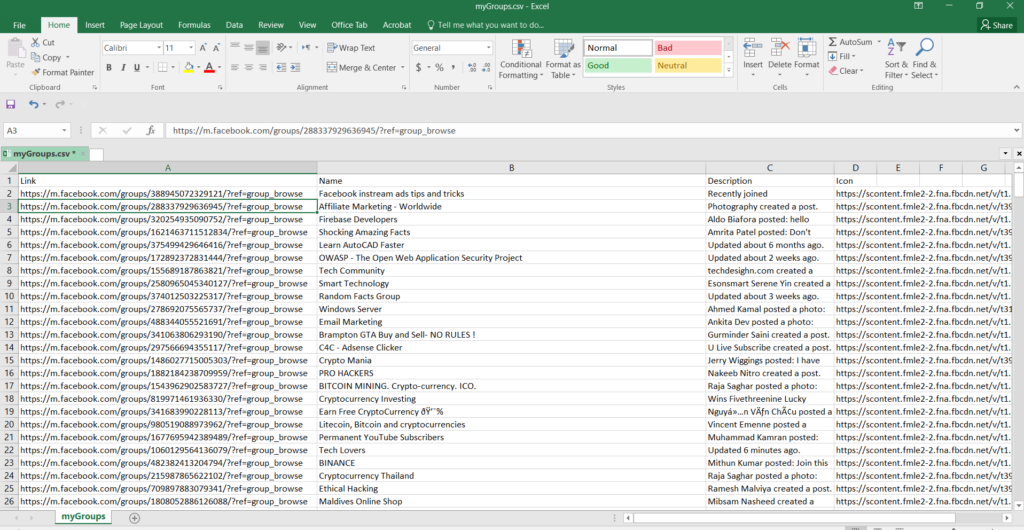
How does the extracted csv file look like?
How to extract facebook groups
The extracted csv file will contains rows and columns with the details of the groups you have joined. This program will only extract the details from the groups you have joined only. Once the program finishes extracting the facebook groups, you can open the csv file and edit the csv to any way you want. For example you can use the find and replace tool in excel to extract the only id of the group by editing the link field.
If you are from a small country like me that doesn’t support PayPal or Stripe, Getting paid online will be a pain in ass. I have researched the internet a lot to accept payments by credit card with a link from clients world wide. There are lot offering this service but somehow I do not meet minimum requirement (country or traffic). So Today I am going to share you a method on how to accept payment by credit card with a link from anyone with a payment card. The only requirement is for you to have a valid passport, you do not need a website or traffic to get approval. For this service we will use a virtual bank called DukasCopy which has a lot of cool features.
To accept payment by credit card go to your account and click request. This will prompt you to enter the amount you like to receive. Once you enter send request, it will give you a link to accept payment by credit card. Share this link and get paid online from anyone with a credit or debit card.
Please note that this request option will be visible only on mobile app. Also check other post from my My Blog
Download DukasCopy Connect App.
How to accept payment by credit card with a link
The first thing you need to do is go to playstore or appstore and download DukasCopy 911 app. Also you can download mobile bank also, But to open you need to use Dukascopy Connect 911 App. The mobile bank app can be used once you complete the registration. On the registration use the code V46-AR8 to get 5 DukasCoin (Can be converted to dollar).
How to open your virtual bank account
How to open a dukascopy account
Now you have successfully installed the 911 app, Open the app and fill the required form. The form will contain basic question, ensure that you write your name and details, as exactly in your passport, because like any other bank, dukascopy bank is going to verify that information.
The last step is the video verification. Don’t panic, its just a two minute call where they take a live picture of you with your passport to verify that you are a real person. Its completely normal for any banking system. They wont be asking much of a question, but they may ask your name to verify that you are not a bot.
What are the features of Dukascopy bank
Now that you have completed all steps, within an hour you will receive an email with confirmation. Now you can login to your dukas account using web or mobile app. The dukascopy will work just like any other bank. You can create visa or master card to spend on online store or even deposit or withdraw from popular services like skrill or neteller.
The best features of dukascopy bank include:
Supports 20+ Currencies
Exchange currencies
Get paid from anyone with a payment card
Deposit or withdraw using Payment card, Bank Transfer, Skrill & Neteller
Virtual Master and Visa Card
Online bank statements
etc…
How to accept payment by credit card with a link
Live Proof
Accepting payment by credit card is very easy in DukasCopy bank. You can request money from anyone by sending a link, But this option can be seeing in the mobile app only at the time of writing this post. You can always visit the web and check if that option is there or not, But for me I couldnt find it.
On your mobile open swiss bank app, In the Accounts tab you should see a button with text of “request”. Click this button enter the amount you want and click send request to generate a unique URL you can send to your customers to start accepting payment by credit card with a link. Please note that this link will expire in 7 days.
Create your virtual Master or Visa Card to spend it
Now that you have learnt how to accept payment by credit card with a link, lets focus on how you can withdraw or spent it. The app has bank transfer option, so you can always transfer this funds to your local bank using swift transfer. But the DukasCopy have a great feature, that lets you create master or visa cards.
On the cards tab select plus button to create your payment card. You can get a virtual card or even a physical card which will be delivered to your address. Furthermore, you can also select whether you want a visa card or master card. Please note that for each card you create, you need to pay about 20 USD as a one time fee.
The Dukascopy bank have integrated the skrill and neteller to their banking system. This mean you can easily deposit or withdraw to your skrill and neteller account in seconds.
A quick important note
As you have just started your dukas account, you will be having a limitation in withdraw or deposit amount. So if you ever run into any limitation send a text to bank using the 911 app we downloaded earlier, so they will increase your limitation.