If your computer has been crashing recently, you may be wondering why and how to fix it. There are a few potential reasons for why your computer may be crashing, but luckily there are also a few things you can do to try and fix the issue. In this blog post, we’ll go over some of the possible causes of why your computer may be crashing, as well as some potential solutions to try. Hopefully, by the end of this post, you’ll have a better understanding on why does my computer keeps crashing. Not to mention that you will be able to solve the common problems that cause your computer to crash in the first place.
Why does My Computer keeps crashing?
It’s no secret that computers crash. Sometimes it seems like they do it for no reason at all, but there are actually quite a few reasons why your computer might suddenly stop working. In this comprehensive guide, we’ll take a look at some of the most common causes of computer crashes and what you can do to fix them. If you’re wondering why your computer keeps crashing, you’ve come to the right place. Here are top 3 of the most common reasons for computer crashes and how to fix them.
Hardware Issues
One of the most common causes of computer crashes is hardware issues. If your computer is crashing frequently, it could be because of a faulty piece of hardware or an outdated driver. To fix this, try updating your drivers or replacing any damaged or old hardware.
Overheating
Another common cause of computer crashes is overheating. If your CPU gets too hot, it can lead to all sorts of problems, including system instability and blue screens of death. To keep your computer from overheating, make sure you have good ventilation and avoid running resource-intensive programs for long periods of time. You can also try using a cooling pad or fan to help cool down your laptop if it tends to overheat often.
Software conflicts
Computer crashes can also be caused by software conflicts. This happens when two programs are trying to access the same file or resource, which can cause instability and ultimately lead to a crash. To fix this , try uninstalling any programs that you don’t use regularly , as well as any third – party applications that might be causing conflicts. You can also try disabling certain features in programs that are known to cause conflicts.
How to fix computer crashing?
Computers crash for a variety of reasons. Sometimes it’s a simple software issue that can be fixed with a restart or an update. Other times, it could be caused by hardware problems or malware. In this comprehensive guide, we’ll discuss the top reasons for computer crashes and how to fix them later. Also if you want you can check this 10 ways to fix computer crash, But only if the rest of ways I mention in this article is not useful for you. The reason for that is because above mentioned ways are little bit technical than the solution mentioned below.
Top reasons for computer crashes
Computers crash for a variety of reasons. Sometimes it is due to hardware failure, while other times it is because of software issues In either case, it can be frustrating when your computer crashes and you are not sure why. This guide will give you some tips on how to fix your computer crashing problem. There are many different reasons why computers crash It could be a hardware issue, such as a faulty processor or bad memory Or, it could be a software issue, such as an incompatible driver or virus. No matter what the cause, there are several things you can do to fix your computer crashing problem.
If you suspect that hardware is the cause of your computer crashing, then you should check all of the connections inside your computer. Make sure that everything is plugged in correctly and securely. You may also want to try replacing parts that seem to be causing the problem. If this does not solve the issue, then you should take your computer to a professional for further diagnosis.
If you think that software is the root cause of your computer crashing, then you should run a virus scan and remove any malware from your system. You should also update all of your drivers and install any missing patches for your operating system. These steps should fix most software-related issues that can cause crashes However, if these do not work, then you may need to reinstall your operating system or contact a technician for further help. But usually when you go to windows updates and update to the latest version, the issue will not be there anymore.
If your reaching a technician online, share some video of the
Computers crash for a variety of reasons. Sometimes it is due to a software problem, while other times it is because of hardware issues. In either case, there are solutions that can help you fix the problem and get your computer up and running again. One of the most common reasons for computers to crash is because of a software issue This can be anything from an incompatible program to a virus or malware infection. If you suspect that this is the cause of your crashing issue, then you should run a virus scan and see if anything comes up. You may also want to try uninstalling any new programs that you have installed recently as they could also be causing the issue.
Another common reason for computers to crash is because of hardware issues. This can include things like bad drivers or faulty components. If you think that this might be the cause, then you should check all of your drivers and make sure they are up to date. You may also need to replace any damaged or defective parts on your computer. If you are still having problems with your computer crashing, then it may be due to a more serious issue such as a corrupt file system or registry In these cases, it is best to contact a professional who can help you fix the problem so that your computer will start working properly again. If its a software problem, then most likely formatting and reinstalling the windows will solve the issue.
Ways to fix a crashed computer
This guide will show you some of the top reasons for computer crashes and how to fix them. We’ll start with the most common causes and work our way down to the more difficult ones. One of the most common reasons for computers to crash is because of corrupt or outdated drivers. Drivers are what allow your operating system to communicate with your hardware. When they are out of date or corrupt, it can cause all sorts of problems. The good news is that updating your drivers is usually pretty easy. You can usually do it right from within your device manager. If you’re not sure how, there are plenty of guides online that can help you out.
Another common reason for crashes is because of malware or viruses as I have mentioned multiple times in this blog post. If your computer gets infected with something, it can really screw things up. That’s why it’s important to have a good antivirus program installed and running at all times. And if you do get infected, make sure you run a full scan as soon as possible to get rid of the problem.
Furthermore, if your computer crash is caused my a software issue, Then installing the latest windows update from your setting might also help. Its something you definitely want to try before worrying over your head.
How to prevent computer crashes
Computers crash for a variety of reasons Often, it is due to an error in the programming code or a corrupted file. There are ways to prevent computer crashes, and there are also ways to fix a crashed computer. Here, we will take a comprehensive look at the causes of computer crashes and how to fix them.
If your computer keeps crashing, there could be several reasons why. Fortunately, there are also several things you can do to fix a crashed computer. Top reasons for computer crashes include outdated software or hardware, corrupt or missing files, and overheating. To prevent your computer from crashing in the future, be sure to keep your software and hardware up to date, run regular maintenance scans, and keep your PC clean and well-ventilated.
If somehow this guide did not solve your computer crashing problem, I recommend you watch the below video which is more in-dept.
A screenshot is an image taken of whatever is on your screen. The Windows operating system has built-in screenshot capabilities, and taking a screenshot in Windows is very simple. There are a few different ways to take a screenshot in Windows. The most common way is to press the Print Screen button on your keyboard. This will take a screenshot of your entire screen. If you only want to take a screenshot of a specific window, you can press the Alt and Print Screen Button.
How to take a screenshot on Windows
Are you wondering how to take a screenshot on windows? Well, you’ve come to the right place In this comprehensive guide, we’ll show you everything you need to know about taking screenshots on your Windows computer. We’ll start by showing you how to take a basic screenshot using the built-in tools in Windows Then, we’ll move on to more advanced methods, such as taking screenshots of specific areas or regions on your screen Once you know how to take screenshots in Windows, you’ll be able to capture any images or information that you need for work, school, or personal use. So let’s get started!
The different ways to take a screenshot on Windows
There are many different ways that you can take a screenshot on Windows. You can use the Snipping Tool, you can use the Print Screen button, or you can use the Alt + Print Screen shortcut ,You can also use the built-in Game Bar in Windows , or you can use third-party software like Greenshot.
How to take a screenshot of your entire screen
To take a screenshot of your entire screen, press the “Print Screen” (often abbreviated to “PrtScn” key on your keyboard). This will take a photo of your screen and copy it to your computer’s clipboard. Open an image editing program like Paint or Photoshop and paste in the image from your clipboard. In most programs, you can do this by selecting “Edit” > “Paste” from the top menu or pressing Ctrl+V on your keyboard. Crop out any parts of the screenshot that you don’t want to save and then save the file to your computer You can usually do this by selecting “File” > “Save As” from the top menu or pressing Ctrl+S on your keyboard.
To take a screenshot of just one window, first make sure that window is selected and open — you’ll see its name at the top of the window when you hover over it with your mouse cursor, Then press Alt+PrtScn on your keyboard. Also when you take a screenshot, you can will get a notification at right end of your screen. If you click that notification, snipping tool application will be open with the image of the screenshot you just captured. Now in this software you can make little edits and also save the screenshot as png or jpeg file.
How to take a screenshot of a specific area
Are you wondering how to take a screenshot of a specific area on your Windows computer? With the help of this comprehensive guide, you will be able to do just that in no time! In order to take a screenshot of a specific area on your screen, you will need to use the Snipping Tool. This is a handy little tool that comes pre-installed on all Windows computers.
To launch the Snipping Tool, simply search for it in the Start Menu or type “snippingtool” into the Run dialog box. Once the Snipping Tool is open, click on the “New” button and then select the “Rectangular Snip” option. Now simply use your mouse to draw a rectangle around the area of your screen that you want to capture. Once you have done this, release the mouse button and your screenshot will be taken!
You can also use keyboard shortcuts to take screenshots on Windows. To do this, simply press the “PrtScn” (Print Screen key on your keyboard This will take a screenshot of your entire screen If you only want to capture an active window, then press “Alt + PrtScn”. Once you have taken your screenshot, it will be saved as an image file in PNG format within the Pictures folder by default. From here, you can then edit or share it as you please!
How to save your screenshot
We all know how to take a screenshot on our phones, but what about on our computers? Here’s a comprehensive guide on how to take a screenshot on Windows. Whether you want to save a picture of something you found online or capture an error message before it disappears, taking a screenshot is always useful. Here’s how to do it To take a screenshot of your entire screen, simply press the “Print Screen” (sometimes shortened to “PrtScn” key on your keyboard). Your screenshot will now be saved in the clipboard. You can then paste it into an image editing program like Paint or Photoshop and save it as a file.
If you only want to take a screenshot of part of your screen, you can use the Snipping Tool To find this program, go to Start > All Programs > Accessories > Snipping Tool. Once the program is open, click and drag your mouse cursor over the area you want to capture. The selected area will appear in blue so you can make sure you got everything you need. When you release the mouse button, your screenshot will be automatically saved as a PNG file in your Documents folder
Taking a screenshot on Windows is quick and easy with these seven simple steps. With just a few clicks, you can capture images from your screen to save or share with others. Give it a try the next time you need to take a picture of your screen!
The easiest method to save your screenshot is by clicking the notification, you get when you take screenshot using snipping. Once you click this notification, the snipping tool application will be automatically opened with your screeen capture that you just did. Now simply press save button at top to save your screenshot.
How to share windows screenshot to Chat apps
Its verry common especially on office environment, your required to take a screenshot and send it to your boss through email, whatsapp or even in microsoft teams. If that is the scenario, As discussed above take the screenshot using snipping tool. The quicking way is to use snipping tool keyboard shortcut, and right after that, you can just paste the image to your chat apps. You do need to save the image.
For more posts like this ensure to visit zaarmtech daily.
There are a lot of methods on how to reset the windows password in the internet. Some of them will be simple as asking asking you to select “forgot password” under sign in screen (which you obviously would have tried) or asking you to edit windows folder in C drive which might be fairly complicated for you OR NOT.
Today I will share the easiest method which is to boot your PC from a usb which we will recommend below and either copy your files or even let the usb reset windows login password for you. We will be mentioning 2 usb drives (free and paid), but we always recommend you to go for the paid one, as it was developed by professional companies. And most importantly its available on amazon itself.
Reset windows password using EZALINK USB (Reccomended)
Windows Password Reset
Let me simply what you need to do reset windows password to 3 step for you.
Insert the USB and shut down your computer.
Change your settings to boot from the USB. (instructions included)
Presto! The software will reset your password with just a few clicks.
As much as this sounds interesting, I know you will have some Question. I will try my best to answer some here, and if you have any question, comment it below.
“What’s An Ezalink?”
Ezalink products combine quality software with over 20 years of combined technical experience.
Every product can be used without the subscriptions that cost you hundreds over time.
Each USB includes printed instructions and extra guidance is available so you’re never left in the dark.
Frequently Asked Questions
Can I use this on multiple devices? Yes
Can this reset a BIOS or Bitlocker Password?
No, only Windows user passwords can be reset, this includes the admin user.
Does this work with the Password Reset Wizard?
No, it works by booting a small program from usb itself. The steps are similar and the instruction has been extended as well.
Does this work if the hard drive is encrypted? Yes, It will work
Features of Password Reset USB
Now if you want this usb click this link or select product below to make the purchase. If you do not want this, keep reading I have another method, that could copy your files.
Reset windows password with help of Hiren’s Boot CD
Hiren’s boot cd works similar to above USB. Instead of trying to reset the password, hiren boot cd will open your device with the operating in the boot cd. Even though I am referring to CD hiren boot cs can be installed to any usb. You can get hiren boot cd from amazon or even download it from their website.
Insert the bootable cd or usb with hiren boot CD installed, and change your boot device to this device. After that once, logged in you can access all hard drives in your PC like in windows and copy the necessary files. After that you are free to format your PC to reset the password. This way at least you wont loose your data.
Reset windows password with CMD
If you are not a tech person, of course with might sound like its difficult, But just follow this article to get it done.
1) Go to troubleshoot blue screen
Navigating to troubleshoot screen can be little different on different PC, So let me break down most common ways
On the password entering screen, Click & Hold “Shift” and select restart
Press power button when manufacture logo appears for 3 times
I know that pressing power button on boot, sounds foolish, but when you crash booting for 3 times, It will automatically navigate to Troubleshoot screen.
Troubleshoot menu
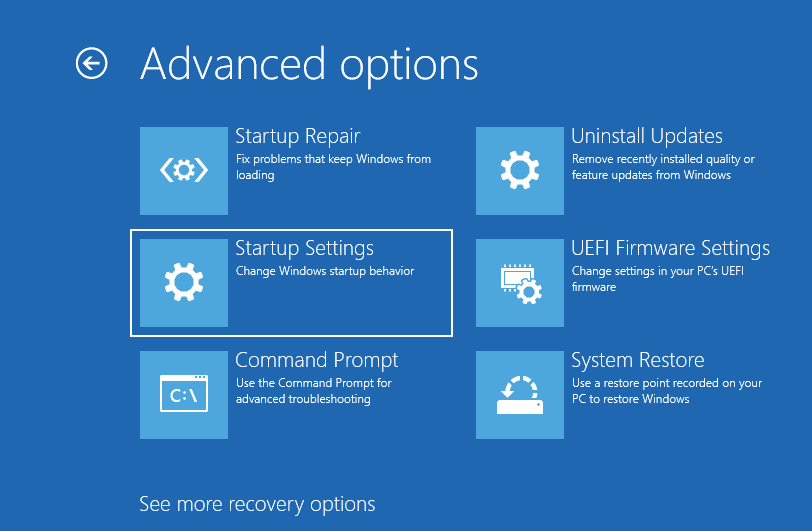
Once you go to Troubleshoot screen, you need to navigate to “Advanced Option”
2) Select Startup Settings
Once you see all the options, on advanced options, Choose the startup settings
Select startup Settings
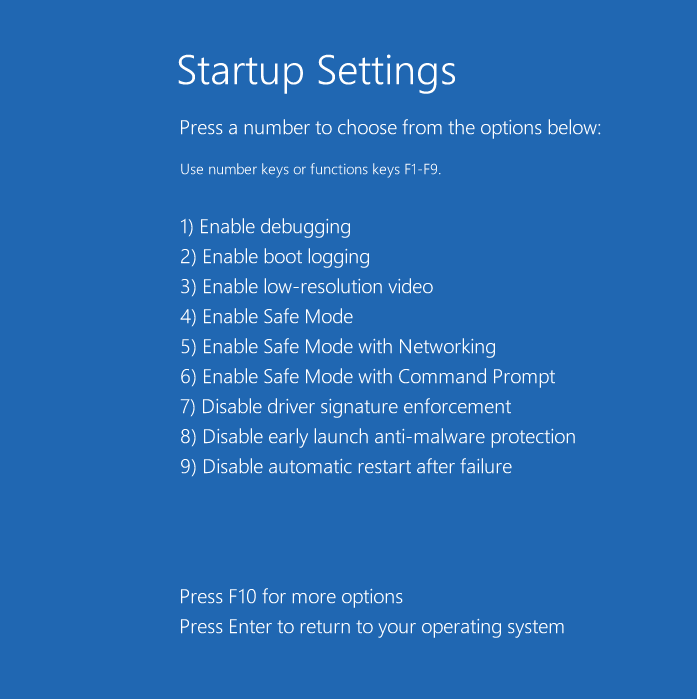
3) Enable the safe mode
Under the startup setting you can see many option, from there select 4th option, which is to enable safe mode.
Enable Safe mord
4) Get available users using CMD
Once you are reboot your PC, you will get a window, opened with cmd or command prompt. CMD is a basic input output typing windows, which is usually black and white. On the CMD type the following command to see available users in your PC.
net user
Net User Command executed on CMD
5) Reset password using CMD netsh command
From the previous account you can get the name of the DefaultAccount, In my case which is “Administrator”. Once you get execute the following command to change the passowrd.
net user Administrator YourP@ssw0rd
Reset windows password using CMD
Once above steps are completed you can restart your machine and login using the password you set above.
First of all its not hacking. We are going to look into how to find wifi password of the networks that you have previously connected on any machine that run windows. I have tested this on windows 10 and is expected to work on any version of windows. Before you want I am going to break it down to 3 categories or methods to see the password of every wifi network you ever connected.
Find wifi password using wireless properties.
Find wifi password using our program.
Find wifi password using cmd
Find wifi password using wireless properties
Image from PCMAG
If you a windows machine you can get into this very easily, without any coding or writing anything on terminal. You just need to follow the steps mentioned below and you are done.
On a Windows PC that’s connected to your Wi-Fi network, do one of the following, depending on which version of Windows is running on your PC:
On Windows 11, select the Start button, type control panel, then select Control Panel > Network and Internet > Network and Sharing Center.
On Windows 10, select the Start button, then select Settings > Network & Internet > Status > Network and Sharing Center.
On Windows 8.1 or 7, search for Network and, then select Network and Sharing Center from the list of results. To learn how to find out which version of Windows you have, see Which Windows operating system am I running?
In Network and Sharing Center, next to Connections, select your Wi-Fi network name.
In Wi-Fi Status, select Wireless Properties.
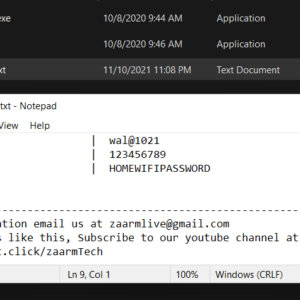
In Wireless Network Properties, select the Security tab, then select the Show characters check box. Your Wi-Fi network password is displayed in the Network security key box.
It might sound like you have to do a lot of thing, But all you need to do is run our program, and it will give you a text file with all your wifi passwords. This is very helpful if you want to get it done very soon.
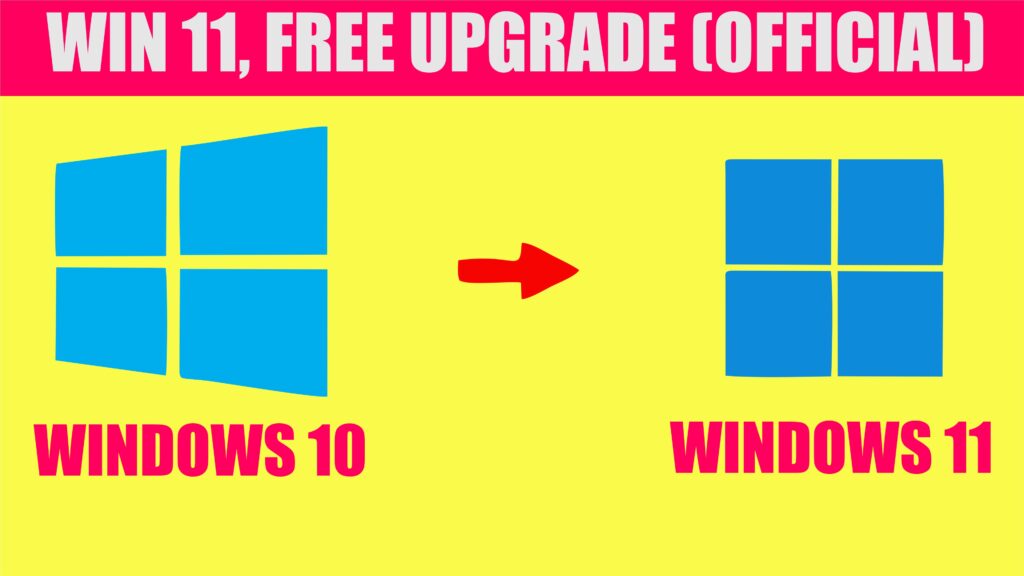
Yes, If you are running windows 10, you can upgrade to windows 11 for completely free. But you have to meet windows 11 requirements for running windows 11. So in this tutorial I will explain how to upgrade windows 10 to windows 11 for completely 0 dollar.
Compatible with DirectX 12 or later with WDDM 2.0 driver.
Display
High definition (720p) display that is greater than 9” diagonally, 8 bits per color channel.
Internet connection and Microsoft account
Windows 11 Home edition requires internet connectivity and a Microsoft account. Switching a device out of Windows 11 Home in S mode also requires internet connectivity. Learn more about S mode here. For all Windows 11 editions, internet access is required to perform updates and to download and take advantage of some features. A Microsoft account is required for some features.
Taken from Microsoft website
Certain features require specific hardware. System requirements to run some apps will exceed the Windows 11 minimum device specifications. Check device compatibility information specific to the apps you want to install. Available storage on your device will vary based on installed apps and updates. Performance will scale with higher end, more capable PCs. Additional requirements may apply over time and for updates.
This tool will check if you meet windows 11 requirements
Going through one by one of this will be very difficult, But with a tool that will determine all this will help. Happily we can install Health PC Check App to see if its a match. This tool will tell you specifically which requirement you are missing to run windows 11. This tool can be downloaded from https://aka.ms/GetPCHealthCheckApp
How to upgrade windows 10 to windows 11 (What I Did)
When I first downloaded and checked if my PC was capable of installing windows 11 it said “Your PC does not meet windows 11 requirement“. I was horrified when I saw this notice. I have a Ryzen 7 and 16 GB RAM and a SSD, But still It said your PC does not meet windows 11. I opened the notice and it said, I am missing TPM 2.0. So I went to windows update, and there was some firmware updates also. SO I went ahead and installed the firmware Update and all other minor updates. After that I went to BIOS setting and under security there was TPM 2.0 with on and off switch. So from there, I enabled TPM 2.0 in my PC.
After restarting PC and running the “check for update” in windows update, I saw an available update named windows-11-someletters. Without waiting for much long I clicked download now button. As my Wi-Fi is slow, It took me exactly 1 hour to finish the download. After downloading It automatically started installation. I was able to use by PC during the installation process. After installation has completed, It nicely prompt me to restart the PC. After restarting just like any update would, I saw the this new look of windows 11. Its amazing. While you are also here how to reduce photo size, save in GB’s.
Microsoft Recommended way to upgrade windows 10 to windows 11
Yes, the Microsoft recommended way to upgrade windows 10 to windows 11 is through windows update as explained above. But what if your PC meet windows 11 requirements, but cannot see the windows 11 update in windows update. From the homepage of windows 11 download on Microsoft , They say to wait until you see the windows 11 update on their. But who are we to wait, Lets find a way.
When you navigate to this page on Microsoft website you can see windows 11 installation assistant. Once you see it, Click the download button and run this software. This software will help you install windows 11. As I installed the the update through windows update, I haven’t tried this method, But I can assure you this will work, as it is mentioned on Microsoft website.
Lets Recap everything we covered on one single video
As of now we can see that QR code is a new trend, Even if you are running a business or non-profit organization you need to generate QR code for various purposes. Most of the online sites and tools offer this service very easily, but all of them are paid when it comes to bulk QR code generator. You might be able create 50 to 100 QR code for free, But when It comes to 1000 or 10 000 QR code, its definitely paid. This is why I have generated a bulk QR code generator software free.
Why is your bulk QR code generator software free?
Lets say that, I love my subscribers and visitors, So I gave them this software for free. The real truth is that I have developed this software using popular programming language known as Python (https://www.python.org/). And as this program will be running on your PC I wont need to pay for anything. It will be using your laptop resources to create QR codes. DONT PANIK, its a very light weight software, so you don’t need to have a higher PC.
Features of bulk QR code generator – a bulk QR code generator software free
Generate unlimited bulk QR codes
Simple .csv upload
Adjust the size of QR code
Change border width of QR code
Select output (Generated QR code Image) filename
Unlimited number of text can be embedded on QR code
Generate QR code in seconds (Very Fast)
A log file printing console (So you can identify if any problem occurs)
Insert fields from .csv (data file) to embedded text in QR code
No additional FEE. (100% FREE)
No ads
Smaller file size
How to generate bulk QR code using this software?
1. Download “A Bulk QR Code Generator Software Free”
As I have mentioned above, You can get this software for completely free. To download this software, you need to fill this form at the end of this page. Once you submit this form, we will send you an email containing the a google drive link, that will contain this software. Just download the software from google drive link. If for some reason, your antivirus software is blocking this program, ensure to disable the antivirus or whitelist this .exe file. If you did not receive the email ensure to check your Spam and promotion box in your mail. Also add admin@zaarmtech.com to your contacts, so can see this mail easily.
Now that the “bulk QR code generator software free” is running successfully, prepare your .csv file. An excel file can be saved as .csv file or even you can use https://docs.google.com/spreadsheets to create your .csv file from scratch.
Yes your column name can contain anything. Your csv file heading can be as many as you want, it also can be as long as you want. And also it can contain as much as detail you want. Lets have a look at my csv file which contain 1000 records.
sample csv file
To upload the csv file, click “Upload CSV” button and chose your csv file. Once you chose the CSV file, you should be able to see records of that csv file inside the program.
3. Adjust the settings to your needs
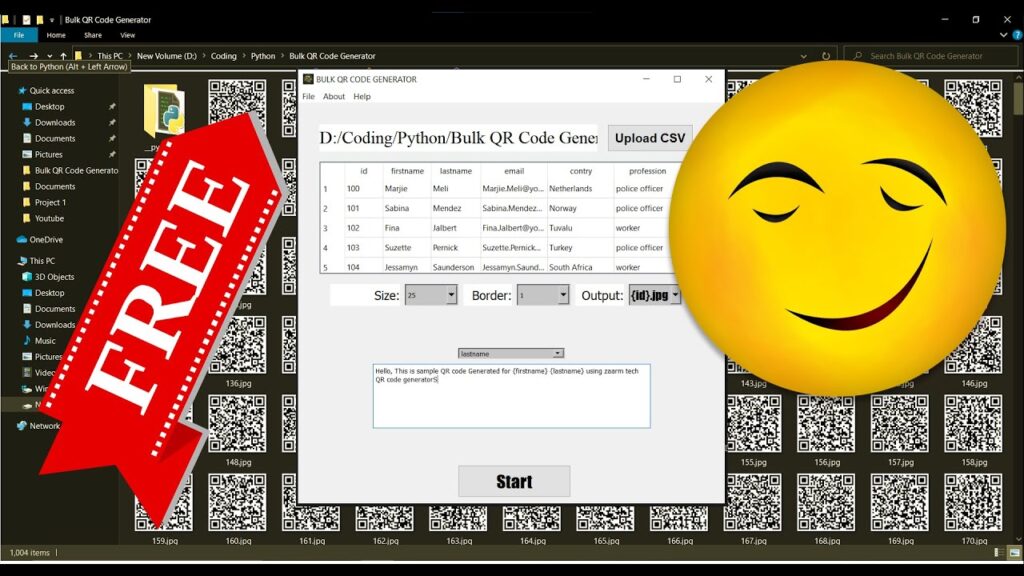
Bulk QR Code Generator
In here, you can customize the QR code by changing its size, border and output file name. Most importantly the bottom input text box contain the text you want to embed in the QR code. In here you can insert dynamic fields from uploaded csv file by using input insert button above or by wrapping the heading of field in csv file with “{}”. For example: {your_field_Heading_name}
4. Generate bulk QR codes at once
Once everything is ready its time to generate QR Codes. To do this simply click start button. Mostly, it will take less than 15 seconds for 1000 records, and the speed varies with number of record and your system specification. Here is the picture of QR codes I generated.
Well, Here is video guide to Bulk QR Code Generator
How to embed different types of links to QR code?
I think you have seen that QR codes open email with pre written subject and body. You might be wondering , “Can I add emails to QR code using this bulk QR code generator software free”?. The answer is YES. Everything that are embedded to a QR code is a text. Even though we don’t have a separate section or option to select email or telephone, you can add it to the QR code like a pro.
What happens if I run into any problem at “a bulk QR code generator software free”
Yes, Error’s happen. It might be on my side or your side. The best approach to solve a issue like that is to use “zaarm tech” community.
Copy the error message from the log of your application (It will look like above), and paste it in the comments of this blogpost or even in the comments of the YouTube video. Its better to ask in the media that is having better engagements. I will my best to give you a reply from comment section as soon as possible.
This program is developed in popular programming language python and is mainly using qrcode and qt5 library. Take a look at the following part of the source code, and if you are interested you can buy the source code as it is not free. After purchasing QR code ensure to check your mail. If you cant see it there, send a message to admin@zaarmtech.com or use Contact Us page. We will send you source code ASAP.
import os
import csv
from PyQt5 import QtCore, QtGui, QtWidgets
import qrcode
import sys
import webbrowser

def resource_path(relative_path):
    """ Get absolute path to resource, works for dev and for PyInstaller """
    try:
        # PyInstaller creates a temp folder and stores path in _MEIPASS
        base_path = sys._MEIPASS
    except Exception:
        base_path = os.path.abspath(".")

    return os.path.join(base_path, relative_path)

class Ui_MainWindow(object):
    def setupUi(self, MainWindow):
        MainWindow.setObjectName("MainWindow")
        MainWindow.resize(800, 778)
        MainWindow.setCursor(QtGui.QCursor(QtCore.Qt.ArrowCursor))
        self.centralwidget = QtWidgets.QWidget(MainWindow)
        self.centralwidget.setObjectName("centralwidget")
        self.UploadCSVBUTTON = QtWidgets.QPushButton(self.centralwidget)
        self.UploadCSVBUTTON.setEnabled(True)
        self.UploadCSVBUTTON.setGeometry(QtCore.QRect(580, 40, 161, 51))
        font = QtGui.QFont()
        font.setFamily("Arial")
        font.setPointSize(14)
        font.setBold(True)
        font.setWeight(75)
        self.UploadCSVBUTTON.setFont(font)
        self.UploadCSVBUTTON.setCursor(QtGui.QCursor(QtCore.Qt.PointingHandCursor))
#These are the first few lines of the software, Purchase the full source code below