If you are a graphics designer, At some point in your life you need to create cards. It might be student cards, staff cards or even another kind of card that contains images / photo’s in it. If you are a corelDraw or Illustrator designer you might be not have option to do photo merge. This tutorial explain how to do print merge with photo. Its 100% Free
How to do print merge with photo / Images
As explained in the above video, In the latest version of coreldraw, you dont have this feature. For this to work you need to export your artwork in corel draw as eps file. This way the quality of your atwork will be intact. After this you can import your design in adobe Indesign without loosing anything in your artwork. After that perform a simple data merge using indesign. If you have any doubt ensure to comment it below, so we can fix it together.
Simple Print merge in CorelDraw
Tutorial on Print merge Corel
An Excel document with CSV design (Example: abc.csv)
Stage 1: Open the Corel draw. Then, at that point explore to File > Print Merge > Create/load Print Merge.
Stage 2: Print Merge Wizard exchange box will be shown. Select “Import text from a document or an ODBC information source”, then, at that point click on Next button.
Stage 3: Locate the document source, which is the Excel record inside CSV design. Snap on “Peruse” symbol and select the document.
Make a point to choose the record types as “Comma Separated File (*.csv)” starting from the drop menu close to File name.
Stage 4: Once you select the document, press Next button. An exchange box will show up inside data from the Excel record. If it’s not too much trouble, twofold check to guarantee you are utilizing the right information. Then, at that point, press Next.
Another discourse will seem to show all information from the Excel document. Press Next when you wrap up really taking a look at the information.
Stage 5: Finish the wizard box.
Stage 6: From Corel Draw screen, you currently can get to Print Merge toolbar as displayed beneath.
From the toolbar, select the field you need to add to your plan and snap on “Insert Print Merge Field”. The field is then added as a text object (Repeatedly measure with different fields).
Stage 7: Click on Merge to New Document. You presently can print with your printer with all printing objects allotted on the plate.
How to print merge with photo in CorelDraw (PAID METHOD)
It is said that E Cut at Macro Monster can do print merge with photo’s. However, Personally I did not try this and I do not recommend this. Why should we pay for a tool like this, when it is already available for free. CorelDraw is a vector designing tool. So it is acceptable to not have this print merge with photo feature. As I mentioned in the above video, you can import CorelDraw design to InDesign and perform the data merge which will contain the image and will be properly displayed on the design.
Well I cant pay But I am a developer, Can I develop a one like that.
The short and sweet answer is YES. If you are a developer you can develop macro’s that will perform the print merge and display the images. But to make it perfect you need a lot of coding. To be honest it depend on design. If you go to YouTube and searched for macro tutorials in CorelDraw, you will find something to start with. But you might need to adjust the coding a bit so, your macro will perform the print merge in the way you want. If you search the web, you might find some macro, but these macro’s will be most likely outdated. So you need to adjust the code to work it with the version of CorelDraw you are using.
HOW TO POST TO MULTIPLE GROUPS ON FACEBOOK IN ONE CLICK
how to post to multiple groups on facebook
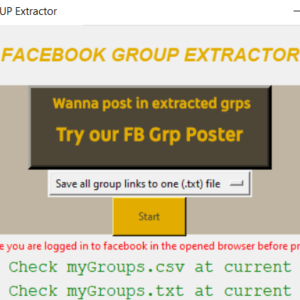
Its time to post for me to show you how to post to multiple groups on facebook on one single click. All you need to do is prepare the list file with facebook groups and this free tool will post to multiple groups on Facebook. Dont worry, we will show you how to get links to all your facebook groups and how to filter the list to your needed groups. This method will get traffic to your links in few clicks. If you have any question about this free tool make sure to comment it below and if you want to take it to the next level make sure to Contact Us
Method 1 On how to post to multiple groups on facebook
This video is about how to post to multiple Facebook groups at once 2021. As of February 2021 Facebook have removed this feature, so here is a automated software that will post to multiple Facebook group at once on 2021.
To do this first of all, you need to watch the video above. Once you understood how to post to multiple groups using the software click the link below to download Facebook groups software.
The Social Auto Poster software is not created by US and some of the users have found that this software is difficult to post to multiple Facebook groups at once, So I have created a new software (Which I will explain in below). However you can download Social Auto Poster software and give it a try. Ensure to check up to bottom of this post to see our facebook post poster.
This software is outdated (still works with chrome V89), and we recommend to use software below (Method 2)
[contact-form-7 id=”614″ title=”Social Auto Poster (Including FB Grp Poster)”]
Method 2 on how to post to multiple groups on facebook (New Method)
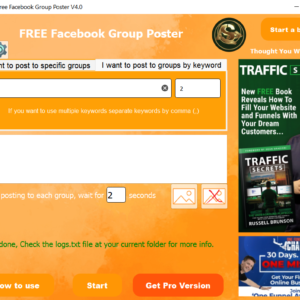
The above video on Facebook group poster uses little outdated software, This is why I decided what if I coded a program like this on my own. So I started the Facebook group poster project on programming language PYTHON and created a Facebook grp poster with much more features and it is so simple. This program can
Post Text
Post Multiple Images
Post Multiple Video’s
Simple txt file upload
Etc…
Now if you want to know how to use this software check the video below. If this guide helps make sure to subscribe to our YouTube channel.
As you can see in this software, You can post to multiple Facebook groups with photo or even video’s. But the thing to note is that these are the automation scripts I have created based on the Facebook website. In future if they change the coding on the website we might need to update the program as well. This is why I decided to share the source code of my python script. However, if you don’t know the coding, no need to worry just download the program using below form and run it.
Pro version and free version
The Facebook group poster designed with us will have two version, A free version, that you can download without providing any payment details. The paid version need to be purchased for $15. However, there are always sale’s going at zaarm tech, so make sure to grab it, while it is in sale. Also you can get coupon code by completing specific task at zaarm tech. Make sure to follow us at http://facebook.com/zaarmtech and http://instagram.com/zaarmtech to get coupons for the products we sell at http://zaarmtech.com
Recently, I have added all features in pro version to free version. The free version will have limitation. However, you can try the free version before purchasing the full version. If you cant to get some more info on pro version and a coupon code watch below video.
Why stop with free version, What’s new in PRO version
Recently, I have added all features of pro version to the free version. Right now, the only limitation in free version is that it will limit the number of groups you can post. We want to let you try the software before purchasing.
Can I buy traffic to my social media?
Basically the reoson you need a facebook group poster is to get traffic. And more importantly free traffic. If you want to achieve this without using facebook groups, the most common thing is to check The first and most important thing is not to buy any just random bot traffic. You could use different google ads or Facebook ads to drive traffic. If you want a cheaper one check our article on How to buy social media marketing? Cheapest SMM
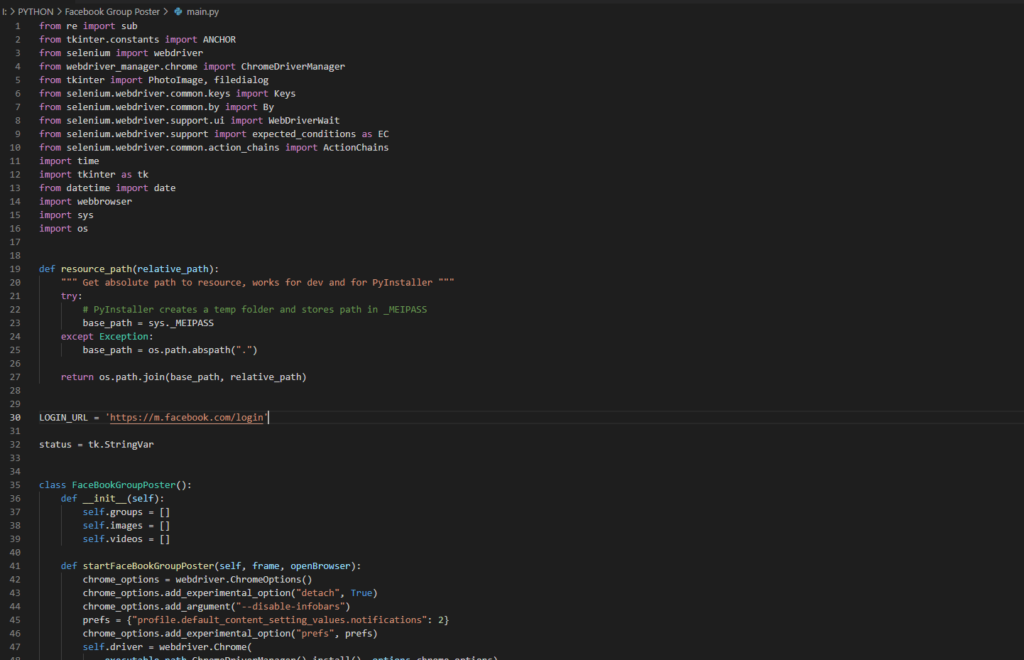
The Source Code
This code is written in program language known as python. So to run this script you will need Download Python and setup your PC. You might also want to download some code editor if you want.
FB GROUP POSTER THUMBNAIL
To run the above code ensure your have python installed and added to path. To run the script you need to open CMD and type “python ‘pathtopythonfile.py'” and hit enter. Once again you dont need to do this if you are not a python developer. You can always download .exe
how to reduce multiple photo size at once without losing quality
How to reduce multiple photo size at once without loosing quality?
To achieve this navigate to bottom and click the download button. This will open a website that have download link of software that we are going to use. From there you can install the software for completely free. Open the software and drag all the photo’s you want to compress without loosing the quality. This will show a alert saying that do you want overwrite the compressed photo or create a new folder to store the compressed photo’s. Select the option you prefer and all is done. Now all of the those photo’s you dragged to software will have reduced file size and quality will remain same. Isn’t it easy.
This have proven quite useful for bloggers to photographers. Bloggers want a smaller size of image because it will load faster on the web, hence decrease page loading time. Photographers take high quality photo which were going to take a lot of storage. So even if they drag and drop those thousand of photo’s they will save GB’s of storage from their storage devices. While you are here at zaarmtech make sure to check our tutorial on LATEST TRENDS IN INFORMATION TECHNOLOGY
What’s this software that we are going to use?
JPEG Mini is a handy application for various field users mainly photographers, photo editors, designers those who have daily workflow of images with JPEG formats. The application offers users a tools to minimize or reduce the size of their JPEG file without losing image quality or pixel integrity. Through this way, users can save a ton of space in their drives, memory cards or USB drive.
Get the smallest picture record size without compromising high-quality or converting your workflow. The best thing about them is that as they are having a desktop application. You don’t need to upload anything to cloud. Its all done natively on your PC. All you need to do is get the Software.
Simple and easy to use especially with drag and drop.
Fastest operations.
Compress JPEG formats.
Save more hard drive space.
Modern wonderful graphical user interface.
Support different Cameras.
Many modes for optimization.
The license of JPEGmini is valid for lifetime, and offers update for 1 year. As like software’s there are full version for free on sites like GetintoPc . However to support developers I recommend you to purchase it through their website. They have a one time fee of 59 dollar that will give you the full access to the application for lifetime.
Are you a lightroom or photoshop fan?
If you use lightroom or photoshop, you can add their plugin to the software. This way you can perform JPEGmini functions directly from your photoshop or lightroom.
Yes, Its difficult believe, So watch this video of me trying the software
how to reduce multiple photo size at once without loosing quality
There are other software or online tools like this, but if you are planning to get a easy and bulk processing software then I recommend JPEGmini pro for you.
The JPEGmini pro Suite photo Optimization software program is a image resizing utility designed to reduce average file sizes without sacrificing photo nice, resolution, or format. Capable of decreasing your JPEG record sizes through as much as 5x, this tool affords an efficient solution for releasing up hard power space and shortening add instances.
This pro Suite model of JPEGmini utilizes all processing cores for your laptop for faster resizing and exporting performance and may assist JPEG pics as much as 128 megapixels. A plug-in for each Adobe Photoshop and Lightroom is covered, which integrates into your workflow, processing each picture when you export it from either software.
Whats windows server? What you are seeing above is a picture of many servers. It might be running any kind of server. But today we are going to cover basic of windows server which is mainly used by small business and organazations.
Windows server is a operating system released by Microsoft. The windows server is mainly used by offices to manage their employees. The latest version for windows server at the moment is windows server 2019. It includes a lot of features and helps you manage the users pc’s.
Windows server is actually useful because of its user friendly interface. Most probably any administrator who can manage windows 10 also can manage windows server. In windows server you can create something called active directory users and join those users to the domain you use. The important part of this is that after joining the windows server you can manage that particular PC with the server manager. You can impose any group policy to the group of users want. This includes restricting their some permission and setting a default background for the users.
Whats DHCP in windows server?
DHCP stand for Dynamic Host Configuration Protocol. That this does is that whenever you connect a pc to the domain it will give the ip address based on the policies that you created. So we don’t need to configure each and every pc. You can give a specific ip based on the users mac-address. When you can the clients ip address you can perform lot more operation like limiting bandwidth and all.
What are the features of windows server?
Let me list our the features of windows server and explain them later in this post
Windows Admin Center
Enhanced Security
Containers
Wlan
Active Directory
System Insights
I could list out endless features of windows server, but let me tell you what it do briefly. When you try to login to your windows PC at office, unlike home it will ask both for username and password. This is managed by windows server. And when you try to connect to office Wi-Fi, you are asked to enter identity and password. So everyone enter their own identity and password. When you try to access files on office server, some are restricted and other are not restricted. All these are most likely implemented by windows server.
What information can IT admin see, Will they see what I have wrote for my password?
Just like any authentication provider, Windows server also keep its users password encrypted. This mean your IT admin also cannot see what you have entered as password, but they will be able to change your password or disable your password at any time.
When you browse wifi using the credentials of windows server, IT admin will be able to track the network usage. They even might log the websites you are visiting. But they also wont be able to see what your texts or email sent IF YOUR WLAN NETWORK IS ENCRYPTED
Every one want a better look for their pc. If its a folder that we created then we can change the icon of that folder. In the following steps i will show you that!
STEPS:
1.Right click on the folder you wish to change icon
2.Go to properties at the bottom
3. Again go to customize.
4. Now you can see how to change the icon buttom
5. Click on that and select the preffered icon
6. Press “OK” or “APPLY”
7. Now you have successfully changed the icon of the folder
Lets watch it in real time
Watch vedio tutorial
How do I change multiple multiple folder icon at one?
Yes it is possible to change multiple folder at once. The easiest way to achieve this is to use a software like https://foldermarker.com/en/ . These tools will change the many folders icon at once. If you are a developer, you can also code a program to change the icon of files.
Features of folder marker
Key features:
Change a folder icon with one click
Label folders by priority (high, normal, low).
Change a folder’s entire color (or shade of color – light or dark) any time you like! Your choice!
Integrated into your Windows Explorer! Right-click on any folder and folder maker will be there
Can change the Network folder icon.
With Folder Marker you also have two additional options for folder icon changes: “Make customized folder distributable” (portable) and “Apply selected icon to all subfolders”
Folder Marker’s menu can contain category submenus.
Add your favorite icons and label folders with them. It’s easy!
several folders at once
Assign an icon to a folder from: ICO, ICL, EXE, DLL, CPL or BMP file
Supports 32-bits icons
and
Folder Marker can change the icons of ALL folders in your system. This is the favorite feature of customization lovers. Get rid of monotony! Make your folders your own!
And what’s more – Folder Marker has a FREE edition with basic functions!
Another software I recommend for you to use is https://www.sordum.org/10124/folder-painter-v1-3/ . The folder painter software is similar to folder marker, So once you install it, It will be pretty straight forward.
Fonts can be a very important thing when it come to visual. In windows 10 you can easily view the fonts you have installed and uninstall unwanted fonts easily.