Recently I have added google admob native ads to my react native Toolkit Box application. I want make these ads appear on different place of my flatlist’s. That way I can maximize CTR for my admob apps. But when I start thinking about how to render ads in flatlist, I was out of idea. But when I start coding it was a piece of cake. So basic question here is how to add admob ads to flatlist.
I will simply this process easily in a few steps
- Add react native admob native ads to your application
- Create a component for your native ad
- Add ads field to your flatlist data array
- Render native ad on flatlist
Install react native admob native ads
The first thing you need to do is add your ad library to application. I am using react native admob native ads library, but you can use any library you need for your ad’s.
If you are using react-native >= 0.60 you just need to do run a simple command in your project directory
npm install react-native-admob-native-ads --saveor if you are using yarn run
yarn add react-native-admob-native-ads
After installing the react-native-admob-native-ads you also need to install react-native-vector-icons
npm install react-native-vector-icons
or
yard add react-native-vector-icons
Please note that you need to setup react-native-vector-icon, for that use this guide.
Lets setup react-native-admob-native-ads
First of all, for this you need admob account. If you don’t have an admob account got to this page and sign up for admob.

On this page add your and go to App Setting, here you can find your app id, which we will need for our next step. In addition to ensure, that compiled sdk version is 28 or higher in your app/build.gradle
AndroidManifest.xml
You need to add the meta data for admob in your androidmanifest.xml as shown in below
<manifest>
    <application>
        <!-- Sample AdMob app ID: ca-app-pub-3940256099942544~3347511713 -->
        <meta-data
            android:name="com.google.android.gms.ads.APPLICATION_ID"
            android:value="ca-app-pub-xxxxxxxxxxxxxxxx~yyyyyyyyyy"/>
    </application>
</manifest>
In here only thing you need to change is android:value, DO NOT CHANGE android:name eventhough, its ending with ‘APPLICATION_ID’. For android:value, paste your app id from admob, which we noted earlier.
build.gradle at project level
Please note that this project level build.gradle is located under android folder at android>build.gradle. It’s not the one under android>app>build.gradlew
buildscript {
    repositories {
        google()
        mavenCentral()
    }
}

allprojects {
    repositories {
        google()
        mavenCentral()
    }
}
Ensure that you include both google() and mavenCentral()
build.gradle at app level
This is the build.gradle located at android>app>build.gradle
dependencies {
  implementation 'com.google.android.gms:play-services-ads:20.4.0'
}
I swear, that all for setup, Lets get to real coding. Also while you are here check my other tutorial on Execution failed for task ‘:app:mergeDexDebug’ | execution failed for task appmergedexdebug and Solved: Execution failed for task ‘:app:installDebug’ | execution failed for task app installdebug
Prepare your ad component.
Now this is the part to design the native ad to display on flatlist. Here, you can design whatever, you want to display. As I use react-native-admob-native-ads, I will use the component from their, library but for you, design it anyway you want using whatever library want.
ListAdView.js
import React, {useEffect, useRef, useState} from 'react';
import { Dimensions, StyleSheet} from 'react-native';
import NativeAdView, {
  CallToActionView,
  IconView,
} from 'react-native-admob-native-ads';
import {List, useTheme, Avatar} from 'react-native-paper'


const ListAdView = () => {
  const [loaded, setLoaded] = useState(false);
  const [headline, setHeadline] = useState('Zaarm Tech')
  const [tagline, setTagline] = useState('visir zaarmtech.com for more things like this')
  const nativeAdRef = useRef();

  const {colors} = useTheme()

  const onAdFailedToLoad = event => {
    console.log('AD', 'FAILED', event.error.message);
  };

  const onAdLoaded = () => {
    console.log('AD', 'LOADED', 'Ad has loaded successfully');
  };

  const onNativeAdLoaded = event => {
    console.log('AD', 'RECIEVED', 'Unified ad  Recieved', event);
    setLoaded(true);
    setHeadline(event.headline)
    setTagline(event.tagline)
    if (event.images){
        setImagUrl(event.images[0].url)
    } else {
        setImagUrl(event.icon)
    }
  };

  useEffect(() => {
      setLoaded(false);
      console.log("Loading the ad")
      nativeAdRef.current?.loadAd();
    return () => {
      setLoaded(false);
    };
  }, []);

  return (
    <NativeAdView
        ref={nativeAdRef}
        style={styles.listItem}
        adUnitID="ca-app-pub-176486971860xxxxx/5xxxxxxxxxxxxxxxxx"
        onAdLoaded={onAdLoaded}
        onAdFailedToLoad={onAdFailedToLoad}
        onNativeAdLoaded={onNativeAdLoaded}
        refreshInterval={60000 * 2}
        videoOptions={{
          customControlsRequested:true,
        }}
          >
          <List.Item
            title={headline}
            description={tagline}
            left={props => loaded ? <IconView style={{ width: 30, height: 30, marginRight: 15, marginTop: 20, marginLeft: 0 }}
                  /> : <Avatar.Image size={30} style={{ width: 30, height: 30, marginRight: 15, marginTop: 20, marginLeft: 0 }} source={{uri: 'https://pbs.twimg.com/profile_images/1252454928355901440/VJVHAmeA_400x400.jpg'}} /> }
            right={props => <></>}
            />
            <CallToActionView
                    style={{
                      height: 1000,
                      width:  Dimensions.get('window').width + 100,
                      paddingHorizontal: 12,
                      backgroundColor: 'transparent',
                      position: 'absolute',
                      borderRadius: 5,
                    }}
                    textStyle={{ color: colors.primary, fontSize: 1 }}
                  />
      </NativeAdView>
  );
};

const styles = StyleSheet.create({
    listItem: {
        margin: 10,
        borderRadius: 4,
        justifyContent: 'center'
    },
})

export default ListAdView;
The ad unit in the above example need to be replaced by your own ad unit id. you can obtain an ad unit id by navigating to Ad Unit section under your app in admob. Ensure to select Native advanced ad format as we are using that kind of ad.

One more thing in above example is that I have used short form (? & 🙂 to render static element if for any reason my ad has failed to load.
Add ads data array to flatlist
const dataForFlatList = [{id: 1, details: 'Flatlist Item 1},{id: 2, details: 'Flatlist Item 2}]
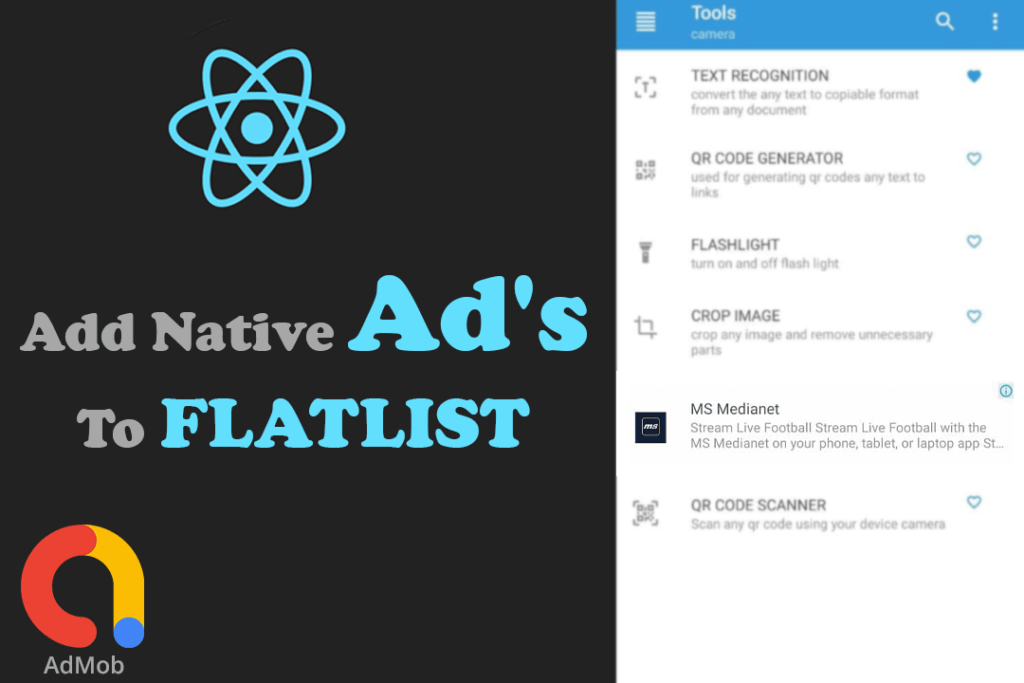
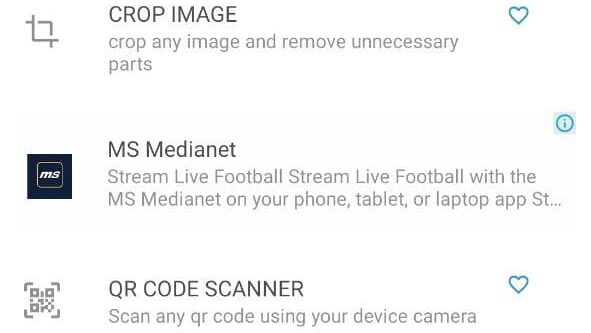
dataForFlatList.add({id: 'ad})As you can see, we are adding a custom item to data array. It need not contain much fields, just one field to identify its the ad object. But if we do this way, it will always add ad to bottom of the flatlist.
This code below, will insert the ad object to random position of the array. It’s just basic javascript.
var temp = [{id: 1, details: 'Flatlist Item 1},{id: 2, details: 'Flatlist Item 2}]

var randomIndex = Math.floor(Math.random() * temp.length)
temp.splice(randomIndex, 0, {id: 'ad'})
setTools(temp);
Render admob ads on the flatlist
The last part on How to add native ads to flatlist on react native is to render these ads on the flatlist itself. This is the most simple task in the whole application. On the render component of your flatlist, Just add a simple if statement to check if that id of the received object is ‘ad’ or not. Based on that you can render your flatlist component or your
if (item.id === "ad") return <ListAdView />

return ( <YourCustomComponentThatDisplayOnFlatList /> )
So basically this is the logic. Before your main return statement add a if statement to display ad, based on the id we added earlier.
Below is the full code of Component that renders for each object in array and also FlatList
<FlatList
        data={Tools}
        extraData={IsRefreshing}
        onRefresh={() => onRefresh()}
        refreshing={IsRefreshing}
        ListEmptyComponent={()=> (<EmptyDatabase navigation={props.navigation} route='Favorite' />)}
        renderItem={({item})=> <ToolList item={item} favorite={Favorite} navigation={props.navigation} />}
        keyExtractor={item => item.id.toString()}
      />
The Component
import React, {useState, useEffect, useRef} from 'react'
import { openDatabase } from 'react-native-sqlite-storage';
import {List, Button, useTheme, TouchableRipple} from 'react-native-paper'
import ListAdView from "./ListAdView";
import ErrorMessage from './ErrorMessage'

const ToolList = ({item, favorite, navigation}) => {
    const errorRef = useRef()
    const [FavoriteIcon, setFavoriteIcon] = useState('heart-outline')
    const [Favorites, setFavorites] = useState([])
    const {colors} = useTheme()
    useEffect(() => {
        if (favorite.length > 0){
            for(let i=0; i < favorite.length; ++i){
            if (favorite[i].item_id == item.id){
                setFavoriteIcon('heart')
            }
        }
        }
        setFavorites(favorite)
    }, [])

    const toggleFavorite = () =>{
        if (Favorites.length > 0){
            for(let i=0; i < Favorites.length; ++i){
            if (Favorites[i].item_id == item.id){
                removeFavorite()
            } else{
                addFavorite()
            }
        }
        } else {
            addFavorite()
        }
    }

    const addFavorite = () => {
        const db = openDatabase({ name: 'tools', createFromLocation: '~/tools.db', location: 'Library'});
        try {
            db.transaction(function (tx) {
            tx.executeSql(
                `INSERT INTO FAVORITE (item_id) VALUES (?)`,
                [item.id],
                (tx, results) => {
                    if (results.rowsAffected > 0) {
                        Favorites.push({"item_id": item.id})
                        setFavoriteIcon('heart')
                    } else {
                        errorRef.current.onToggleSnackBar()
                    }
                }
            );
            });
        } catch (error) {
            errorRef.current.onToggleSnackBar()
        }
    };


    if (item.id === "ad") return <ListAdView />

    return (
        <TouchableRipple
            onPress={() => navigation.navigate(String(item.id),{name: item.name})}
            rippleColor="rgba(0, 0, 0, .32)"
        >
        <>
        <List.Item
        title={item.name.toUpperCase()}
        description={item.description}
        left={props => <List.Icon {...props} icon={item.icon} />}
        right={props => <Button {...props} color={colors.primary} icon={FavoriteIcon} onPress={() => toggleFavorite()}></Button>}
        />
        <ErrorMessage ref={errorRef} errorMessage='Cannot add this item to favorite' />
        </>
        </TouchableRipple>
    )
}

export default ToolList;
Purchase the full app
This tutorial is based on an app developed toolkit. If you go and download this app, you can see that I have implemented some advance feature’s in react native. So if you want you can purchase this product on our website.
-
Product on sale
 Toolkit | Many Tools to Include In any React Native ApplicationOriginal price was: $ 120.00.$ 99.00Current price is: $ 99.00.

