The PDF is something that we need to deal on a regular basis. However these when it comes to converting a PDF to Image on android I have seen people struggling. This is why I decided to break down the process into a simpler way. The first thing is that some mobile photo implemented this feature on production and others did not. There are 2 common ways:
With any pdf reader (without installing an app)
Using toolkit application (installing a app)
PDF to IMAGE without installing an app
This might sound surprising, But there is a way to convert the PDF files into image file without having to install any application. Yes as I have mentioned above some mobile phone manufactures implement a feature to convert pdf to image on android. This option can mainly found when you open a PDF file using system default PDF reader. If you cant find this option, don’t worry there is a work around.
Even though your mobile not have this option, you can easy open the pdf file and zoom to that area of the presentation you would like to make a image, and screenshot this area. Mostly you can take screenshot by pressing volume up button and power key. I know that in some documents, the quality wont be great, This is why we have a second method down below using our mobile app toolkit.
PDF to IMAGE using our toolkit box
The toolkit box is an application designed by us for everyone with simple android tools, that you need daily.
These tools will help you to perform a lot of tasks by using your mobile phone. All of the tools are native, means that this is not a web application, and operations are performed natively and its super fast. Convert between different file types and even recognize the text from printed material in offline mode with the tools in this application. The most important feature in this app is that you can save the files generated by these tools to your device easily.
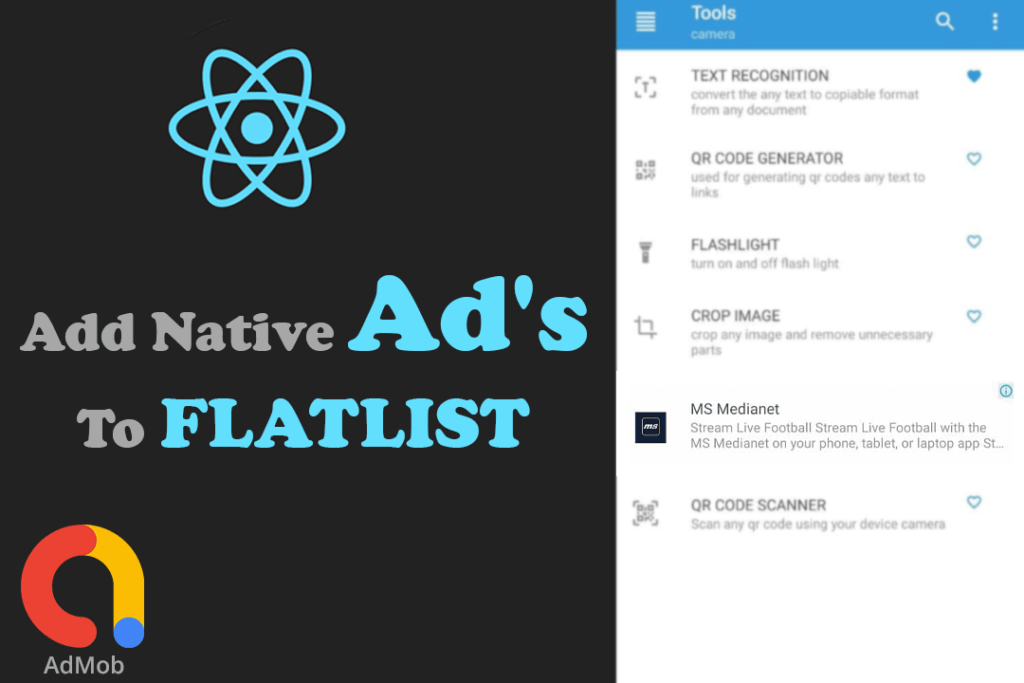
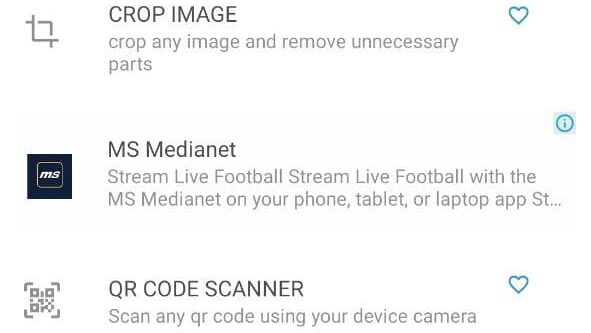
These tools include => Image to PDF Convertor => PDF to Image Convertor => Speed Test => Text to Speak => Stopwatch => Device Info => Unit Convertor => Time Convertor => Day Calculator => Text Recognition => QR Code Generator => Flashlight => Crop Image => QR Code Scanner
All of these tools are full offline, Means that you do not need internet connection to use these tools.
The first thing is for you to head over to playstore and download this application. After downloading open the tool and select PDF to IMAGE option.
Convert PDF to Image on Android
As you can see in the above screen, all you need to do is select the PDF file that you wanted convert to image and it will be saved to my files folder on the application in image format. It is simple as that.
The video guide on how to convert pdf file to image
Recently I have added google admob native ads to my react native Toolkit Box application. I want make these ads appear on different place of my flatlist’s. That way I can maximize CTR for my admob apps. But when I start thinking about how to render ads in flatlist, I was out of idea. But when I start coding it was a piece of cake. So basic question here is how to add admob ads to flatlist.
The first thing you need to do is add your ad library to application. I am using react native admob native ads library, but you can use any library you need for your ad’s.
If you are using react-native >= 0.60 you just need to do run a simple command in your project directory
npm install react-native-admob-native-ads --save
or if you are using yarn run
yarn add react-native-admob-native-ads
After installing the react-native-admob-native-ads you also need to install react-native-vector-icons
npm install react-native-vector-icons
or
yard add react-native-vector-icons
Please note that you need to setup react-native-vector-icon, for that use this guide.
Lets setup react-native-admob-native-ads
First of all, for this you need admob account. If you don’t have an admob account got to this page and sign up for admob.
AdMob Home Page
On this page add your and go to App Setting, here you can find your app id, which we will need for our next step. In addition to ensure, that compiled sdk version is 28 or higher in your app/build.gradle
AndroidManifest.xml
You need to add the meta data for admob in your androidmanifest.xml as shown in below
In here only thing you need to change is android:value, DO NOT CHANGE android:name eventhough, its ending with ‘APPLICATION_ID’. For android:value, paste your app id from admob, which we noted earlier.
build.gradle at project level
Please note that this project level build.gradle is located under android folder at android>build.gradle. It’snot the one under android>app>build.gradlew
Now this is the part to design the native ad to display on flatlist. Here, you can design whatever, you want to display. As I use react-native-admob-native-ads, I will use the component from their, library but for you, design it anyway you want using whatever library want.
The ad unit in the above example need to be replaced by your own ad unit id. you can obtain an ad unit id by navigating to Ad Unit section under your app in admob. Ensure to select Native advanced ad format as we are using that kind of ad.
How to find ad unit id
One more thing in above example is that I have used short form (? & 🙂 to render static element if for any reason my ad has failed to load.
As you can see, we are adding a custom item to data array. It need not contain much fields, just one field to identify its the ad object. But if we do this way, it will always add ad to bottom of the flatlist.
This code below, will insert the ad object to random position of the array. It’s just basic javascript.
The last part on How to add native ads to flatlist on react native is to render these ads on the flatlist itself. This is the most simple task in the whole application. On the render component of your flatlist, Just add a simple if statement to check if that id of the received object is ‘ad’ or not. Based on that you can render your flatlist component or your
This tutorial is based on an app developed toolkit. If you go and download this app, you can see that I have implemented some advance feature’s in react native. So if you want you can purchase this product on our website.
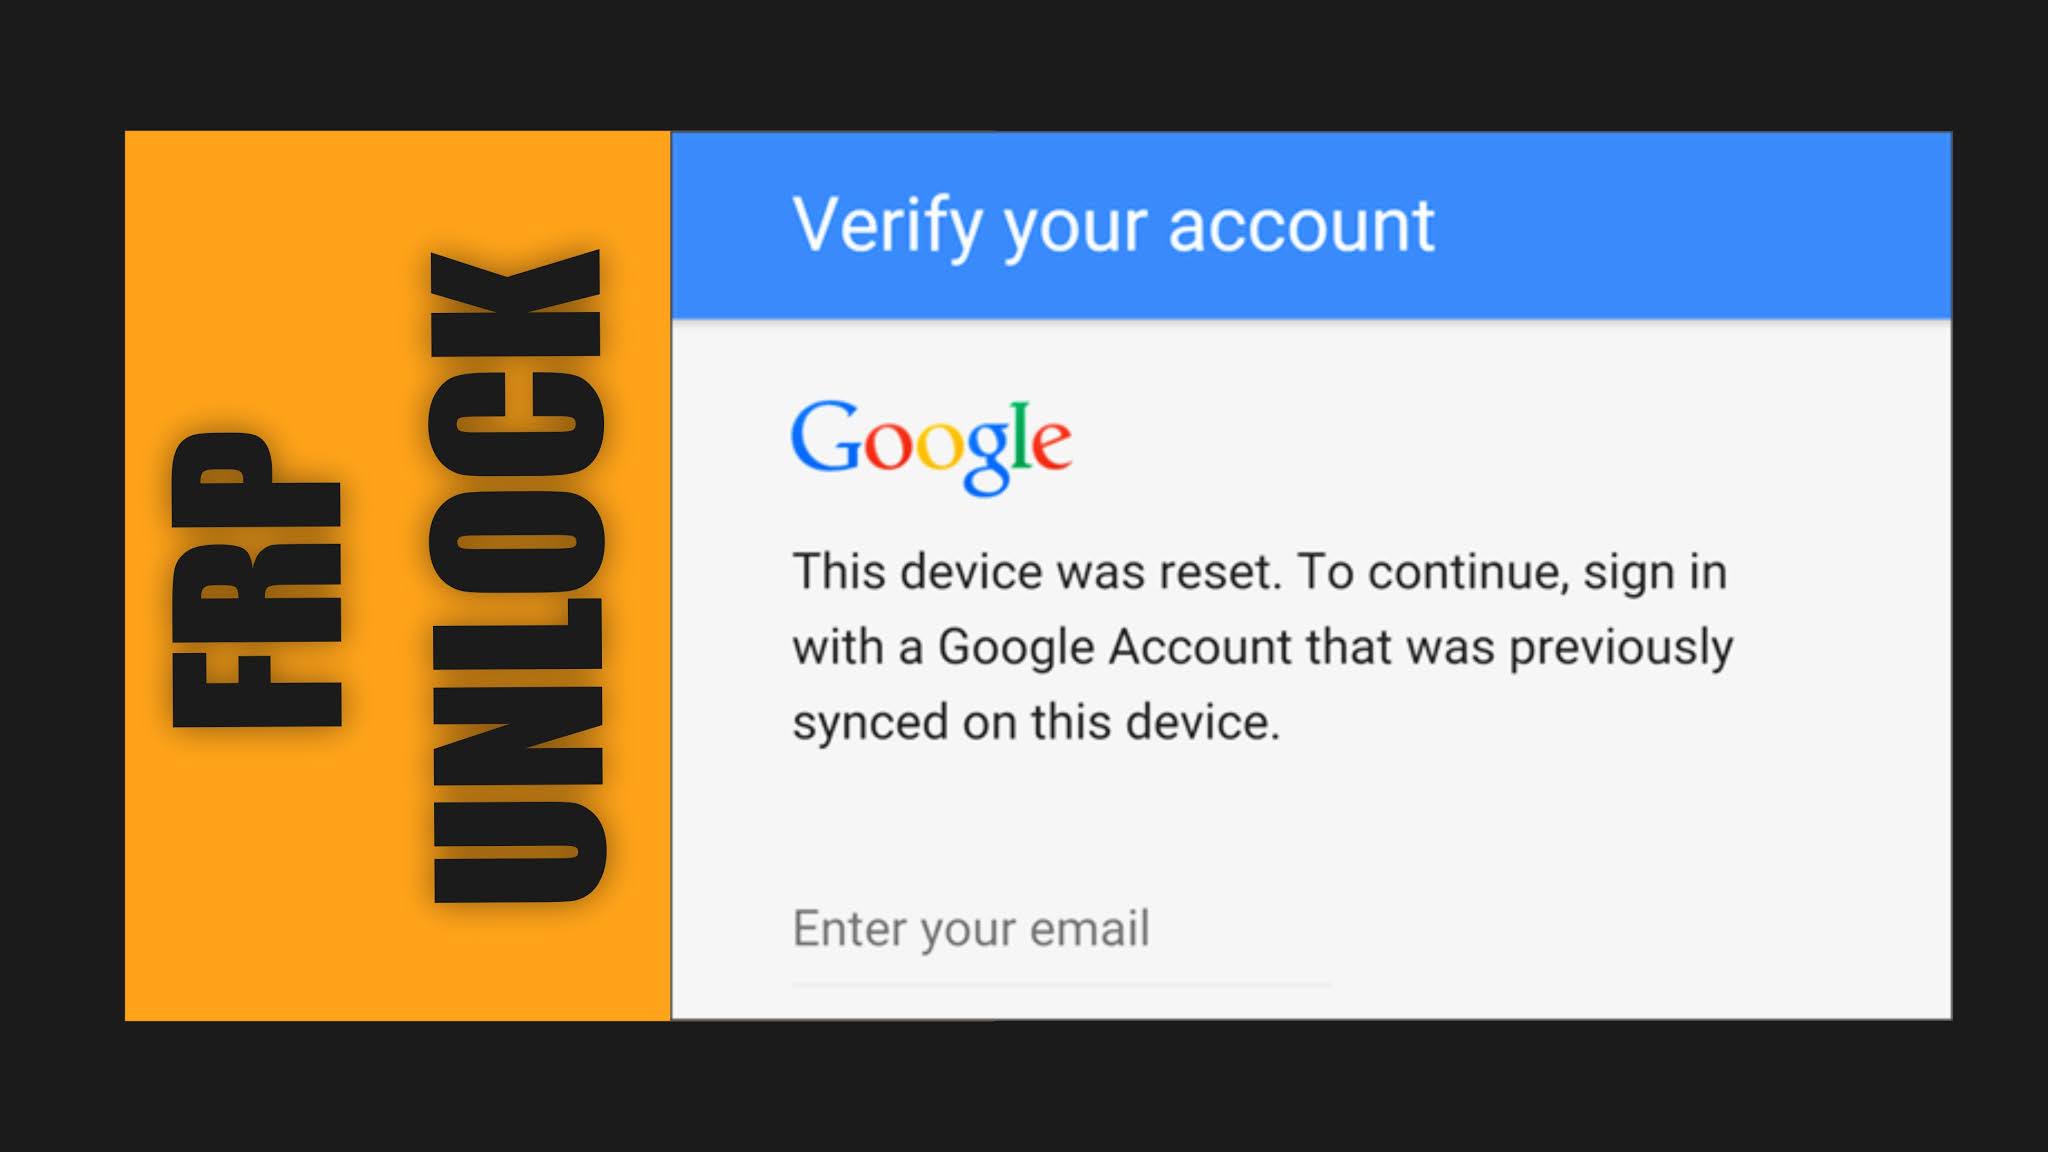
Hello everyone, welcome to the blog. This tutorial will explain how I removed the FRP lock on my Samsung J7. This method can be applied to any android phone. So you can say this tutorial is about how to remove FRP lock on android devices.
How are we going to remove FRP lock on android device, The short and sweet answer is that we are going to delete the user data that have stored your previous email and FRP setting, so that when you open your device it won’t ask for any previous emails stored on your device.
So before starting I will go briefly on what is FRP lock and what it does.
Factory Reset Protection (FRP), is a security feature on Android devices with Android OS Version 5.1 (Lollipop) and higher. The FRP provides a built-in security feature you are able to use that protects your device and information, including screen locks and data encryptions. The FRP is enabled automatically when a Google account has been registered on the device and will be disabled if the Google account is removed from the device prior to the Factory Data Reset. Once the FRP has been activated, it will prevent use of your device after a Factory Data Reset in an untrusted environment. This means if your device has been Factory Reset in any other way than Settings General Management Reset Factory Data Reset, the FRP Lock will be enabled. So basically when FRP lock is enabled you will be asked to sign in using a google account that was previously synced on your device.
Now enough talk, let get our hands dirty. One more this before proceeding.
We won’t be taking any responsibility for anything that happen to your devices, however we will show some tricks at end to solve any problem you face during the procedure.
To begin with get the required files by filling above form. The above form collects your email in exchange for email address. Do not worry, we wont spam you, but we will send you updates only when we have a new post.
After downloading the zip file from the link in email, extract the zip file and open the folder. Now you will see 3 files that I used to remove FRP lock on my android phone. As I am using a Samsung device, I am installing Samsung usb driver. Make sure to install the appropriate driver for your device. For some device you might not need to install any driver at all. But to be on safe side, make sure to install the usb driver.
After the installing is complete unzip or extract the odin file and open the odin file. Odin is used to wipe the user data on your device using exynos file we have downloaded. After opening the odin, you need to connect your mobile device to your PC using an usb cable.
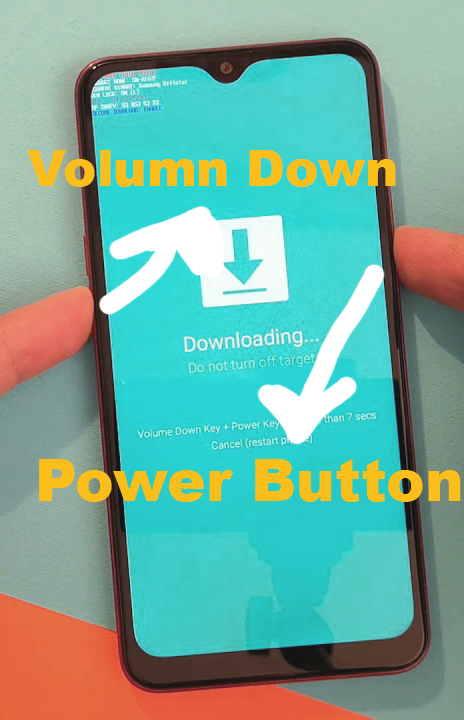
Make sure to use a strong usb cable, the cable that came with your device would work perfectly fine. Once connected you need to boot your device in to recovery mode. To boot your device into recovery mode turn off your device and press power button, volume down key and if there is main home button in your device, press that all three or two button at same time. Once, you see your manufacture device logo, remove from three buttons at once. It might ask for confirmation in some devices, in that case press yes or continue using the volume up key.
Pres the button required to go to this screen
Once you are in recovery or download mode, you can go back to odin and start the process. In odin you need to see “added” message now, if you have done everything as I have instructed.
As I have not connected any device to my PC it’s not showing added but for you it need to be showing on the screen. Next thing is to check the AP and click AP button. This will open a new dialog and now you need to select that Exynos dot RAR file.
This is what you see when you are processing rar file..As mentioned do not turn off your device
Once selected click start and now to will start the process. You will see a progress bar on both odin and android device as things proceed. Once the process is completed your android device will automatically open and you won’t be asked for any previous synced email address.
Its done, But one last step
If your notice any problem like storage full or anything, now you can do a factory reset directly from the setting.
How to do a factor reset after opening the device
Remember that I have told you in the begging about how I can fix my device if anything happens. For that also you need to follow exact process, but instead of selecting the Exynos dot RAR file you need to download the firmware of your device from any website select that file. These are some of the websites that you can use to download the firmware.
If this video helps make sure to give a thumbs up and comment and subscribe to our channel for more tutorials like this. Also check my other tutorial on WordWeb(Offline Dictionary)
Video Tutorial on how to remove FRP lock on android phone
Is this all, What if it doesn’t work for some reoson
Removing FRP lock is tricky and will vary from device to device. Another working method that I found is to insert a SD card to device with some application to launch your home screen. I am sure if you google for your phone model FRP removal, this method will popup. I wont be explaining that method here, but if you have a question make sure to comment it below
At last also run ‘gradlew clean’ in android directrly Just to be on safe side
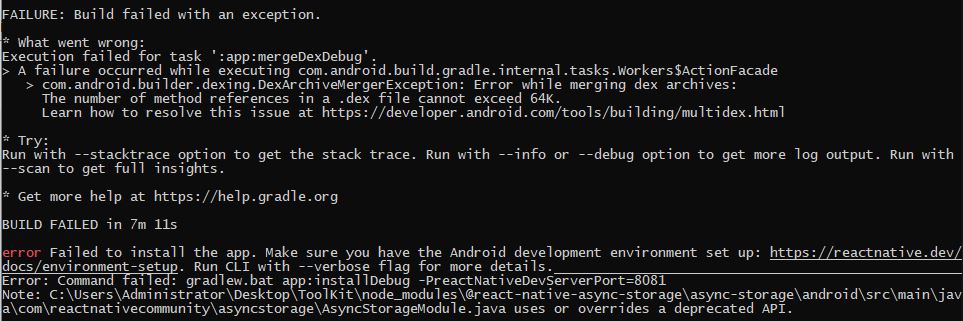
What execution failed for task app mergedexdebug?
When you build the android app, It creates .dex file. If you extract a apk file also, you will be able to see this file. What’s happening is that the app cant fit all imported packages into one single .dex file. This is why It is happening. usually this error occurs when you have imported many packages to your your app.
How did we solve this issue?
By enabling multiDexEnabled to true you are giving permission to create more than one .dex file. This way it will create two or more .dex file if required. Anyway, the fix is to add multiDexEnabled true to your app/build.gradle
What if this doesnt work
If it does not work, the best thing is try to other solution that have mentioned on StackOverFlow. Also ensure your minSdkVersion is above 21. If you have solved this issue in any other way make sure to comment it in this post and help each other.
Your App/build.gradle should include these lines in appropriate places
dependencies {
  implementation 'com.android.support:multidex:1.0.3' //enter the latest version
}
android {
    defaultConfig {
        multiDexEnabled true
    }
}
* What went wrong: Execution failed for task app installdebug
Execution failed for task ‘:app:installDebug’.
> com.android.builder.testing.api.DeviceException: No connected devices!
* Try:
Run with –stacktrace option to get the stack trace. Run with –info or –debug option to get more log output. Run with –scan to get full insights.
* Get more help at https://help.gradle.org
BUILD FAILED in 3m 49s
error Failed to install the app. Make sure you have an Android emulator running or a device connected. Run CLI with --verbose flag for more details.

Error: Command failed: gradlew.bat app:installDebug -PreactNativeDevServerPort=8081
What task app installdebug failed?
The task app installdebug failed happen in when it cant install the build apk on your device. This might be due to because your device is not connected or emulator is not running. Somehow the point is that apk was built successflly but it cant install the app. It might be because you have a higher version of same apk already installed on the device or emulator!
Possible solution for this problem
Ensure that device is connected successfuly to PC
Check if emulator is running.
Check if USB Debugging is enabled
Check for loose connection
If you have already installed application, please uninstall application and try
The best solution for Execution failed for task app installdebug
The best solution is for you to install the emulator. Download genymotion or any other emulator. Once the emulator is opened you can start the build process of application. This way application will auto start on the emulator. You can always use the built in emulator in the android studio also. While choosing emulator type, ensure to chose a emulator that have playstore installed. Mostly pixel devices will have google playstore pre-installed.
Wordweb is one of the best offline dictionary which i know..Its always good to have a offline dictionary in your mobile..
Wordweb dictionary is available to download from playstore very easily..But the problem comes when you need to download audio files for pronouncestation. It is not available for free.And not available in Maldives region.
Today I am going to share you how to download it for free..
Then go to device storage..Then Android..Then obb…Now you will find a file named “com.wordwebsoftware.android.wordwebaudio” Paste it their…If it is not their means open the app and search for a word and repeat the process…You may need to clear data the app after these thing…