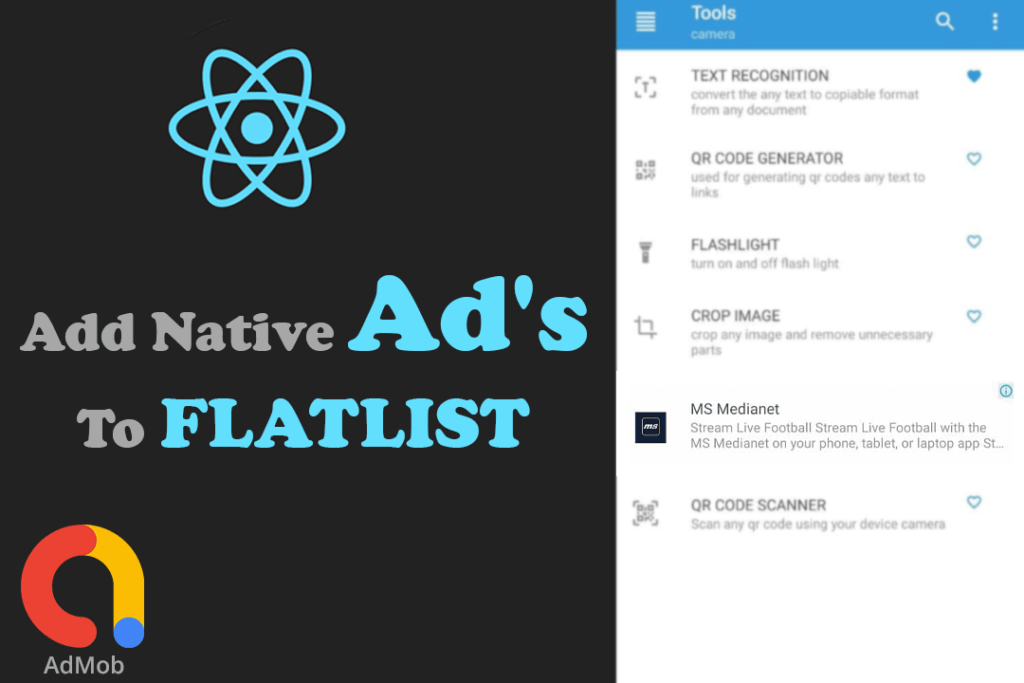
Recently I have added google admob native ads to my react native Toolkit Box application. I want make these ads appear on different place of my flatlist’s. That way I can maximize CTR for my admob apps. But when I start thinking about how to render ads in flatlist, I was out of idea. But when I start coding it was a piece of cake. So basic question here is how to add admob ads to flatlist.
The first thing you need to do is add your ad library to application. I am using react native admob native ads library, but you can use any library you need for your ad’s.
If you are using react-native >= 0.60 you just need to do run a simple command in your project directory
npm install react-native-admob-native-ads --save
or if you are using yarn run
yarn add react-native-admob-native-ads
After installing the react-native-admob-native-ads you also need to install react-native-vector-icons
npm install react-native-vector-icons
or
yard add react-native-vector-icons
Please note that you need to setup react-native-vector-icon, for that use this guide.
Lets setup react-native-admob-native-ads
First of all, for this you need admob account. If you don’t have an admob account got to this page and sign up for admob.
AdMob Home Page
On this page add your and go to App Setting, here you can find your app id, which we will need for our next step. In addition to ensure, that compiled sdk version is 28 or higher in your app/build.gradle
AndroidManifest.xml
You need to add the meta data for admob in your androidmanifest.xml as shown in below
In here only thing you need to change is android:value, DO NOT CHANGE android:name eventhough, its ending with ‘APPLICATION_ID’. For android:value, paste your app id from admob, which we noted earlier.
build.gradle at project level
Please note that this project level build.gradle is located under android folder at android>build.gradle. It’snot the one under android>app>build.gradlew
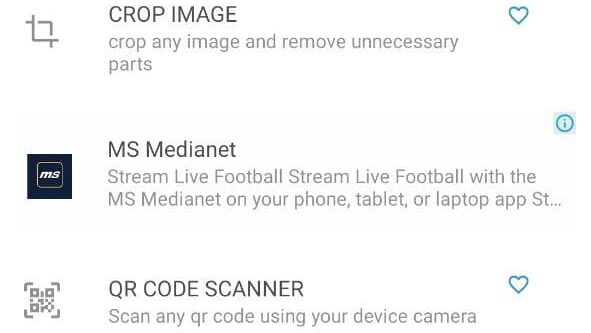
Now this is the part to design the native ad to display on flatlist. Here, you can design whatever, you want to display. As I use react-native-admob-native-ads, I will use the component from their, library but for you, design it anyway you want using whatever library want.
The ad unit in the above example need to be replaced by your own ad unit id. you can obtain an ad unit id by navigating to Ad Unit section under your app in admob. Ensure to select Native advanced ad format as we are using that kind of ad.
How to find ad unit id
One more thing in above example is that I have used short form (? & 🙂 to render static element if for any reason my ad has failed to load.
As you can see, we are adding a custom item to data array. It need not contain much fields, just one field to identify its the ad object. But if we do this way, it will always add ad to bottom of the flatlist.
This code below, will insert the ad object to random position of the array. It’s just basic javascript.
The last part on How to add native ads to flatlist on react native is to render these ads on the flatlist itself. This is the most simple task in the whole application. On the render component of your flatlist, Just add a simple if statement to check if that id of the received object is ‘ad’ or not. Based on that you can render your flatlist component or your
This tutorial is based on an app developed toolkit. If you go and download this app, you can see that I have implemented some advance feature’s in react native. So if you want you can purchase this product on our website.
This tutorial is about how to host a website locally. Which mean at the end of this tutorial, you will be able to access the website you host to be accessible from any device on your network. You might need to host a local web app on office to access it internally or even at home for watching movies, across many device. At the end of this tutorial, you can access this website from any device on your local network. And a quick note I have testing this on windows 11 and on windows 10.
Can you host any type of website?
I have tested this with react application. The important thing is that it should contain index.html or index.php and other static files. You website need not to be in react, it can be a WordPress website or a custom php website with MySQL as database. So, to start you need a web server to serve your files. Don’t worry, its not a big configuration, you just need to install an app. In browser search for download page of xampp server. Once you get there, you can download the latest version. With the help of this software, we will setup the apache server. And if you use MYSQL, then you can install it too.
The XAMPP Server
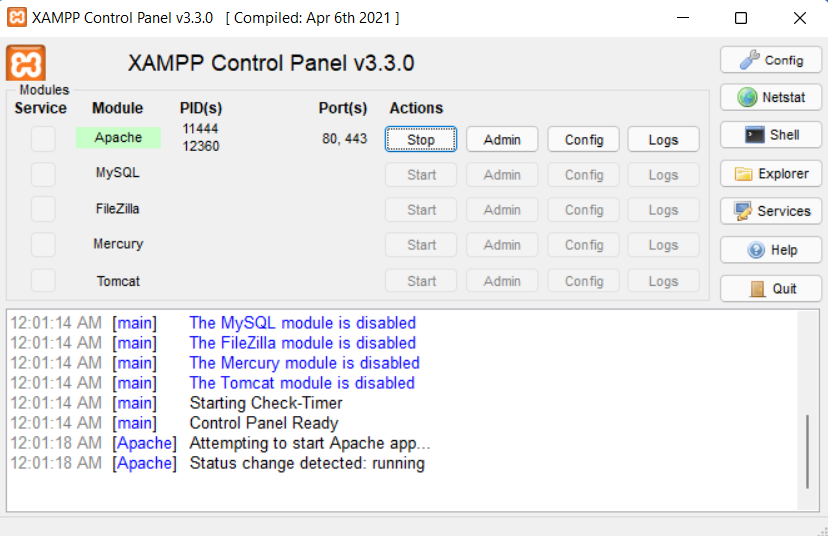
Once download is completed, open the setup file and install it. Its a simple next, next screen you need to follow. On service selecting screen, you can select what services that need to be installed for you. If you don’t know what these things are then select apache and untick all other options. If you want to use local MySQL database you can tick MySQL option. you can leave all other option as default. Once the installation is completed click finish button to open xampp control panel. When the xamp control panel starts start the apache module. When it starts you should see port 80 under ports. Ensure you have port 80 there.
Xampp Control Panel
Move your website public folder
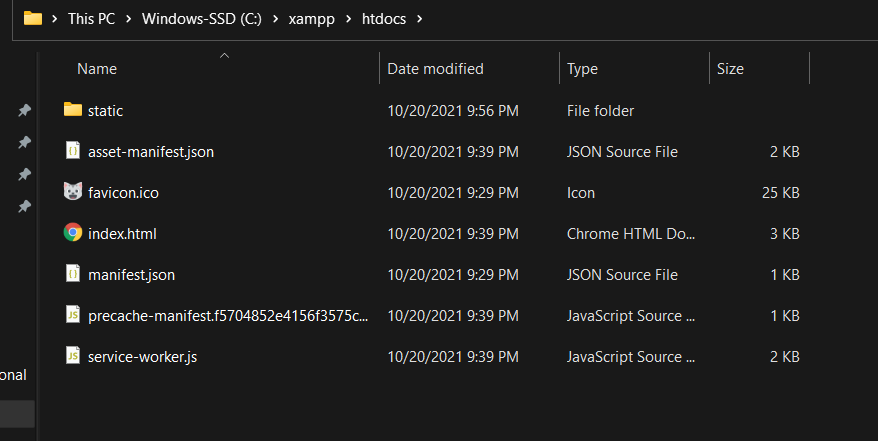
Click explorer button on xampp control panel and then you can close the xampp control panel. Even though you close xampp control panel, the apache server will be running in the background. Navigate to htdocs folder on the “C://xampp/htdocs” and delete everything there is, to host your website at root directory. Those deleted file are default xampp files and if you want you can also host it on a new folder in here and add folder name to your URL. This way you don’t need to delete those files.
Your website files should be here
Paste your website files on this folder. Ensure you have index.html or index.php on this htdocs folder. Now when you go to localhost on web browser you should see your website live on your PC.
Lets make it accessible from any device on your local network
Many people think this is very hard, or requires a complex configuration, buts its a piece of cake. Open windows defender firewall and navigate to advance setting on left side bar. Under Inbound rule, create a new rule to allow port 80 in your firewall. With this, your device will open port 80 (which is default port for web server). Also, do the same with outbound rule to allow port 80 there also. The reason why we are using port 80 is because, then we need not to specify port when we go to this address. If you do not understand this make sure to watch the video at end on this post.
Adding a custom domain name to your local website
Check the web address, its custom name, You can also add .com or .org etc…
How to access this website using a name of your choice. For that go to rename your PC and rename it to what you want you want domain name to be. You can also rename your PC by going to advance system setting. So if your DNS server is mapping device name to IP ,any device visiting to http your device name will see the website.
However, you cant put .com or .net as your PC name. So if your want access your device using something like localwebsite.com, then you need to add a record to your router or dns setting to point that domain name to your IP.
You can get your IP by opening cmd and typing IPCONFIG.
Lets wrap it with video explanation on how to host any website locally
So basically, what we did was, install xampp and put our website in htdocs folder. And to access from any device on my local network, I allowed port 80 on my device.
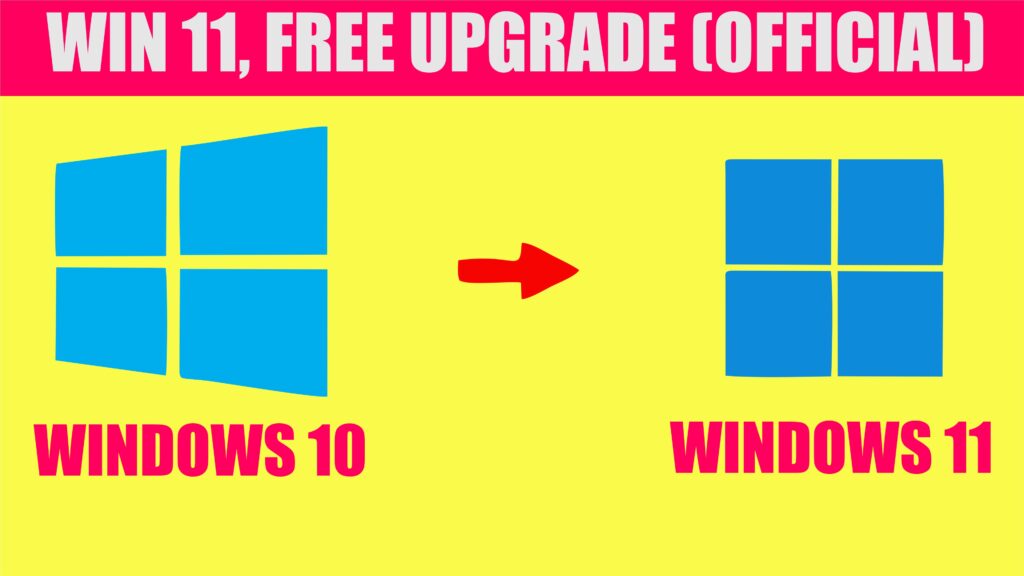
Yes, If you are running windows 10, you can upgrade to windows 11 for completely free. But you have to meet windows 11 requirements for running windows 11. So in this tutorial I will explain how to upgrade windows 10 to windows 11 for completely 0 dollar.
Compatible with DirectX 12 or later with WDDM 2.0 driver.
Display
High definition (720p) display that is greater than 9” diagonally, 8 bits per color channel.
Internet connection and Microsoft account
Windows 11 Home edition requires internet connectivity and a Microsoft account. Switching a device out of Windows 11 Home in S mode also requires internet connectivity. Learn more about S mode here. For all Windows 11 editions, internet access is required to perform updates and to download and take advantage of some features. A Microsoft account is required for some features.
Taken from Microsoft website
Certain features require specific hardware. System requirements to run some apps will exceed the Windows 11 minimum device specifications. Check device compatibility information specific to the apps you want to install. Available storage on your device will vary based on installed apps and updates. Performance will scale with higher end, more capable PCs. Additional requirements may apply over time and for updates.
This tool will check if you meet windows 11 requirements
Going through one by one of this will be very difficult, But with a tool that will determine all this will help. Happily we can install Health PC Check App to see if its a match. This tool will tell you specifically which requirement you are missing to run windows 11. This tool can be downloaded from https://aka.ms/GetPCHealthCheckApp
How to upgrade windows 10 to windows 11 (What I Did)
When I first downloaded and checked if my PC was capable of installing windows 11 it said “Your PC does not meet windows 11 requirement“. I was horrified when I saw this notice. I have a Ryzen 7 and 16 GB RAM and a SSD, But still It said your PC does not meet windows 11. I opened the notice and it said, I am missing TPM 2.0. So I went to windows update, and there was some firmware updates also. SO I went ahead and installed the firmware Update and all other minor updates. After that I went to BIOS setting and under security there was TPM 2.0 with on and off switch. So from there, I enabled TPM 2.0 in my PC.
After restarting PC and running the “check for update” in windows update, I saw an available update named windows-11-someletters. Without waiting for much long I clicked download now button. As my Wi-Fi is slow, It took me exactly 1 hour to finish the download. After downloading It automatically started installation. I was able to use by PC during the installation process. After installation has completed, It nicely prompt me to restart the PC. After restarting just like any update would, I saw the this new look of windows 11. Its amazing. While you are also here how to reduce photo size, save in GB’s.
Microsoft Recommended way to upgrade windows 10 to windows 11
Yes, the Microsoft recommended way to upgrade windows 10 to windows 11 is through windows update as explained above. But what if your PC meet windows 11 requirements, but cannot see the windows 11 update in windows update. From the homepage of windows 11 download on Microsoft , They say to wait until you see the windows 11 update on their. But who are we to wait, Lets find a way.
When you navigate to this page on Microsoft website you can see windows 11 installation assistant. Once you see it, Click the download button and run this software. This software will help you install windows 11. As I installed the the update through windows update, I haven’t tried this method, But I can assure you this will work, as it is mentioned on Microsoft website.
Lets Recap everything we covered on one single video
As of now we can see that QR code is a new trend, Even if you are running a business or non-profit organization you need to generate QR code for various purposes. Most of the online sites and tools offer this service very easily, but all of them are paid when it comes to bulk QR code generator. You might be able create 50 to 100 QR code for free, But when It comes to 1000 or 10 000 QR code, its definitely paid. This is why I have generated a bulk QR code generator software free.
Why is your bulk QR code generator software free?
Lets say that, I love my subscribers and visitors, So I gave them this software for free. The real truth is that I have developed this software using popular programming language known as Python (https://www.python.org/). And as this program will be running on your PC I wont need to pay for anything. It will be using your laptop resources to create QR codes. DONT PANIK, its a very light weight software, so you don’t need to have a higher PC.
Features of bulk QR code generator – a bulk QR code generator software free
Generate unlimited bulk QR codes
Simple .csv upload
Adjust the size of QR code
Change border width of QR code
Select output (Generated QR code Image) filename
Unlimited number of text can be embedded on QR code
Generate QR code in seconds (Very Fast)
A log file printing console (So you can identify if any problem occurs)
Insert fields from .csv (data file) to embedded text in QR code
No additional FEE. (100% FREE)
No ads
Smaller file size
How to generate bulk QR code using this software?
1. Download “A Bulk QR Code Generator Software Free”
As I have mentioned above, You can get this software for completely free. To download this software, you need to fill this form at the end of this page. Once you submit this form, we will send you an email containing the a google drive link, that will contain this software. Just download the software from google drive link. If for some reason, your antivirus software is blocking this program, ensure to disable the antivirus or whitelist this .exe file. If you did not receive the email ensure to check your Spam and promotion box in your mail. Also add admin@zaarmtech.com to your contacts, so can see this mail easily.
Now that the “bulk QR code generator software free” is running successfully, prepare your .csv file. An excel file can be saved as .csv file or even you can use https://docs.google.com/spreadsheets to create your .csv file from scratch.
Yes your column name can contain anything. Your csv file heading can be as many as you want, it also can be as long as you want. And also it can contain as much as detail you want. Lets have a look at my csv file which contain 1000 records.
sample csv file
To upload the csv file, click “Upload CSV” button and chose your csv file. Once you chose the CSV file, you should be able to see records of that csv file inside the program.
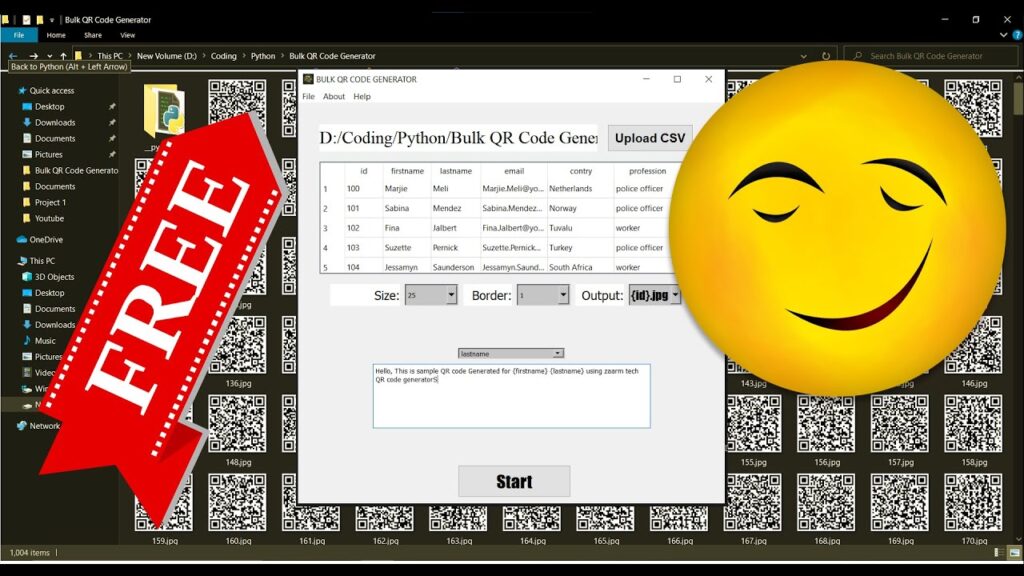
3. Adjust the settings to your needs
Bulk QR Code Generator
In here, you can customize the QR code by changing its size, border and output file name. Most importantly the bottom input text box contain the text you want to embed in the QR code. In here you can insert dynamic fields from uploaded csv file by using input insert button above or by wrapping the heading of field in csv file with “{}”. For example: {your_field_Heading_name}
4. Generate bulk QR codes at once
Once everything is ready its time to generate QR Codes. To do this simply click start button. Mostly, it will take less than 15 seconds for 1000 records, and the speed varies with number of record and your system specification. Here is the picture of QR codes I generated.
Well, Here is video guide to Bulk QR Code Generator
How to embed different types of links to QR code?
I think you have seen that QR codes open email with pre written subject and body. You might be wondering , “Can I add emails to QR code using this bulk QR code generator software free”?. The answer is YES. Everything that are embedded to a QR code is a text. Even though we don’t have a separate section or option to select email or telephone, you can add it to the QR code like a pro.
What happens if I run into any problem at “a bulk QR code generator software free”
Yes, Error’s happen. It might be on my side or your side. The best approach to solve a issue like that is to use “zaarm tech” community.
Copy the error message from the log of your application (It will look like above), and paste it in the comments of this blogpost or even in the comments of the YouTube video. Its better to ask in the media that is having better engagements. I will my best to give you a reply from comment section as soon as possible.
This program is developed in popular programming language python and is mainly using qrcode and qt5 library. Take a look at the following part of the source code, and if you are interested you can buy the source code as it is not free. After purchasing QR code ensure to check your mail. If you cant see it there, send a message to admin@zaarmtech.com or use Contact Us page. We will send you source code ASAP.
import os
import csv
from PyQt5 import QtCore, QtGui, QtWidgets
import qrcode
import sys
import webbrowser

def resource_path(relative_path):
    """ Get absolute path to resource, works for dev and for PyInstaller """
    try:
        # PyInstaller creates a temp folder and stores path in _MEIPASS
        base_path = sys._MEIPASS
    except Exception:
        base_path = os.path.abspath(".")

    return os.path.join(base_path, relative_path)

class Ui_MainWindow(object):
    def setupUi(self, MainWindow):
        MainWindow.setObjectName("MainWindow")
        MainWindow.resize(800, 778)
        MainWindow.setCursor(QtGui.QCursor(QtCore.Qt.ArrowCursor))
        self.centralwidget = QtWidgets.QWidget(MainWindow)
        self.centralwidget.setObjectName("centralwidget")
        self.UploadCSVBUTTON = QtWidgets.QPushButton(self.centralwidget)
        self.UploadCSVBUTTON.setEnabled(True)
        self.UploadCSVBUTTON.setGeometry(QtCore.QRect(580, 40, 161, 51))
        font = QtGui.QFont()
        font.setFamily("Arial")
        font.setPointSize(14)
        font.setBold(True)
        font.setWeight(75)
        self.UploadCSVBUTTON.setFont(font)
        self.UploadCSVBUTTON.setCursor(QtGui.QCursor(QtCore.Qt.PointingHandCursor))
#These are the first few lines of the software, Purchase the full source code below
Whats windows server? What you are seeing above is a picture of many servers. It might be running any kind of server. But today we are going to cover basic of windows server which is mainly used by small business and organazations.
Windows server is a operating system released by Microsoft. The windows server is mainly used by offices to manage their employees. The latest version for windows server at the moment is windows server 2019. It includes a lot of features and helps you manage the users pc’s.
Windows server is actually useful because of its user friendly interface. Most probably any administrator who can manage windows 10 also can manage windows server. In windows server you can create something called active directory users and join those users to the domain you use. The important part of this is that after joining the windows server you can manage that particular PC with the server manager. You can impose any group policy to the group of users want. This includes restricting their some permission and setting a default background for the users.
Whats DHCP in windows server?
DHCP stand for Dynamic Host Configuration Protocol. That this does is that whenever you connect a pc to the domain it will give the ip address based on the policies that you created. So we don’t need to configure each and every pc. You can give a specific ip based on the users mac-address. When you can the clients ip address you can perform lot more operation like limiting bandwidth and all.
What are the features of windows server?
Let me list our the features of windows server and explain them later in this post
Windows Admin Center
Enhanced Security
Containers
Wlan
Active Directory
System Insights
I could list out endless features of windows server, but let me tell you what it do briefly. When you try to login to your windows PC at office, unlike home it will ask both for username and password. This is managed by windows server. And when you try to connect to office Wi-Fi, you are asked to enter identity and password. So everyone enter their own identity and password. When you try to access files on office server, some are restricted and other are not restricted. All these are most likely implemented by windows server.
What information can IT admin see, Will they see what I have wrote for my password?
Just like any authentication provider, Windows server also keep its users password encrypted. This mean your IT admin also cannot see what you have entered as password, but they will be able to change your password or disable your password at any time.
When you browse wifi using the credentials of windows server, IT admin will be able to track the network usage. They even might log the websites you are visiting. But they also wont be able to see what your texts or email sent IF YOUR WLAN NETWORK IS ENCRYPTED


 Toolkit | Many Tools to Include In any React Native ApplicationOriginal price was: $ 120.00.$ 99.00Current price is: $ 99.00.