If you don’t have a Google account, you’re missing out on all the benefits that come with being a member of the Google community. signing up for a Google account is free and easy, and only takes a few minutes. Here’s how to do it: Visit the Google Accounts homepage. Click Create Account. Enter your name, birthday, gender, and location. Choose a username and password. Enter your email address and hit done.
What is a Google account?
A Google account is a user account that allows access to many Google services, such as Gmail, YouTube, and Google Drive. A Google account can be created for free using a valid email address. After creating a account, users can add a profile picture and fill out personal information such as their name, age, gender, and interests. Now if you want to know “How to Sign Up for a Google Account
What are the benefits of having a Google account?
There are many benefits of having a Google account. For example, Gmail is a free email service that offers users 15GB of storage. Gmail also offers features such as labs, which allow users to test new features before they are released to the public, and filters, which allow users to organize their inboxes. In addition, YouTube is a popular video sharing website where users can upload, view, and share videos. Google Drive is a cloud storage service that allows users to store and share files. Finally, Google+ is a social networking site that allows users to connect with friends and family. To sign up to these services by google, you need a google account.
Overall, a Google account is beneficial for those who want to take advantage of the many services that Google has to offer. A Google account is a user’s account with Google that gives them access to many of the company’s services. These services include Gmail, YouTube, Google Drive, and Google Calendar as I have mentioned before.
How to sign up for a Google account
Go to the Google Accounts homepage Click on the blue “Create Account” button. Enter in your first and last name in the appropriate boxes. Choose your username. Your username will be what comes before “@gmailcom” in your email address. For example, if your name was Jane Doe and you wanted your email address to be jane@gmailcom, your username would be “jane”. Pick something original that you can easily remember! Type in a password that is both secure and easy for you to remember into the next box labeled “password”. Re-enter this password in the box below to confirm it. Make sure this password is at least 8 characters long and includes both upper- and lower-case letters, as well as numbers or symbols (like # $ ! % & ‘ * + – = ? ^ _ ` { } ~ r.
Answer some security questions (in case you forget your password later on These can be anything from “What city were you born in?” to “What is the name of your favorite pet?”. Choose questions that only YOU would know the answer to! Next, enter in a recovery email address. This is an email address that isn’t yours, but where Google can send information about how to recover your account if necessary–just in case! If you don’t have one, ask a friend or family member if they wouldn’t mind letting you use theirs for this purpose alone, If not, skip this step by clicking on “I don’t want one right now” Scroll down and agree to Google’s terms of service by checking off the box that says “I accept” You’re almost done! All that’s left now is type in the CAPTCHA code displayed onscreen (this helps Google make sure that create accounts are being made by people and not robots, then click on “Next Step”.
Enter your name, username, password, and other required information. Click Next step. Enter your recovery email address and a phone number where you can be reached. Click Continue. Enter the verification code that you received via text message or voice call and click Verify. You can now start using your Google account!
If you need more details on how to do sign up for a google account check this step by step guide.
in your web browser and click on the blue “Sign in” button in the top-right corner.
2. On the next page, click on the link that says “Create account.”
3. You’ll now be taken to the account sign-up page. Fill out the required information in the fields provided, including your name, birth date, gender, and location.
4. Choose a username for your account. This will be the name that you’ll use to log in to your account and that will appear on any content that you create.
5. Create a password for your account. Be sure to choose something that you’ll remember but that isn’t easy to guess.
6. Enter your mobile phone number. This is optional but can be used to help recover your account if you forget your password.
7. Enter an alternate email address. This is also optional but can be used to help recover your account if you forget your password.
8. Finally, click on the ” Next step ” button.
9. On the next page, you’ll be asked to verify your identity by entering a code that will be sent to your mobile phone. If you didn’t enter a mobile phone number in the previous step, you can choose to verify your identity with a different method.
10. Once you’ve verified your identity, you’ll be taken to the “Welcome to Google” page. From here, you can start using the various services that are included with your account.
What is needed to sign up for Google?
You can create a Google account by visiting the Google website and clicking on the “Sign Up” button. You will need to provide some personal information, such as your name, birth date, and location. You will also need to create a password and select a security question.
Once you have created your account, you will need to set it up. This includes choosing an email address, setting up a profile, and adding friends or colleagues.
Did you know that many of the products and services you already use to run your small business are tax deductible? Being able to deduct up to one-third of your home office space via the IRS home office deduction is another benefit for freelancers and small business owners who are ready to scale their business.
When it’s time for your small business to level up, it’s important to know what direction you’re headed in. Read on to learn why you should incorporate your small business as an LLC, how to market your small business to attract new clients, and how to set up easy invoicing for getting paid.
Consider Incorporating Your Small Business as an LLC
An LLC is a limited liability corporation that protects individuals from business liabilities. The IRS taxes LLCs differently than corporations. Annual tax savings can generate long-term savings for your small business.
If you don’t want to file for LLC status yourself, contact a third-party business service provider for help. Companies like LegalZoom help thousands of new business owners incorporate their businesses to reap the benefits of having a more professional-looking image — and potentially lower your taxes.
Market Your Small Business to Attract New Clients
Once your business is up and running, it’s critical to market to new clients to attract leads and generate sales. Use inbound digital marketing strategies to create keyword-based content that drives customers to your blog, company website, and social media channels.
If you’re committed to finding new leads for freelancers, startups, and small businesses, then consider a lead generation company. They deliver well-researched and qualified marketing leads to contracted clients.
Lead-generation experts use a combination of cold calling, pay-per-click ads, and content marketing to drive relevant traffic to your website. They use inbound marketing techniques to inform customers about your products and services and use a call-to-action to tell them how to learn more.
Set Up Easy Invoicing for Billing Your Clients
When small business clients have a difficult time navigating your payment website or when they have to read complex invoices, it can take them longer to pay. Avoid payment delays and a backlog of overdue invoices by using an easy invoicing system where clients can make payments for your products and services online.
Make it easy for your clients to pay their invoices by setting up an easy-to-follow invoicing process. Companies like Square, Shopify, and Paypal offer free invoicing services for small businesses, medium-sized businesses, gig workers, and freelance entrepreneurs.
Signing up for a Paypal account is free, and Paypal business accounts offer free invoicing services for small businesses. Whether you choose Paypal or another third-party invoicing service provider like QuickBooks, most online invoicing software and apps for small businesses include customization options to help your brand stand out among the crowd. Once you’ve added your brand logo, colors, text, and signature fonts, you can create an invoice template for easy invoicing on the go.
Scale Your Business Successfully
Incorporating your business, securing new clients, and setting up easy invoicing will enable you to scale up successfully. For small business support service products and other resources, reach out to the small business professionals at Zaarmtech.
There are three different ways of taking a screenshot if you own a modern Mac. But all of them involve keyboard shortcuts. However, if you own a MacBook Pro having a Touch Bar, there is another method. macOS Software also provides you with several options for saving, deleting, or opening those screenshots easily. You can apply the same tips to the latest models also, such as MacBook Pro with M2 Chip and MacBook Air also.
How to screenshot on mac
Let’s take a look at some of the methods you can choose to take a screenshot on Mac.
1. Cmd-Shift-3
You can use this shortcut for capturing the screenshot of your Mac’s entire screen.
2. Cmd-Shift-4
You can use this keyboard combo for turning the cursor into a crosshair. You can then drag it for selecting a part of the screen to capture. Releasing the mouse button then will take the shot.
You may use some other options as well after you hit “Cmd-Shift-4”.
· Press & Release the Space bar
After pressing & releasing the spacebar, the crosshair will turn into a camera icon. You can move that icon over any window you want for taking a screenshot of. The screenshot taken this way will feature a “White Border” around that window with some drop shadow as well.
· Press & Hold the Space bar
After you drag crosshair for highlighting a specific area, don’t release the mouse button. This will lock in the size and shape of that area but will allow you to reposition on the screen. It is a good option if the area you selected initially is a bit off. You just need to hold down the spacebar for repositioning it before you release the mouse button for taking a screenshot.
· Hold down “Shift” Key
After you drag crosshair for highlighting a specific area, don’t release the mouse button. This will lock in each side of that selected area you made with crosshairs. This will not only let you save the bottom edge, but you can move the mouse as well for positioning that edge.
After that, release the “Shift” key instead of the mouse button ad press it again. This will reposition the edges of your selected area. Toggling between the two edges also becomes easy; you just need to keep the touchpad engaged while pressing the “Shift” key at the same time.
3. Cmd-Shift-5
This shortcut command was introduced few years back in macOS Mojave. It calls up some parts of the panel along with screen capture options. You get to see three screenshot buttons on your screen for capturing it entirely or a part of it. But that doesn’t end here; you can also record your entire screen or some selected part using the buttons. On the left side of the screen is an “X Button” for closing the screenshot panel. Or you can use the “Escape” key also for this purpose.
Moreover, you will see an “Options” button on the right side of the screen. You can choose where you want to save that screenshot; Documents, Mail, Desktop, Messages, Clipboard, or any other location. And don’t forget to set a 5-second delay so that you may not lose any item while engaging the screenshot tool. The tool automatically enables “Show Floating Thumbnail” by default. This will put a small preview thumbnail (in the lower right corner of your screen) of the screenshot you just captured. This procedure is quite similar to the one we witnessed for iOS. But you can’t turn this preview thumbnail on your iPhone. However, Mac lets you do that also. And you also have the option of showing the mouse pointer in video or screenshot.
If you see the screenshot panel causing hindrance, you can just move it anywhere on the screen by grabbing its left edge and dragging it. So, it’s quite easy to take a screenshot on Mac, particularly if you follow the built-in keyboard shortcuts. And if one or two keys aren’t working, you can opt to go for others keys also (mentioned in method 2).
Now, let’s take a look at how you can screenshot on Mac that has a touch bar as well.
4. Cmd-Shift-6: Touch Bar MacBooks
If you have an older MacBook Pro or the latest version of it, you can screenshot on it as well. The screenshot will show you what’s in front of you, on the Touch Bar. Just press “Cmd-Shift-6” for taking a skinny and wide screenshot of the Touch Bar.
Easy Annotation
By embracing the “Floating Thumbnail”, you will have access to different “Markup Tools” for annotating your screenshot. You can let the thumbnail slip away, or you can swipe it away as well. This will save it to the spot where you previously saved the screenshot. Click on “Floating Thumbnail” and a new window will appear containing all the markup tools. You just need to right-click it for:
Saving the screenshot to Documents, Clipboard or Desktop.
Opening it in Photos, Messages, Mail or Preview
Showing in Finder
Deleting it
Opening in the Markup Window
Closing and saving it.
Mac screenshotters don’t work as effectively as they should with the Cmd-Shift-5 shortcut. But since you get the option of annotation without opening any preview, this one is more reliable. And deleting the messed-up screenshots when you can’t handle them is another good thing. Apart from that, a good addition is a 5-second delay which most other shortcuts don’t offer. So, this is one of the best ways of taking a screenshot on Touch Bar.
If for some reason if you can’t take a screenshot on mac, check this article on how to fix it.
Conclusion
MacOS doesn’t allow you to take a screenshot for safety purposes. But you can use various keys to do that as well. This isn’t some kind of hack; it’s just a way to save whatever is on the screen. Even though the method of taking a screenshot on an iPhone is simple, Mac doesn’t offer that much flexibility. So, just take a look at the options mentioned above and choose the one that suits your device the most.
Its always important to have a backup of your pc or laptop drivers. We all are always trying to limit our data plan and to spend less. In this article your are going to learn how to backup and restore your drivers. Ensure you can always backup and restore drivers easily.
This will be super helpful when you are about to format your PC for any reason. And also, sometimes you might not have the driver CD or even find the best compatible driver online, that’s the time you need to use this method.
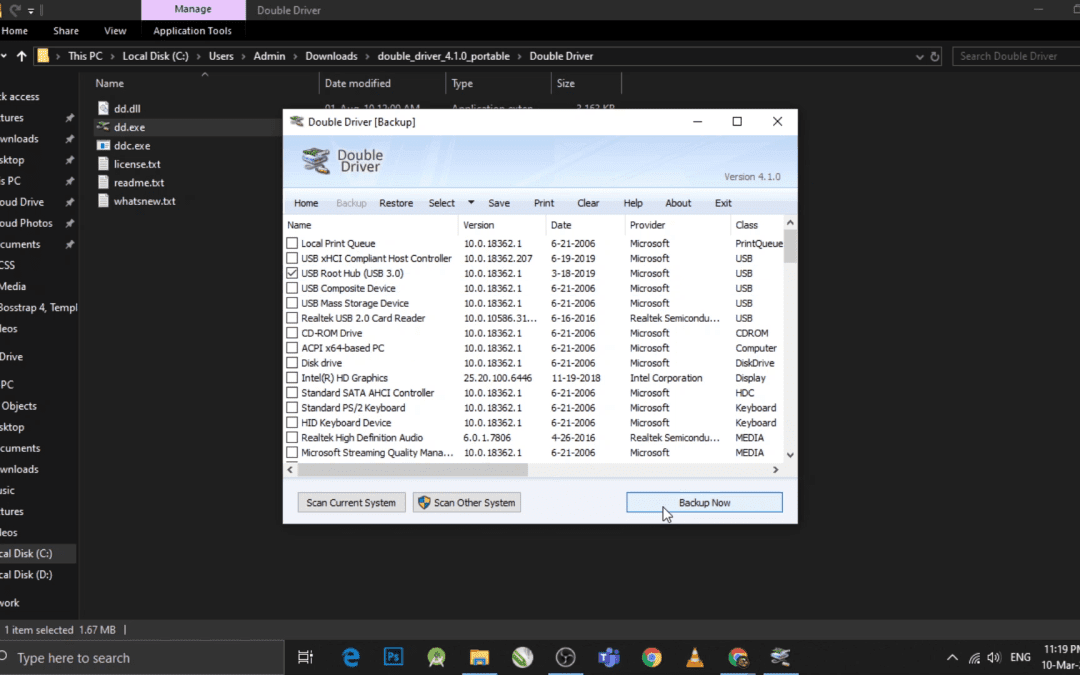
open double driver and scan your pc for the available driver.
Select the desired drivers to backup
Click the Backup button.
Click restore button to restore the driver
Select the folder that contain the backup
select ok and proceed with installation
Lets see how to backup and restore drivers
A story from my personal experience about driver
In 2021, I started to work as a IT Technician on an organization. During my time, I was tasked to connect a display to a PC using USB TO VGA adapter. As a normal technician, I connected the display using the USB to VGA adapter. However, It was not working. I realized it should have something to do with driver. So I installed the driver from their website. It was a perfect match, but somehow that PC started crashing cannot always go to startup repair screen.
To solve the issue, I had to format the PC. Later I used double driver to copy the driver from another PC which already is connected using the USB to VGA adapter. And finally, It worked fine. So its better to backup the drivers and use it on compatible PC, instead of trying new ones from the internet.
This is a common issue for many people. Somehow double driver also did not find the driver you are looking. It’s rare, But it might happen. So let me tell you what you need to do if you ever face a situation like this.
Instead of randomly google searching for driver, you need to care fully identify the manufacture brand and go to their website. Once you reach their website head over to download section which will most probably be under the support section. Once you go their most likely you can enter the model number of the product. This way they will show you the real and updated driver for your PC. It’s not recommended to install drivers from websites that are not original manufactures.
Is there any software that will help me find the drivers?
There are software’s that you can install on your PC and it will search for the driver based on your system hardware specifications. But the downside of these software’s is that they all come with a pricing. Of course, they have a free package, but it wont cover it all. One of the famous software for this is Driver Boosters
Yes! If you have connected to a wifi network ever in your life means that you can see the password of that network. Connected wifi passwords will be stored in your pc and you can easily accsess it. Follow the steps below.
Setps:
Open CMD
Write the command “netsh wlan show profiles” and press enter
You will see the list of networks you have connected
Write the name of wifi network with previous command.
It will be some thing like this “netsh wlan show profiles wifinetworkname”
After pressing the enter, you will see many information about the network.
Under security setting look for “Security key : Present” (If absent you cant view wifi password)
with previous command type key=clear
Now you will see the password under “security setting”