How to remove FRP lock on android devices?
how to remove FRP lock on android
how to remove FRP lock on android devices
Hello everyone, welcome to the blog. This tutorial will explain how I removed the FRP lock on my Samsung J7. This method can be applied to any android phone. So you can say this tutorial is about how to remove FRP lock on android devices.
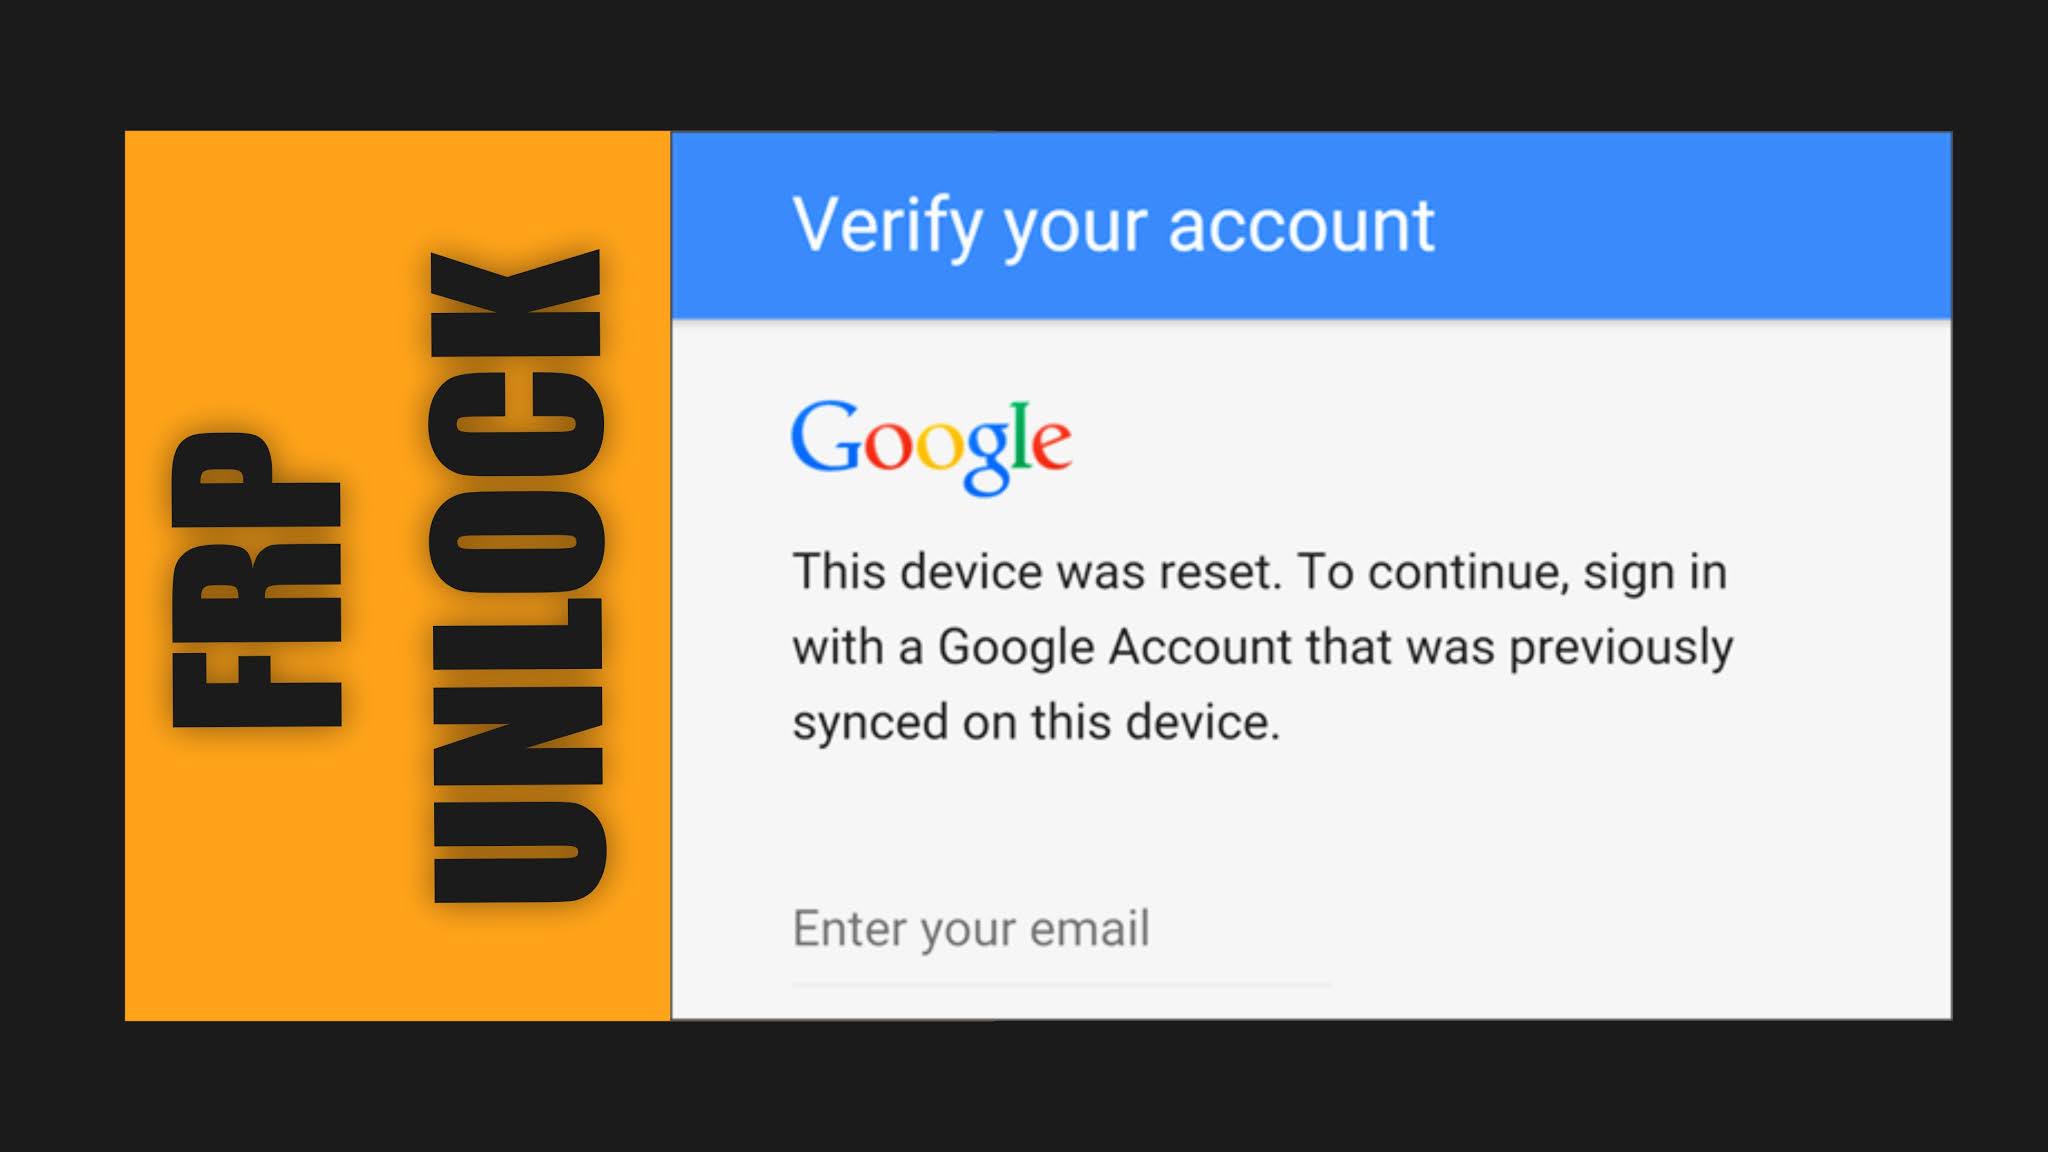
How are we going to remove FRP lock on android device, The short and sweet answer is that we are going to delete the user data that have stored your previous email and FRP setting, so that when you open your device it won’t ask for any previous emails stored on your device.
while you are here, also check How to upgrade to windows 11 without loosing any data
So before starting I will go briefly on what is FRP lock and what it does.
Factory Reset Protection (FRP), is a security feature on Android devices with Android OS Version 5.1 (Lollipop) and higher. The FRP provides a built-in security feature you are able to use that protects your device and information, including screen locks and data encryptions. The FRP is enabled automatically when a Google account has been registered on the device and will be disabled if the Google account is removed from the device prior to the Factory Data Reset. Once the FRP has been activated, it will prevent use of your device after a Factory Data Reset in an untrusted environment. This means if your device has been Factory Reset in any other way than Settings General Management Reset Factory Data Reset, the FRP Lock will be enabled. So basically when FRP lock is enabled you will be asked to sign in using a google account that was previously synced on your device.
Now enough talk, let get our hands dirty. One more this before proceeding.
We won’t be taking any responsibility for anything that happen to your devices, however we will show some tricks at end to solve any problem you face during the procedure.
Lets Start the process
To begin with get the required files by filling above form. The above form collects your email in exchange for email address. Do not worry, we wont spam you, but we will send you updates only when we have a new post.
After downloading the zip file from the link in email, extract the zip file and open the folder. Now you will see 3 files that I used to remove FRP lock on my android phone. As I am using a Samsung device, I am installing Samsung usb driver. Make sure to install the appropriate driver for your device. For some device you might not need to install any driver at all. But to be on safe side, make sure to install the usb driver.
After the installing is complete unzip or extract the odin file and open the odin file. Odin is used to wipe the user data on your device using exynos file we have downloaded. After opening the odin, you need to connect your mobile device to your PC using an usb cable.
Make sure to use a strong usb cable, the cable that came with your device would work perfectly fine. Once connected you need to boot your device in to recovery mode. To boot your device into recovery mode turn off your device and press power button, volume down key and if there is main home button in your device, press that all three or two button at same time. Once, you see your manufacture device logo, remove from three buttons at once. It might ask for confirmation in some devices, in that case press yes or continue using the volume up key.
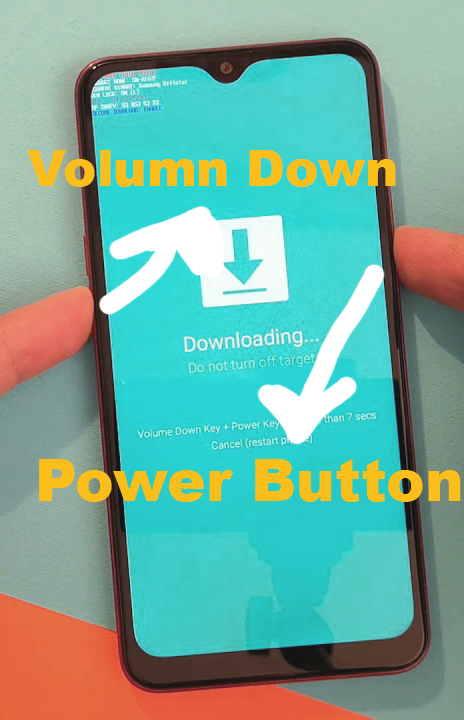
Once you are in recovery or download mode, you can go back to odin and start the process. In odin you need to see “added” message now, if you have done everything as I have instructed.
As I have not connected any device to my PC it’s not showing added but for you it need to be showing on the screen. Next thing is to check the AP and click AP button. This will open a new dialog and now you need to select that Exynos dot RAR file.

Once selected click start and now to will start the process. You will see a progress bar on both odin and android device as things proceed. Once the process is completed your android device will automatically open and you won’t be asked for any previous synced email address.
Its done, But one last step
If your notice any problem like storage full or anything, now you can do a factory reset directly from the setting.

Remember that I have told you in the begging about how I can fix my device if anything happens. For that also you need to follow exact process, but instead of selecting the Exynos dot RAR file you need to download the firmware of your device from any website select that file. These are some of the websites that you can use to download the firmware.
If this video helps make sure to give a thumbs up and comment and subscribe to our channel for more tutorials like this. Also check my other tutorial on WordWeb(Offline Dictionary)
Video Tutorial on how to remove FRP lock on android phone
Is this all, What if it doesn’t work for some reoson
Removing FRP lock is tricky and will vary from device to device. Another working method that I found is to insert a SD card to device with some application to launch your home screen. I am sure if you google for your phone model FRP removal, this method will popup. I wont be explaining that method here, but if you have a question make sure to comment it below
